# Cloud Functions
Cloud Functions let you run backend code in response to events and API requests without managing your own servers. They are commonly used for tasks such as processing data, calling external APIs, sending notifications, running AI workflows, or securely handling secrets and business logic.
FlutterFlow Studio supports both Firebase Cloud Functions and Supabase Edge Functions, allowing you to build scalable backend workflows.
## Firebase Cloud Functions[](#firebase-cloud-functions "Direct link to Firebase Cloud Functions")
[**Firebase Cloud Functions**](https://firebase.google.com/docs/functions) allow you to run server-side Node.js code triggered by Firebase services and HTTPS requests. For example, you can automatically send emails, process uploads, generate AI content, or react to database changes.
FlutterFlow Studio includes built-in support for creating, editing, deploying, and triggering Firebase Cloud Functions directly from the platform.
Note
Read up on some interesting use cases of [**Cloud Functions**](https://firebase.google.com/docs/functions/use-cases).
### Adding Cloud Functions[](#adding-cloud-functions "Direct link to Adding Cloud Functions")
Let's see how to add a *Cloud Function* by building an example that generates logos based on user prompts. Here's how it looks:
The Cloud Function takes input from a TextField widget and initiates an API call to an [image generation API](https://platform.openai.com/docs/api-reference/images/create). Once the image URL is retrieved, it's displayed within an Image widget.
Here are the step-by-step instructions to build such an example:
Before you Begin
* Make sure the project is on Blaze plan on Firebase.
* Completed all steps in the [**Firebase Setup**](/integrations/firebase/connect-to-firebase.md).
**1. Add page state variables**
For this example, you'll need to set up two [Page State variables](/resources/ui/pages/page-lifecycle.md#creating-a-page-state):
1. **generatingImage (*****Type: Boolean*****)**: This is used to control the visibility of a loading indicator during the logo creation process. Its value is set to *True* before initiating the API call and switched to *False* once the logo generation is complete.
2. **logoImage (*****Type: ImagePath*****)**: This is used to hold the generated logo image. After a successful API call, the retrieved image URL is stored here, allowing the logo to be displayed in the Image widget.

**2. Build a page**
Let's add a page that allows users to enter the prompt. To speed up, you can add a page from the template or use [AI Page Gen](/resources/ui/pages.md#generate-with-designer). Here is the page added using AI Page Gen, and after some modification, it looks the below:
Also, see how to [build a page layout](/concepts/layouts.md) if you want to build a page from scratch.

Few things to note here:
* We use the [**ConditionalBuilder**](/concepts/layouts/conditional-builder.md) widget to show/hide the loading indicator based on the *generatingImage* variable. **Tip**: The Else branch of this widget is nothing but a ProgressBar inside the Container with a [rotating loop animation](/concepts/animations/widget-animations.md).
* The Image widget uses the *logoImage* variable to display the logo.
**3. Create and deploy Cloud Function**
To create and deploy a *Cloud Function* :
1. Click on the **Cloud Functions** from the [**Navigation Menu**](/flutterflow-ui/builder.md#navigation-menu) (left side of your screen).
2. Click **+**, and then select **Firebase Cloud Function**. This adds the default `newCloudFunction`.
3. Set the **Cloud Function Name**.
#### Boilerplate Settings[](#boilerplate-settings "Direct link to Boilerplate Settings")
On the right side, you can configure the following Boilerplate Settings:
1. **Memory Allocation**: You can specify the amount of memory your function should have when it's executed based on its complexity and needs. This setting is crucial as it influences the function's performance and the cost of running it. More memory can enhance performance for intensive tasks but also increase costs.
2. **Timeout (s)**: This refers to the maximum amount of time, in seconds, that a function is allowed to run before it is automatically terminated. If your function takes longer to execute, increasing the timeout setting may be necessary. However, be aware that longer timeouts can incur higher costs since billing is based on execution time.
3. **Require Authentication**: Turn on this setting if you want users to be authenticated to execute this cloud function.
4. **Cloud Function Region**: This determines the geographical location of the servers where your functions are hosted and executed. Ideally, you should keep this same as your *Default GCP resource location* and the Cloud Function Region specified in the Firebase Advanced Settings.

#### Configuring Input & Output[](#configuring-input--output "Direct link to Configuring Input & Output")
Your cloud function might need some data to process and return the result. You can do so by configuring the input and output.
1. To receive output from a Cloud Function, enable the **Return Value** and choose an appropriate Type for the output, like 'String' for text. For this example, set it to *ImagePath* to get the URL of the generated logo.
2. To input data: Click **+ Add parameters**. **Name** the parameter, select its **Type**, choose single or multiple items (**Is List** option), and uncheck **Nullable** if the value can be null. For this example, add a parameter 'prompt' with *Type* set to *String*.
3. When using [Custom Data Types](/resources/data-representation/custom-data-types.md), Cloud Function expects JSON, matching each field in the Data Type to a key-value pair in the JSON. If the Data Type is a list, the function expects a list of JSONs. For example, for a custom data type named 'Person' with fields 'Name' and 'Age,' the function should return:
```
//JSON:
{ "Name": "John", "Age": 30 }
//Example Cloud Function Code:
return {
"name": person.name,
"age": person.age
};
```
For a list, the function should return:
```
//JSON
[ { "Name": "John", "Age": 30 }, { "Name": "Jane", "Age": 25 } ]
//Example Cloud Function Code:
return filteredpersons.map(filteredpersons => {
return {
"name": filteredpersons.name,
"age": filteredpersons.age
};
});
```
#### To deploy[](#to-deploy "Direct link to To deploy")
1. Click the `[]` icon to view the boilerplate code; a popup will open with the updated code, and then click **` Copy to Editor`**. **Tip**: To see if you are able to deploy the cloud function (before adding your own code), proceed directly with steps 8 and 9.
2. Inside the code editor, add the cloud function code. **Tip**: You can copy the boilerplate code to [ChatGPT](https://chat.openai.com/) and ask it to write the desired code based on that.
3. Click **Save Cloud Function**.
4. Click **Deploy**.
Here's the code used for this example:
```
const functions = require('firebase-functions');
const admin = require('firebase-admin');
const https = require('https');
exports.logoMaker = functions.region('us-central1')
.runWith({
timeoutSeconds: 10,
memory: '512MB'
}).https.onCall((data, context) => {
return new Promise((resolve, reject) => {
const prompt = data.prompt;
if (!prompt) {
reject(new functions.https.HttpsError('invalid-argument', 'No prompt provided'));
return;
}
const postData = JSON.stringify({
model: "dall-e-3",
prompt: prompt,
n: 1,
size: "1024x1024"
});
const options = {
hostname: 'api.openai.com',
port: 443,
path: '/v1/images/generations',
method: 'POST',
headers: {
'Content-Type': 'application/json',
'Authorization': `Bearer YOUR-APIKEY`,
'Content-Length': postData.length
}
};
const req = https.request(options, (res) => {
let responseBody = '';
res.on('data', (chunk) => {
responseBody += chunk;
});
res.on('end', () => {
try {
const responseJSON = JSON.parse(responseBody);
if (responseJSON.data && responseJSON.data.length > 0) {
// Retrieve the URL of the first image
const firstImageUrl = responseJSON.data[0].url;
resolve(firstImageUrl);
} else {
reject(new functions.https.HttpsError('not-found', 'No images found'));
}
} catch (error) {
reject(new functions.https.HttpsError('internal', 'Error processing response', error));
}
});
});
req.on('error', (error) => {
reject(new functions.https.HttpsError('internal', 'Error generating image', error));
});
req.write(postData);
req.end();
});
});
```
Important
Always regenerate and use the updated boilerplate code or adjust your own code accordingly whenever there are changes in the code, boilerplate settings, or input/output parameters.
Optional: Add package
Your cloud function may require third-party packages to work. You can include any npm package (dependency) by listing it in the `package.json` file. This file not only manages the npm package dependencies for your functions but also holds project metadata, sets up scripts for tasks such as deployment and outlines the compatible Node.js versions.
To add a dependency, open the `package.json` file and specify your package in the `dependencies` section.

**4. Trigger Cloud Function**
The newly created *Cloud Function* will be available as an action when you are adding one. For this example, on click of a button, we'll first set the *generatingImage*to *True* and then trigger the **Cloud Function Action**.
**5. Optional: Use Cloud Function result**
To use the *Could Function* result, ensure you provide the *Action Output Variable Name* while adding the action, and then you can access it via the **Set from Variable menu > Action Outputs > \[Action Output Variable Name]**.
For this example, we'll use the result (i.e., generated logo image URL) and set it to *logoImage* variable. Here's how you do it:
### Testing Cloud Functions[](#testing-cloud-functions "Direct link to Testing Cloud Functions")
The Google Cloud console has built-in functionality to allow you to trigger a Cloud Function for testing. This means that after deploying Cloud Functions, you can test them without writing to Firestore (either from FlutterFlow Studio or otherwise).
Here's how to test FlutterFlow Studio's `sendUserPushNotificationsTrigger` function in the Google Cloud console:
1. Open your browser and navigate to the following URL: `https://console.cloud.google.com/functions/details/us-central1/sendUserPushNotificationsTrigger?env=gen1&project=&tab=testing`
In here:
* Replace `` with your GCP or Firebase project.
* If you want to test a different Cloud Function, update `sendUserPushNotificationsTrigger` with the relevant cloud function name.
2. Paste the following JSON into the `Configure Triggering Event` text area.
* If you want to test a different Cloud Function, update `sendUserPushNotificationsTrigger` with the relevant cloud function name.
```
{
"value": {
"name": "projects//databases/(default)/documents/sendUserPushNotificationsTrigger/",
"fields": {
"scheduled_time": { "stringValue": "" },
"initial_page_name": { "stringValue": "" },
"notification_title": { "stringValue": "Your friends are missing you!" },
"notification_text": { "stringValue": "Please come back to Nanochat" },
"user_refs": { "stringValue": "users/VXu6EvFMl5M8KMXriYRvFEWTFHA2" }
}
}
}
```
3. In the `name` property:
* Replace `` with your GCP or Firebase project.
* Replace `` with the ID of the document. This document must already exist in Firestore.
* If you're testing another function than `sendUserPushNotificationsTrigger`, update `ff_user_push_notifications` with the collection where the document is written.
4. Update the values under the `fields` property for the message you want to send.
The `fields` in the example above are for FlutterFlow Studio's built-in `sendUserPushNotificationsTrigger` function. If you're testing a different Cloud Function, you will need to update the `fields` for the code in *that* function.
5. Click the `TEST THE FUNCTION` button.
The Cloud Function will now run and gather the relevant entries from Google Cloud Logging.
### FAQs[](#faqs "Direct link to FAQs")
Why do cloud function deployments fail on newly created projects?
This issue occurs because the newly created Google Cloud Platform (GCP) project hasn't been fully configured with the necessary APIs and permissions. Follow the steps below to enable the required APIs and set proper permissions.
1. Open your browser and navigate to the following URL: `https://console.cloud.google.com/functions/list?referrer=search&hl=en&project=` Replace `` with your GCP or Firebase project ID.
2. Click on the **Create Function** button. GCP will prompt you to enable the necessary APIs: **Cloud Build** and **Cloud Functions**.
3. After clicking **Next**, you will be prompted to enable the **Cloud Run Admin API**. 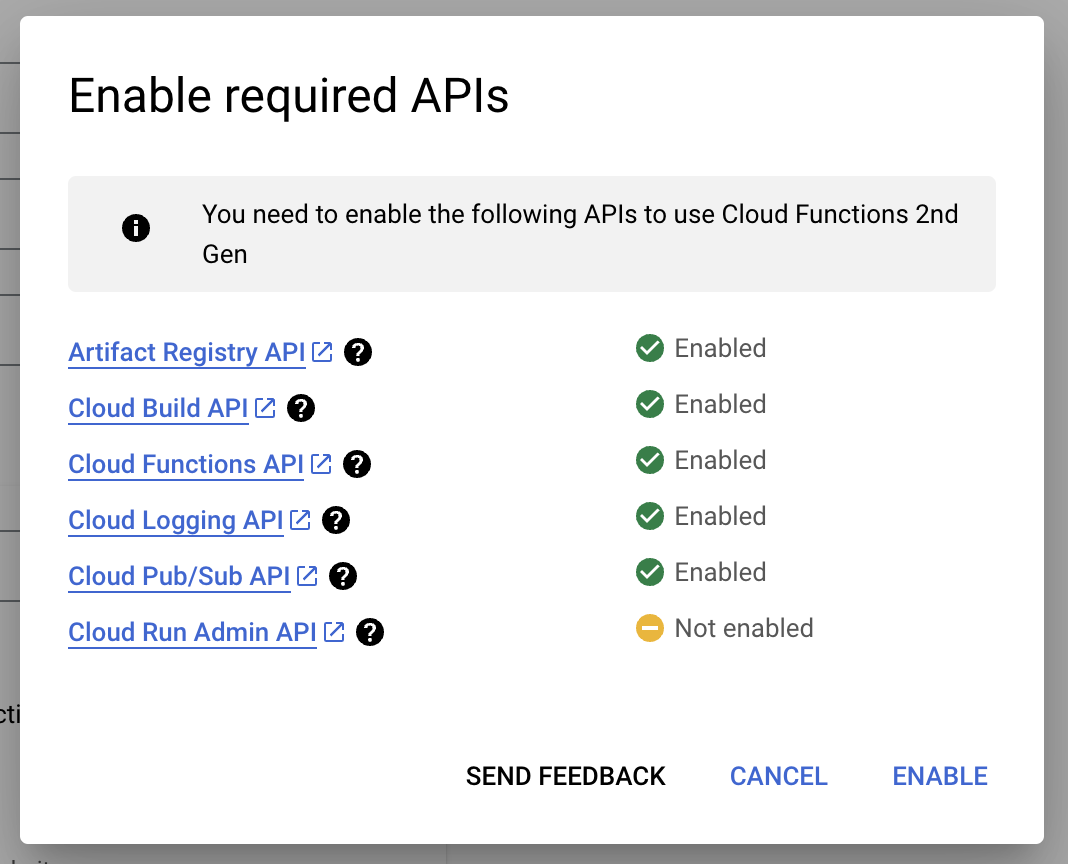
4. Now, you need to grant the default compute service account the appropriate permissions. In the next page, you will see the option to deploy an example cloud function like `helloHttp`. Deploy this function. You will be prompted to grant permissions to the default compute service account. The message will look like: `You need to grant the following roles to the build service account to deploy a function: roles/cloudbuild.builds.builder to -compute@developer.gserviceaccount.com.`
5. Click **Grant** to provide the required permissions and deploy the example cloud function. Once deployed, you can delete this function if you wish.
With the required permissions granted, you should now be able to deploy cloud functions from FlutterFlow Studio without any further issues.
I am getting Cloud Function Deployment Errors

If you encounter deployment errors, it may be helpful to check out [this community post](https://community.flutterflow.io/discussions/post/how-to-fix-cloud-function-deployment-errors-all-solutions-discussion-wgfMLgpLrBlmnUI) for possible solutions and insights.
Why am I getting a CORS error when executing my Cloud Function?
The CORS error occurs because the **Access-Control-Allow-Origin** header is missing from the response, preventing your request from being completed. This issue can arise with new Cloud Functions, whether deployed through FlutterFlow Studio or not.
Follow the steps below to fix the issue:
1. Open your Google Cloud Project's [**Cloud Functions List**](https://console.cloud.google.com/functions/list)
2. Select the function causing the issue.
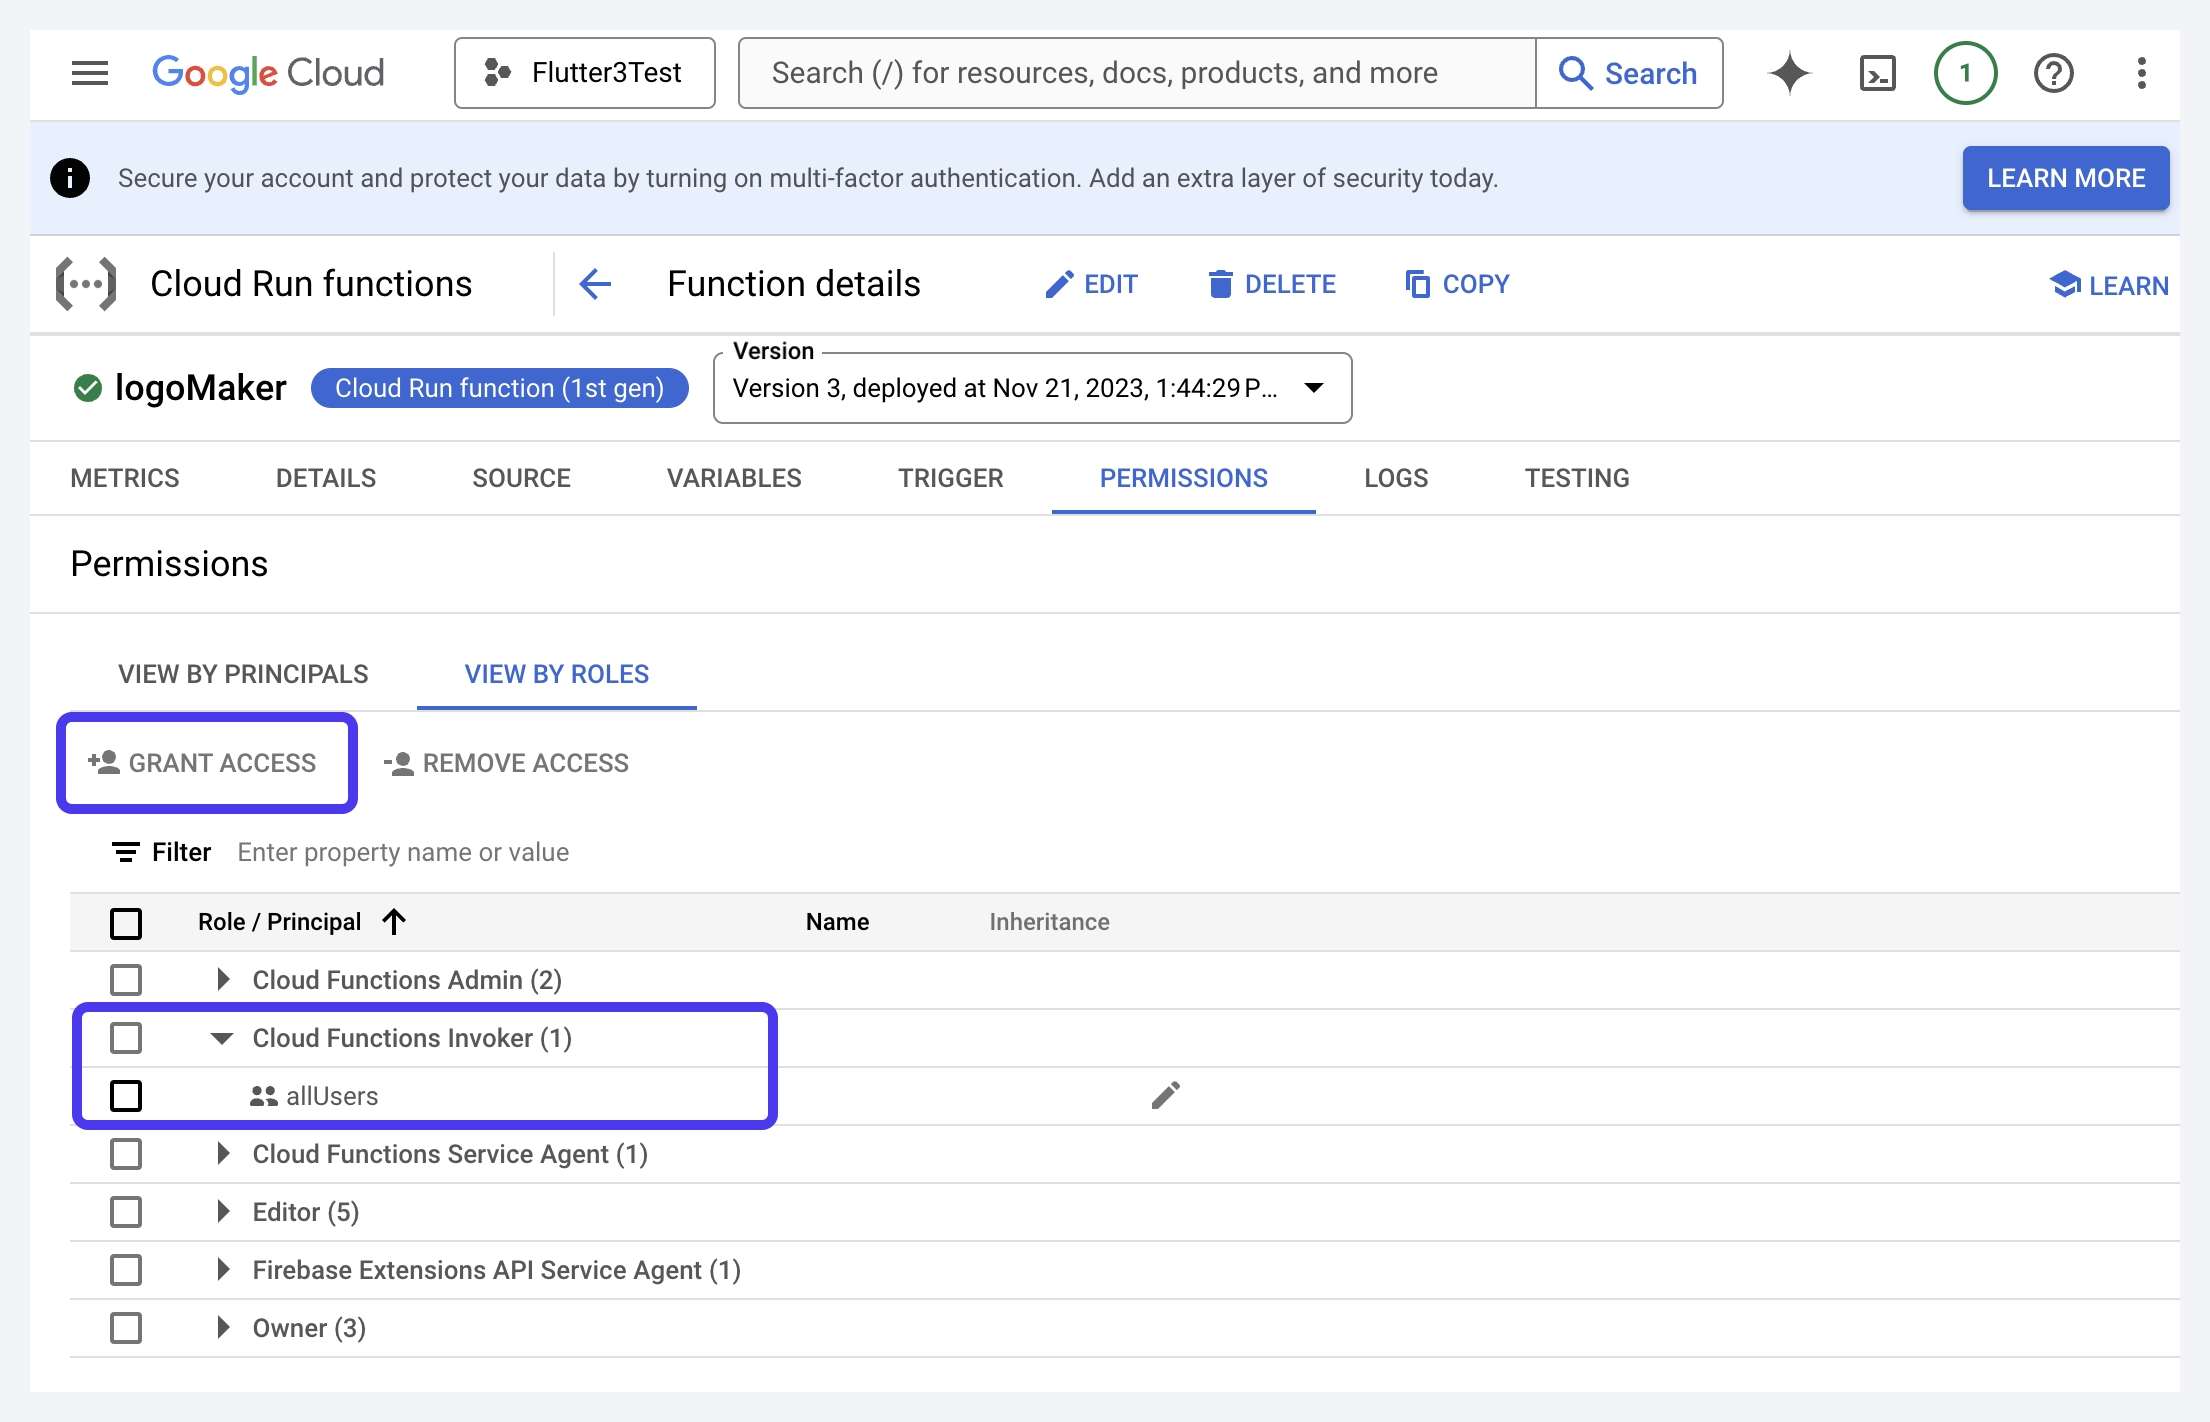
3. Navigate to the **Permissions** tab.
4. Open the **VIEW BY ROLES** tab.
5. Ensure there's a row with `Cloud Functions Invoker` with principal set to `allUsers`. If it’s missing, click on the **Grant Access**, add `allUsers` with the `Cloud Functions Invoker` role.
## Supabase Edge Functions[](#supabase-edge-functions "Direct link to Supabase Edge Functions")
[**Supabase Edge Functions**](https://supabase.com/docs/guides/functions) let you run secure backend logic using Deno and TypeScript directly on Supabase infrastructure. They are ideal for AI integrations, secure API wrappers, webhooks, payments, and server-side processing.
Unlike Firebase Cloud Functions, Supabase Edge Functions are tightly integrated with your Supabase project and run closer to users for lower latency.
Prerequisite
Before using Supabase Edge Functions, make sure your FlutterFlow Studio project is connected to Supabase. See the [**Supabase Setup**](/integrations/supabase/setup.md#connect-with-supabase-oauth) guide.
### Adding Edge Functions[](#adding-edge-functions "Direct link to Adding Edge Functions")
Let's see how to add an Edge Function by building an example that generates an AI summary of product reviews.
The Edge Function takes a list of reviews as input, sends them to an AI model, and returns a JSON response containing a summary and overall sentiment. This example demonstrates a key benefit of Edge Functions: securely storing API key on the Supabase backend instead of exposing it inside the app.
Here's how it looks:
**1. Create and Deploy Edge Functions**
1. Open the **Cloud Functions** section from the Navigation Menu.
2. Click the **+** button and select **Supabase Edge Function**.
3. Give the Edge Function a name. In this example, we use `getAIReviewsSummary`.
4. Configure the function settings. In this example, the function accepts a list of reviews as input and returns a JSON response containing the AI-generated summary and sentiment.
You can also configure additional settings:
* **Verify JWT**: Verifies the JWT token from the request header. Disable this if you want to allow unauthenticated access.
* **Enable CORS**: Automatically adds CORS headers and preflight request handling. Required when calling the Edge Function from web apps.
* **Return Value**: Defines the response type returned by the function.
* **Define Parameters**: Configure the request body parameters accepted by the function.
5. Click the code-generation button to generate and copy the boilerplate code into the editor. Copy the boilerplate code and use any AI assistant to generate the implementation for your specific use case. For example, you can ask the AI assistant to complete the function for generating AI-powered review summaries using the Anthropic API. Review the generated implementation and verify it matches your expected logic and response format.
6. Paste the generated code back into the Edge Function editor.
7. Click **Save Edge Function**.
8. Once saved, click **Deploy**.
9. FlutterFlow Studio will show a deployment dialog listing the available Supabase Edge Functions for deployment.
10. Click **Deploy** for the selected Edge Function to deploy it to your connected Supabase project.
Optional - Add Package
You can also add external Deno, npm, or JSR packages using the `Dependencies (deno.json)` tab if your Edge Function requires additional libraries or SDKs.
For example, to add the `lodash` npm package:
```
{
"imports": {
"lodash": "npm:lodash@4.17.21"
}
}
```
You can then use it inside your Edge Function:
```
import _ from "lodash"
```

**2. Handling Secrets**
When your Edge Function needs credentials, API keys, or tokens, do not hardcode them in the function code. Store them as Supabase Edge Function secrets so they remain encrypted and are not exposed in your app or repository.
To add a secret, open your Supabase project, go to **Edge Functions > Secrets**, enter the secret name and value, then click **Save**. For example, you can add an any API key as:
```
ANTHROPIC_KEY=your-api-key
```
Then reference it inside your Edge Function using `Deno.env.get()`:
```
const apiKey = Deno.env.get("ANTHROPIC_KEY")
if (!apiKey) {
return new Response("Missing ANTHROPIC_KEY", {
status: 500,
headers: { ...corsHeaders, "Content-Type": "text/plain" },
})
}
```

This keeps sensitive values on the Supabase backend while allowing your function to securely use them at runtime.
**3. Trigger Edge Functions and Use Result**
Once the Edge Function is deployed, you can trigger it from an action in your app.
For example, on a button tap or page load, add the **Edge Function** action and select the function you created. Pass the required input parameters, such as the list of reviews.

If the function returns a value, provide an **Action Output Variable Name** while configuring the action. You can then use the returned data from:
**Set from Variable > Action Outputs > \[Action Output Variable Name]**
For this example, you can use the returned JSON values, such as `summary` and `sentiment`, to update page state variables or display the AI-generated review summary directly in your UI.
