# ChoiceChips
> This page is about FlutterFlow Studio (the visual builder), not FlutterFlow (the app builder you use by describing your app).
URL: https://docs.flutterflow.io/resources/forms/choice-chips
Learn how to add ChoiceChips in your FlutterFlow Studio app.
The ChoiceChips widget allows users to select a single option from a group of chips. Each chip is presented with an icon and accompanying text, making it easy to represent various choices.
You could use this widget to implement a filter feature in an e-commerce app to let users select different product attributes like size, color, or price range.
:::tip[Widget State]
Before diving into form widgets, check out our guide on [**Widget States**](https://docs.flutterflow.io/concepts/state-management/widget-state) to efficiently manage the state and behavior of your form elements.
:::
## Adding ChoiceChips widget
To add the ChoiceChips widget to your app:
1. Add the **ChoiceChips** widget from the **Form Elements** tab.
2. By default, this widget adds a single option named **Option 1**. To change the name, move to the Properties Panel, and scroll down to the **Define Options** section. Find the **Option 1** property and change the **name** and **icon**.
3. To add more options, click on the **Add Option** text and set the name and icon for new options.
4. To set any chip as selected by default, find the **Initial Option** property and enter the chip name.
1. To set this value dynamically, open the **Set from Variable** menu and set the variable.
2. When [multiselect](#allow-multiselect) is enabled, you can also set the list of options to pre-select.
### Trigger Action on Change
See how to [trigger an action when a selection changes](https://docs.flutterflow.io/resources/forms/form-triggers#on-selected) on this widget.
## Select or Clear All Choices [Action]
Users may need to swiftly deselect all chips or choose all available choice chips at once. You can do so by adding the **Clear All/Select All** action.
:::note
Before you add this action, ensure you [**allow multiselect**](#allow-multiselect) on this widget.
:::
## Customizing
You can customize the appearance and behavior of this widget using the various properties available under the properties panel.
### Allow Multiselect
You might want to allow users to select multiple choices to filter the result.
To allow multiselect, select the **ChoiceChips** widget, move to the properties panel, find the **Allow Multiselect** property and enable it.
### Disable ChoiceChips
Sometimes, you may want to present the choices in a read-only mode, preventing users from making any changes.
To do so, move to the **Properties Panel** **>** turn on **Disable >** click **Unset,** and set the [**Conditions**](https://docs.flutterflow.io/resources/functions/conditional-logic). This can be the [**Single Condition**](https://docs.flutterflow.io/resources/functions/conditional-logic#single-condition) or [**Combine Conditions**](https://docs.flutterflow.io/resources/functions/conditional-logic#multiple-conditions-andor) based on your requirement. **Note:** The ChoiceChips widget will be disabled only when condition(s) is true.
### Adding Space between Chips
To add a space between the chips, you can use the **Chip Spacing** ad **Row Spacing** property.
- **Chip Spacing**: This adds horizontal gaps between individual chips.
- **Row Spacing**: This adds vertical gaps between the chips in a row.
### Align Chips
When you have chips in multiple rows, you can align them using the **Alignment** property. This is similar to setting main axis alignment for the Row widget.
### Customizing Selected and Unselected Chip Style
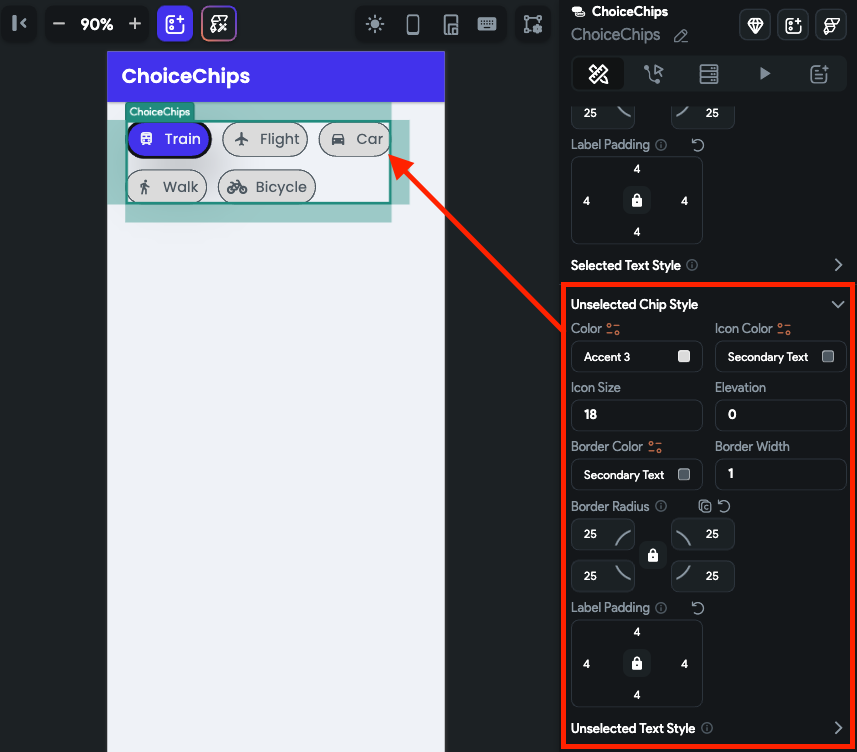
Various properties under the **Selected Chip Style** and **Unselected Chip Style** section allow you to customize chips to match your design. Here's how you do it:
1. To change the background color, use the **Color** property.
2. To change the icon's color and size, use the **Icon Color** and **Icon Size** property.
3. To add a shadow or to create a sense of depth for the chip, you can use the **Elevation** property.
4. To customize the border, use the **Border Color**, **Border Width** (thickness), and **Border Radius** (rounded corner) properties.
5. To create some space around the label, use the **Label Padding** property.
6. To change the label text styling, use the **Selected Text Style** property.
7. Similarly, you can customize the properties under the **Unselected Chip Style**.