# Properties Panel
> This page is about FlutterFlow Studio (the visual builder), not FlutterFlow (the app builder you use by describing your app).
URL: https://docs.flutterflow.io/resources/ui/widgets/properties
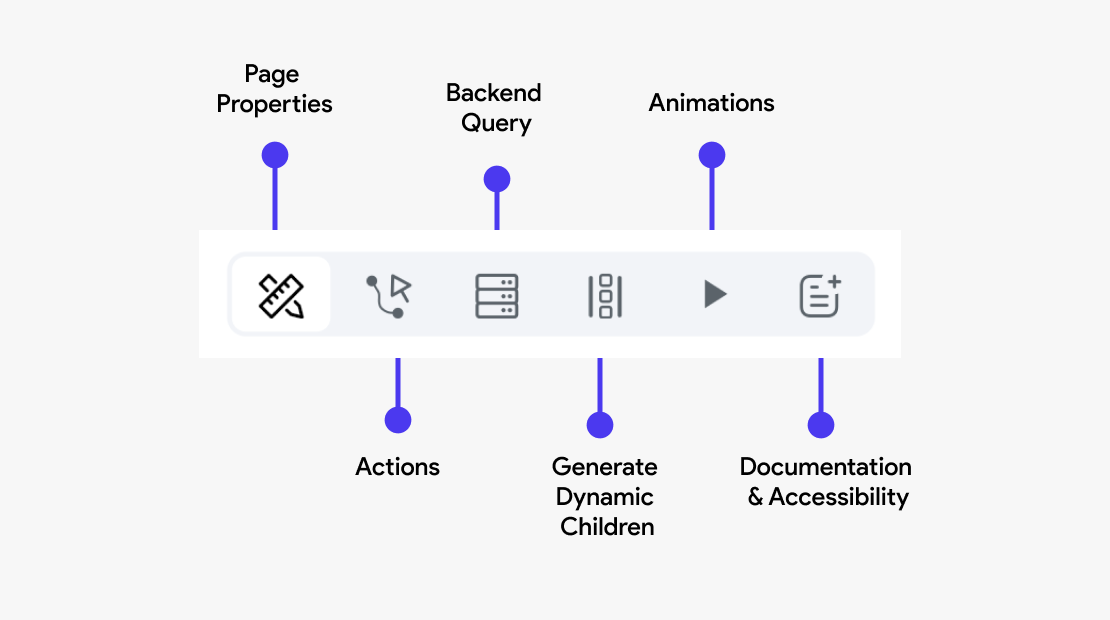
In FlutterFlow Studio, the Properties Panel on the right helps you configure and manage your widgets. It opens when you click on a widget or component in the Widget Tree.
In FlutterFlow Studio, the Properties Panel on the right helps you configure and manage your widgets. It opens when you click on a widget or [component](https://docs.flutterflow.io/resources/ui/components) in the [**Widget Tree**](https://docs.flutterflow.io/resources/ui/widgets#widget-tree).
Here's a quick demo showing how to add a widget to the canvas, which opens the widget properties panel on the right, allowing you to update the widget's properties:
The panel is divided into sections, each focusing on settings specific to the selected widget. The available options may vary depending on the widget type, with additional advanced configurations available for further customization.
### Widget name
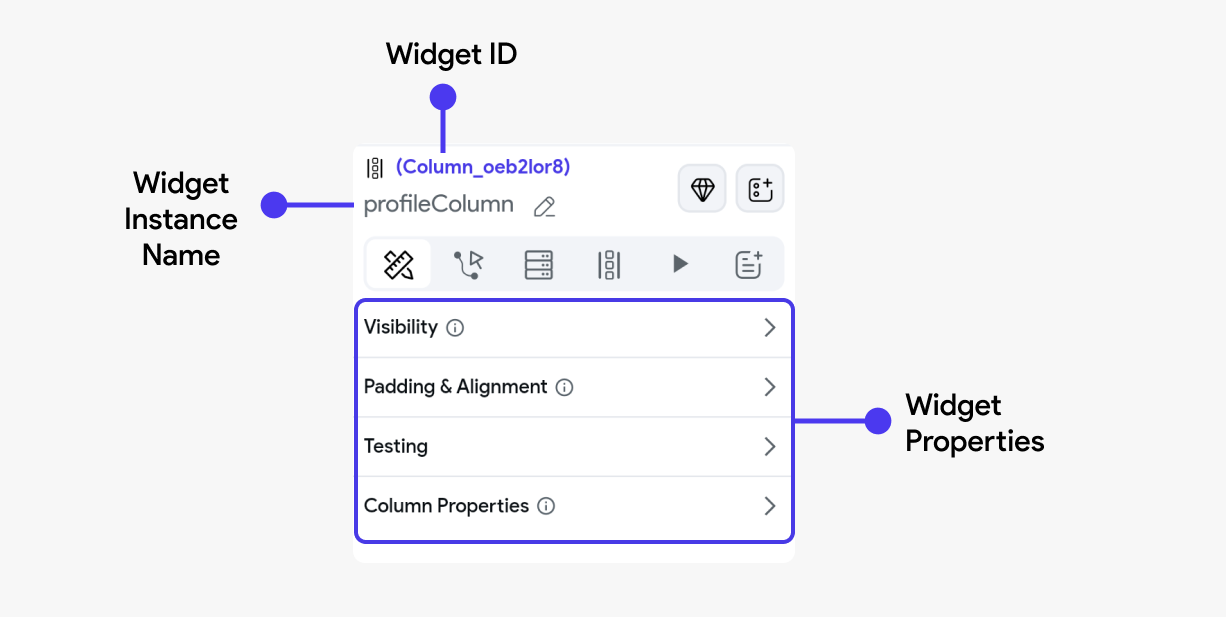
When you select any widget, its name appears on the properties panel. The default name for any
widget is its type. For example, if you select the Container widget, the name appears as '**Container**'. However, you can use the edit icon on the right to change its name.
## Actions
This section allows you to define and manage interactions or events triggered by user actions. For
example, you can configure a button to navigate to another page, submit form data, or call an API.
Actions are crucial for creating interactive and functional apps.
In the case of widgets, you can add user interactions on action triggers such as **On Tap** or **On
Long
Press**. The availability of these actions may vary depending on the widget.
Actions differ according to the widget selected; on some widgets, you can't apply any actions.
## Backend Query
Here, you can configure the page to fetch data from a backend source or database. This is
typically done through API calls or direct database queries. Setting up a backend query allows
the widget to display dynamic content, such as user profiles, product lists, or any other data your
app needs to retrieve from a server.
## Generate Dynamic Children
Widgets capable of handling multiple child widgets have an additional tab called **Generate Dynamic
Children**. This feature helps you generate multiple child widgets from a list variable.
This is particularly useful when you are retrieving data from an API call.
Some of the widgets that can handle multiple children include **Column, Row, Stack, ListView,
GridView, and PageView**.
:::note
To learn more about [**Generating Dynamic Children**](https://docs.flutterflow.io/resources/ui/widgets/composing-widgets/generate-dynamic-children), refer here.
:::
## Animations
You can apply animations to a widget to enhance the visual appeal and user experience. Animations can be used to draw attention to important elements, provide feedback on user interactions, or create visually engaging transitions between states.
:::note
Learn more about adding **[animations](https://docs.flutterflow.io/concepts/animations)** here
:::
## Documentation and Semantic Labels
**Documentation** helps developers understand the purpose and function of a widget within the app,
making maintenance and future updates easier.
**Semantic labels** are crucial for accessibility, allowing screen readers to accurately describe
the widget's function to users with visual impairments.
## Additional Flutter Properties
The properties panel doesn't show every parameter of the underlying Flutter widget. To set a parameter that isn't available in the panel, use **Additional Flutter Properties** at the bottom. Visual editing, theming, and bindings remain available, so you don't need to rebuild the widget as a [custom widget](https://docs.flutterflow.io/concepts/custom-code/custom-widgets).
The section appears for built-in widgets that generate a standard Flutter or third-party widget, such as **Text**, **Container**, **Image**, and **ListView**. It doesn't appear for widgets that FlutterFlow Studio builds with its own wrappers, such as **Button** and **DropDown**. The properties panel already exposes all parameters for those widgets. The section also doesn't appear for components, custom widgets, or widget builders.
### Add a Property
To set an additional property:
1. Select the widget in the canvas or the **Widget Tree**.
2. In the properties panel, expand **Additional Flutter Properties**.
3. On the highlighted line, write the parameter as a named Dart argument followed by a comma, for example `softWrap: false,`.
4. To add more parameters, write one per line.
The editor shows these parts:
- The first line is the generated constructor for the widget, such as `Text(`.
- The `...` line stands for the properties that FlutterFlow Studio already sets from the properties panel.
- The highlighted lines are the only ones that you can edit. The gutter numbers these lines from 1, and error messages use the same line numbers.
FlutterFlow Studio adds your arguments to the widget's constructor call, before `child` or `children`.
:::tip
The editor suggests completions as you type. At the start of a line, it suggests the widget's remaining named parameters. After a parameter name, it suggests values such as theme colors and text styles. After a dot, it suggests members of that type.
Suggestions require the code analyzer. If it isn't ready, the section shows a message, but you can still type the arguments.
:::
:::note
Additional Flutter properties apply in the generated code and in [**Test Mode**](https://docs.flutterflow.io/testing/run-your-app#test-mode). They don't appear on the canvas.
:::
### What You Can Write
- Use named arguments only, one per line, such as `maxLines: 2,`. Positional arguments aren't supported.
- Use only classes and other names available through the generated page's existing imports.
- Don't use `key`, `child`, or `children`. FlutterFlow Studio manages these parameters.
- Don't set the same parameter twice.
- Don't set a parameter that the properties panel already controls, even when that panel property still has its default value. Set it from the panel instead.
If an argument breaks one of these rules, or has a syntax or type error, the section shows an error under the editor, and the same error appears in the **Issues** panel. You can't run your app in Test Mode or publish it until you fix the error.
To remove an additional property, delete its line from the editor. A widget that already has additional properties always shows the section, so you can review and remove them.