Phone Login
Phone login allows a user to sign in by sending an SMS message to the user's phone. The user login in using a one-time code contained in the SMS message.
Before getting started with this section:
- Complete Firebase Setup.
- Complete Initial setup required for authentication.
Adding Phone sign-in
Adding Phone sign-in comprises the following steps:
- Setting up phone sign-in
- Enabling phone authentication in Firebase
- Building phone number page
- Building verify code page
- Adding phone sign-in action
- Adding verify code action
- Adding logout action
- Testing phone sign-in
- Verify user creation
1. Setting up phone sign-in
To use phone sign-in, you must get the SHA-1 key and regenerate the configuration files. You can find the detailed instructions here. Note that this step is often missed, so ensure you must complete this step before you proceed further.
2. Enabling phone authentication in Firebase
To enable authentication in the Firebase:
-
Open the Firebase console and click on Authentication.
-
Click on the Get started button (this may not be visible if you have already set up other forms of Authentication).
-
Select the Sign-in method tab.
-
Click on Phone (Under the 'Native Providers' section). If you have already added any other provider, click on the Add new provider and then click on Phone.
-
Find the Phone switch and enable it.
-
Click on the Save button.
3. Building phone number page
To allow users to authenticate using their phone number, you need to create a page to accept the user's phone number. We provide a collection of ready-to-use templates. You can use one of our templates or create a page from scratch.
Here is the page added from the templates, and after some modification, it looks the below:
4. Building verify code page
You need to create another page to verify the SMS code. Here's how you build the verify code page using templates.
5. Adding phone sign-in action
On click the 'sign-in' or 'send code' button, you will add the 'Phone Sign In' action, which redirects users to a page where they can enter the code received on their phone.
To add this action:
-
Select the widget (e.g., Button) on which you want to add the action.
-
Select Actions from the Properties Panel (the right menu) and select Add Action.
-
Search and select the Phone Sign In (under Backend/Database > Firebase Authentication) action.
-
Now provide the Phone Number via Widget State > TextField (that accepts the phone number).
-
Now, Select Page that you created to verify code.
6. Adding verify code action
On click of the 'Verify Code' button, you will add the 'Verify SMS Code' action, which opens the home page if the action is successful.
-
Select the widget (e.g., Button) on which you want to add the action.
-
Select Actions from the Properties Panel (the right menu) and select Add Action.
-
Search and select the Verify SMS Code (under Backend/Database > Firebase Authentication) action.
-
Now provide the SMS Code via Widget State > TextField (that accepts the code).
7. Adding logout action
To let users log out of your app, you can use the Logout action.
8. Testing phone sign-in
8.1 Test on Run or Test mode
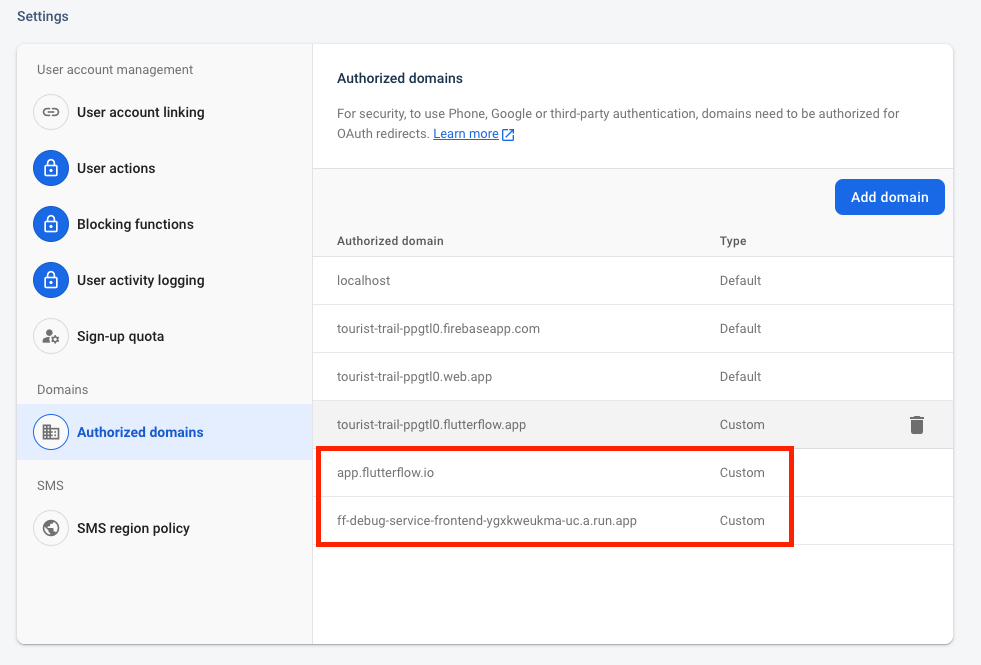
To test phone sign-in in Test or Run mode, you must add the authorized domain in the Firebase console.
Here's how you add the authorized domain:
- For Test mode, you can open the browser console, try logging in, and get the domain from the browser console, and for Run mode, you can simply use 'app.flutterflow.io.'
- Now open the Firebase console and click on Authentication.
- Select the Setting tab.
- Select Authorized domains from the left side menu.
- Click Add domain.
Here's how it should look:
8.2 Test on a real device
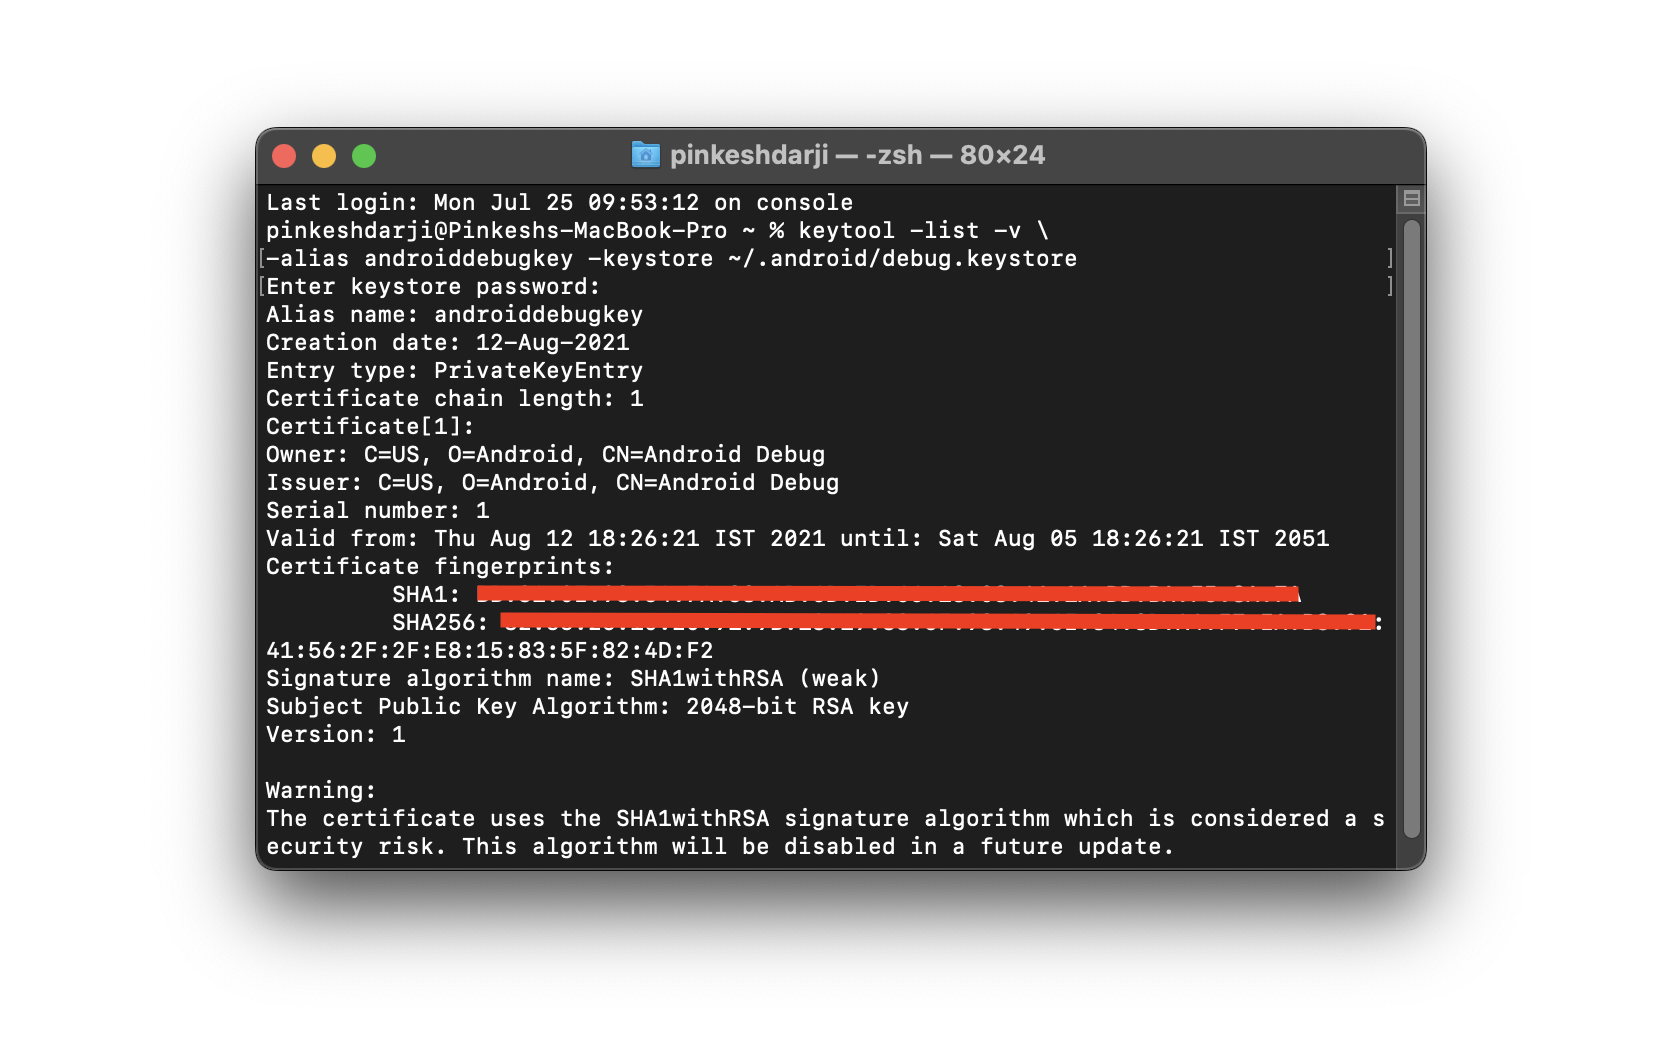
Phone Sign In does not work in an Android emulator. You can only test it on a real device.
To test on a real device, add the SHA-256 key in the Firebase console and enable the 'Google Play Integrity API' in Google Cloud.
Skip if you find the below steps already completed by our automated Firebase integration.
- Get the SHA-256 key/fingerprint, add it to your Firebase project, and then regenerate the Firebase config files in FlutterFlow. Note: The instructions are similar to generating the SHA-1 key and are explained here. You will find the SHA-256 key in the terminal just below the SHA-1 key. This is required for the Firebase to verify that the sign-in request is coming from a legitimate device.
While releasing the app, make sure to get the key from the Play Console.
- Open the Google Developers Console (Make sure your project is selected in the dropdown at the top), Click on the Library menu on the left, search for the Google Play Integrity API, and enable it.
- Now, download and test the app using the instructions here.
9. Verify user creation
To confirm the successful integration and the creation of users, navigate to your Firebase project > Authentication > Users and check the user entries.
FAQs
How do I test with dummy numbers?
To try phone sign-in without any limitations, you can add some fictitious numbers to the Firebase console.
To add the fictitious number:
- Open the Firebase console and click on Authentication.
- Select the Sign-in method tab.
- Click on the Phone (Under the Sign-in providers section).
- Scroll down, find the Phone numbers for testing menu, and click on it.
- Enter any dummy phone number (Make sure it looks unreal).
- Enter the verification code that you would use on the verify code page.
- Click on add.
Getting this error: "The given sign-in provider is disabled for this Firebase project. Enable it in the Firebase console, under the sign-in method tab of the Auth Section."
- First, ensure you have clicked the "Save" button while Enabling phone authentication in Firebase.
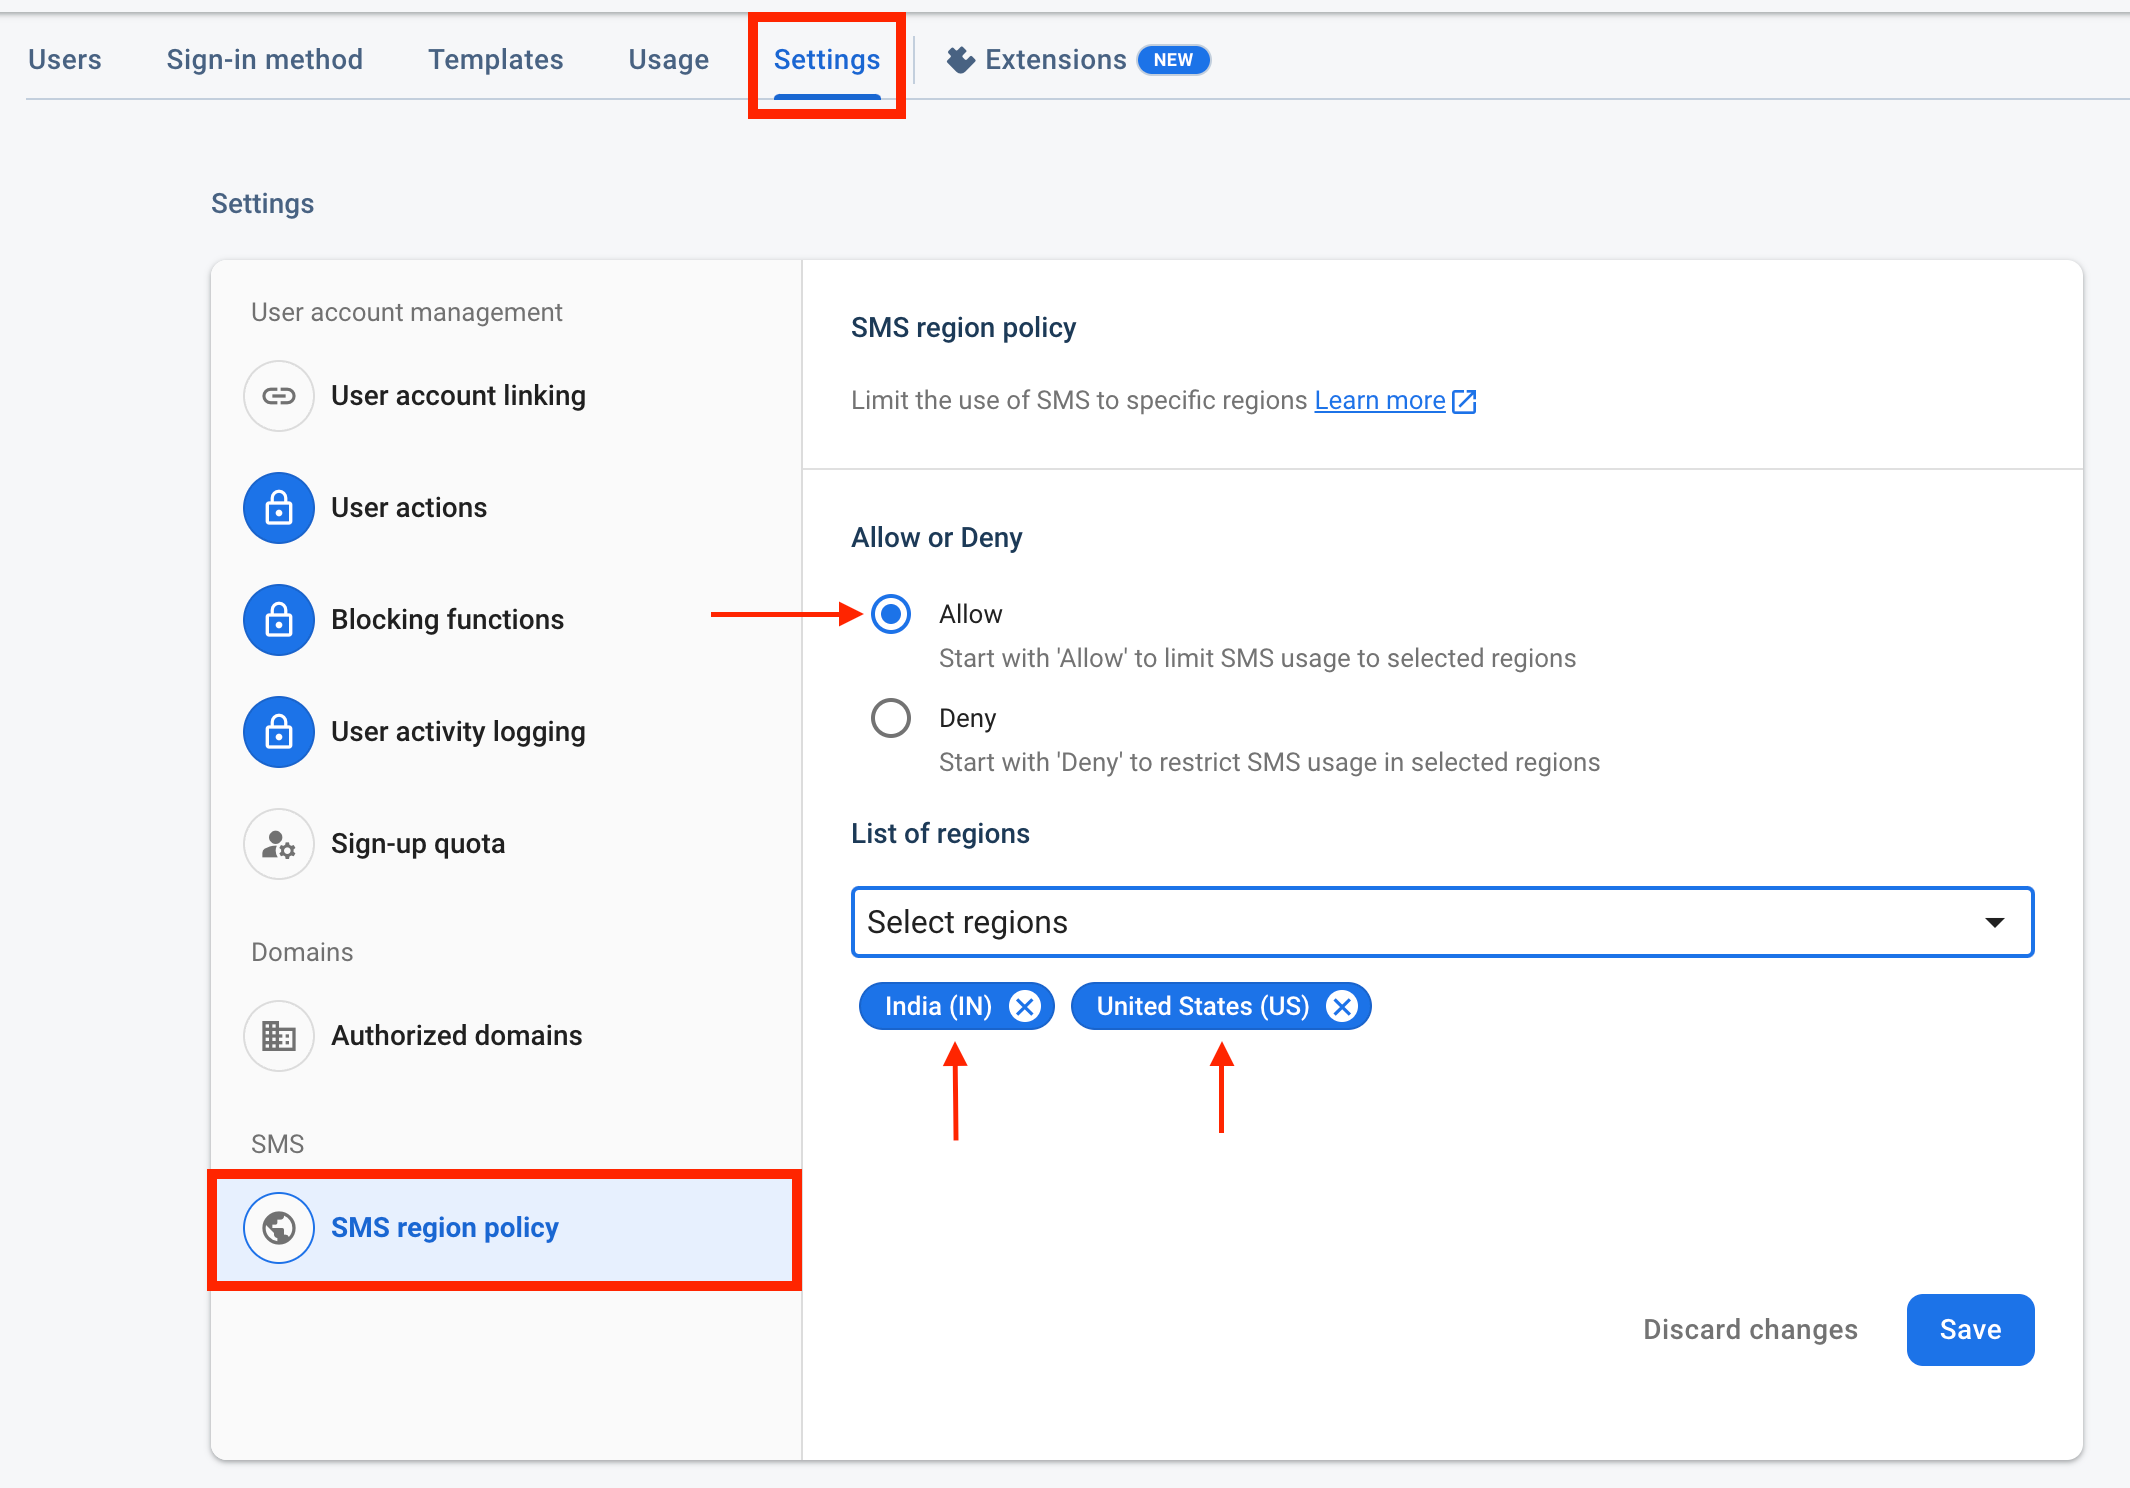
- If this is already enabled, head over to Settings > SMS region policy > select Allow > Select regions you want to support and click Save.