Authentication Actions
Currently FlutterFlow supports the following Actions for Supabase Authentication:
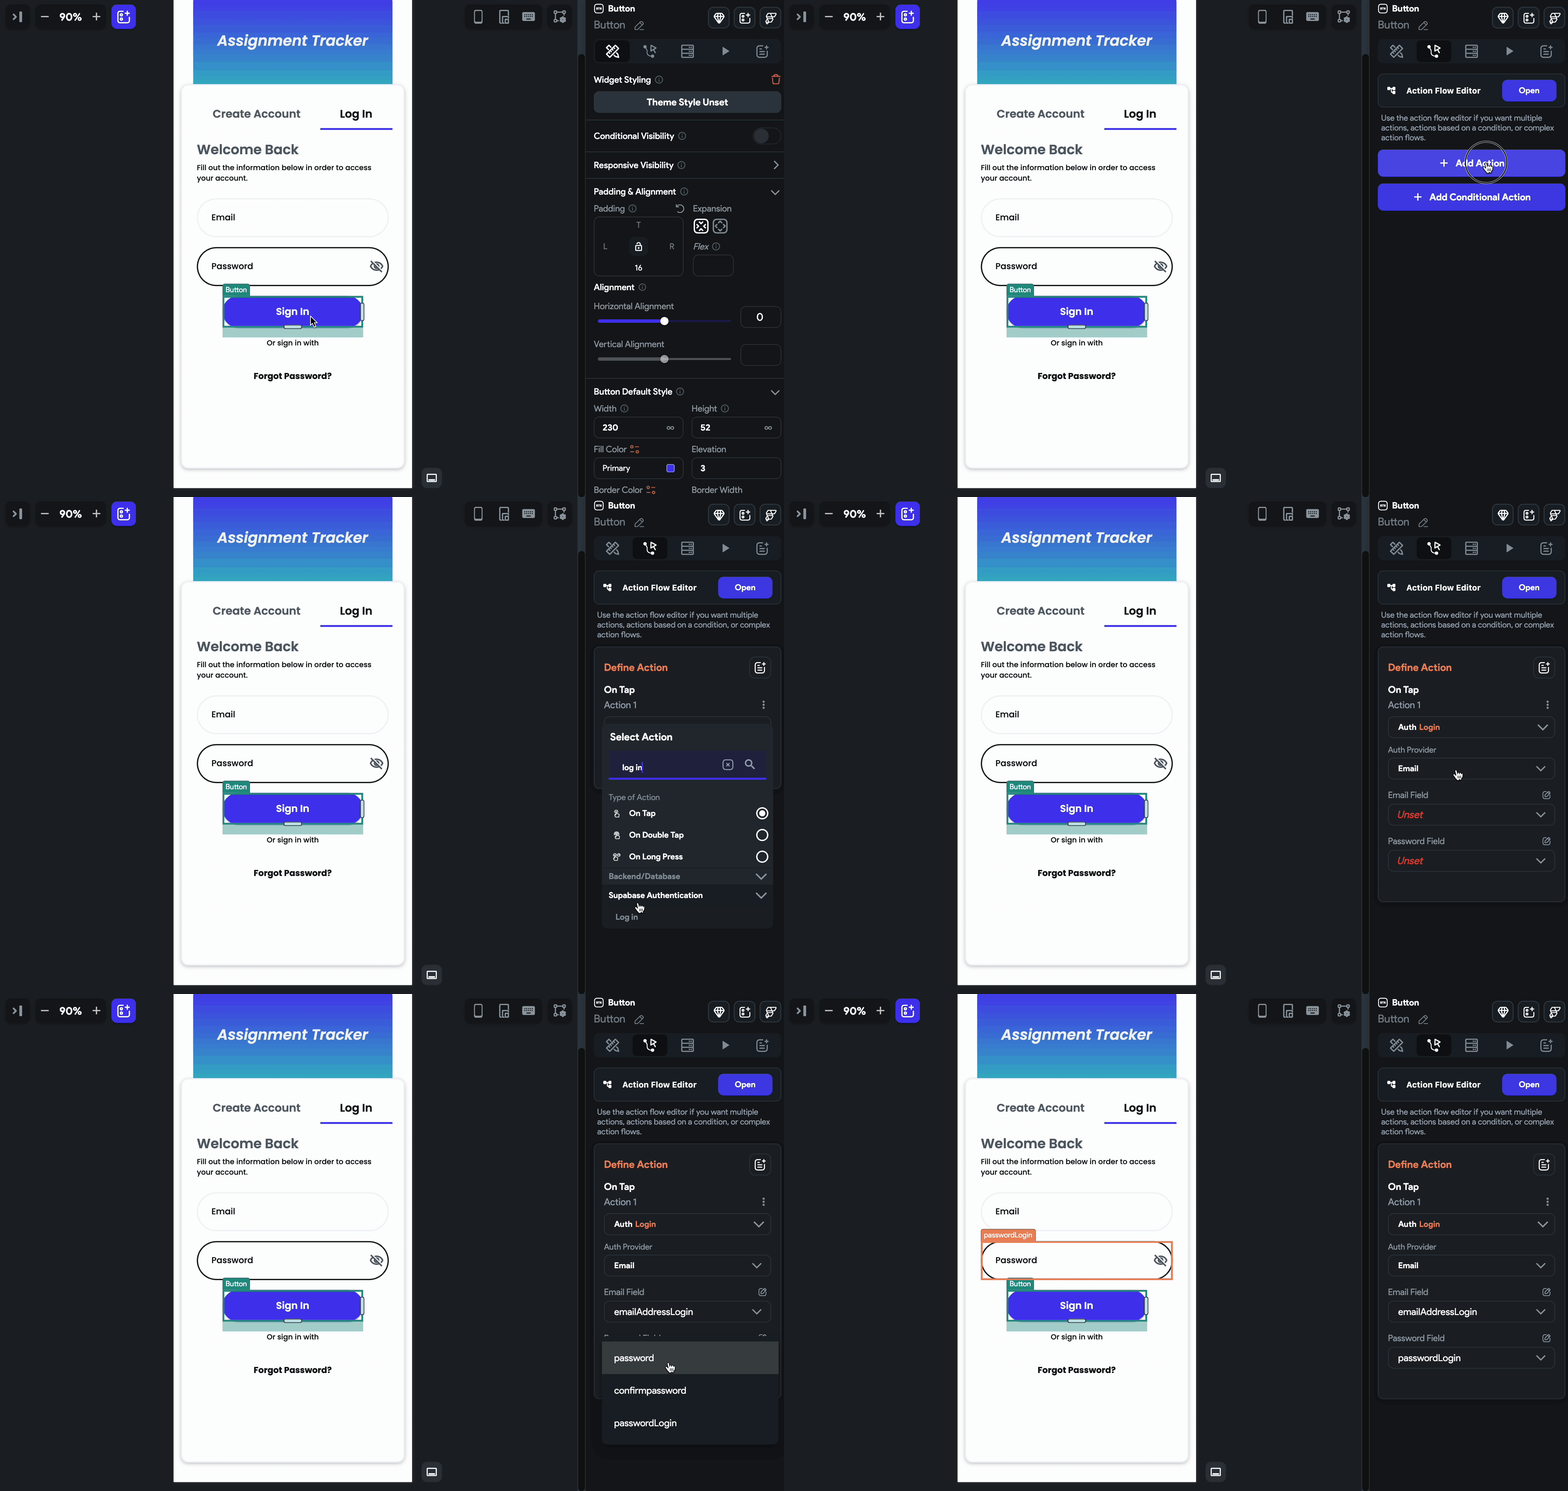
Log in [Action]
This action provides users with multiple login options to access their accounts.
Follow the steps below to add Email Login action:
- Select the widget(e.g., Button) on which you want to add the action.
- Select Actions from the Properties Panel (the right menu) and click + Add Action.
- Search and select the Log in (under Backend/Database > Supabase Authentication) action.
- Set Auth Provider to Email.
- Set the Email Field dropdown to the widget name that accepts email (e.g., TextFieldEmail).
- Set the Password Field dropdown to the widget name that accepts a password (e.g., TextFieldPassword).

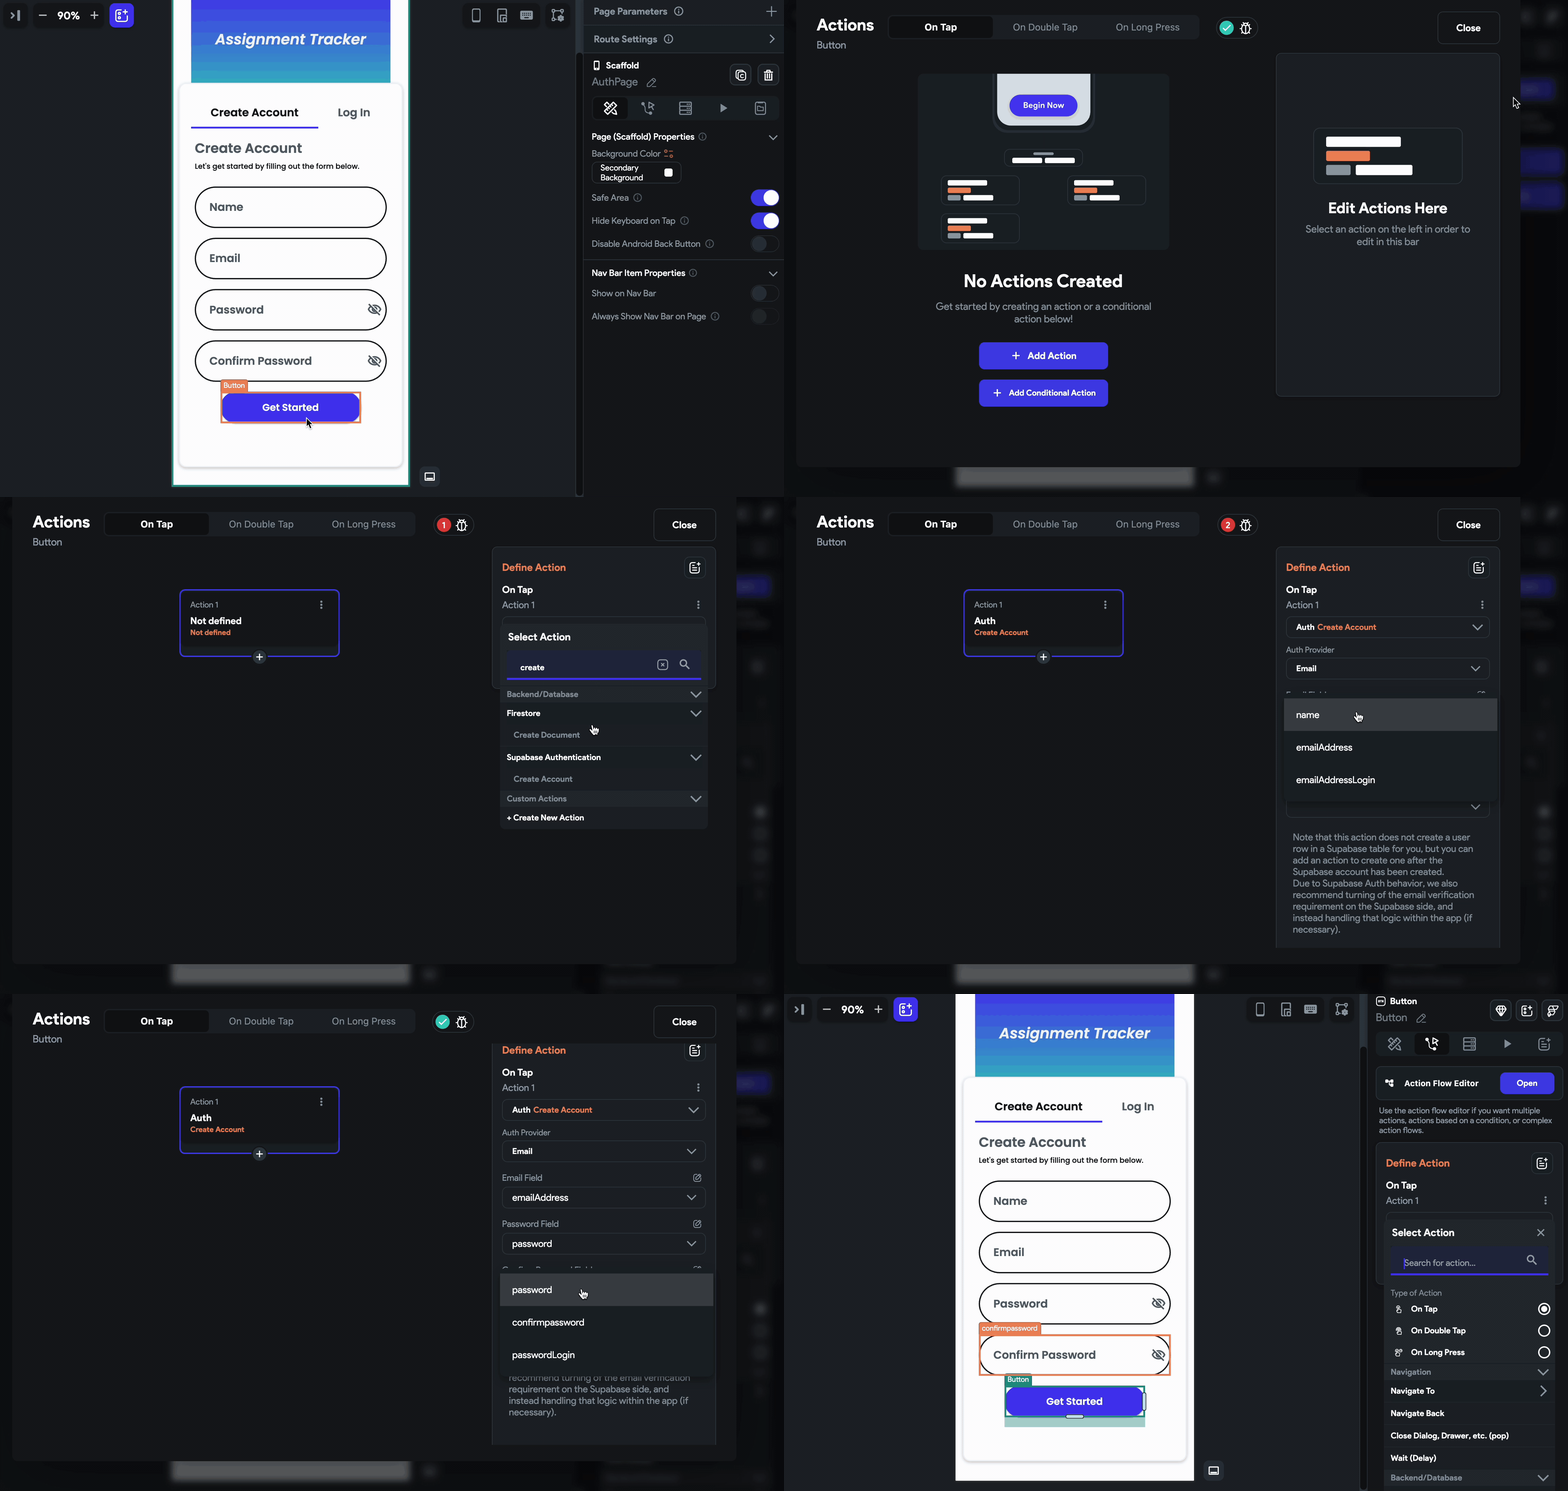
Create Account [Action]
By using this action, you can provide your users with the flexibility to create their accounts in different ways, according to their preferences.
As of now, we support creating accounts with Email/Password, Google and Apple auth providers.
Follow the steps below to add email signup action:
-
Select the widget(e.g., Button) on which you want to add the action.
-
Select Actions from the Properties Panel (the right menu), Open the Action Flow Editor, and click + Add Action.
-
Search and select the Create Account (under Backend/Database > Supabase Authentication) action.
-
Set Auth Provider to Email.
-
Set the Email Field dropdown to the widget name that accepts email (e.g., TextFieldEmail).
-
Set the Password Field dropdown to the widget name that accepts a password (e.g., TextFieldPassword).
-
Similarly, If you have a confirm password field in your UI, set the Confirm Password Field to the appropriate one.

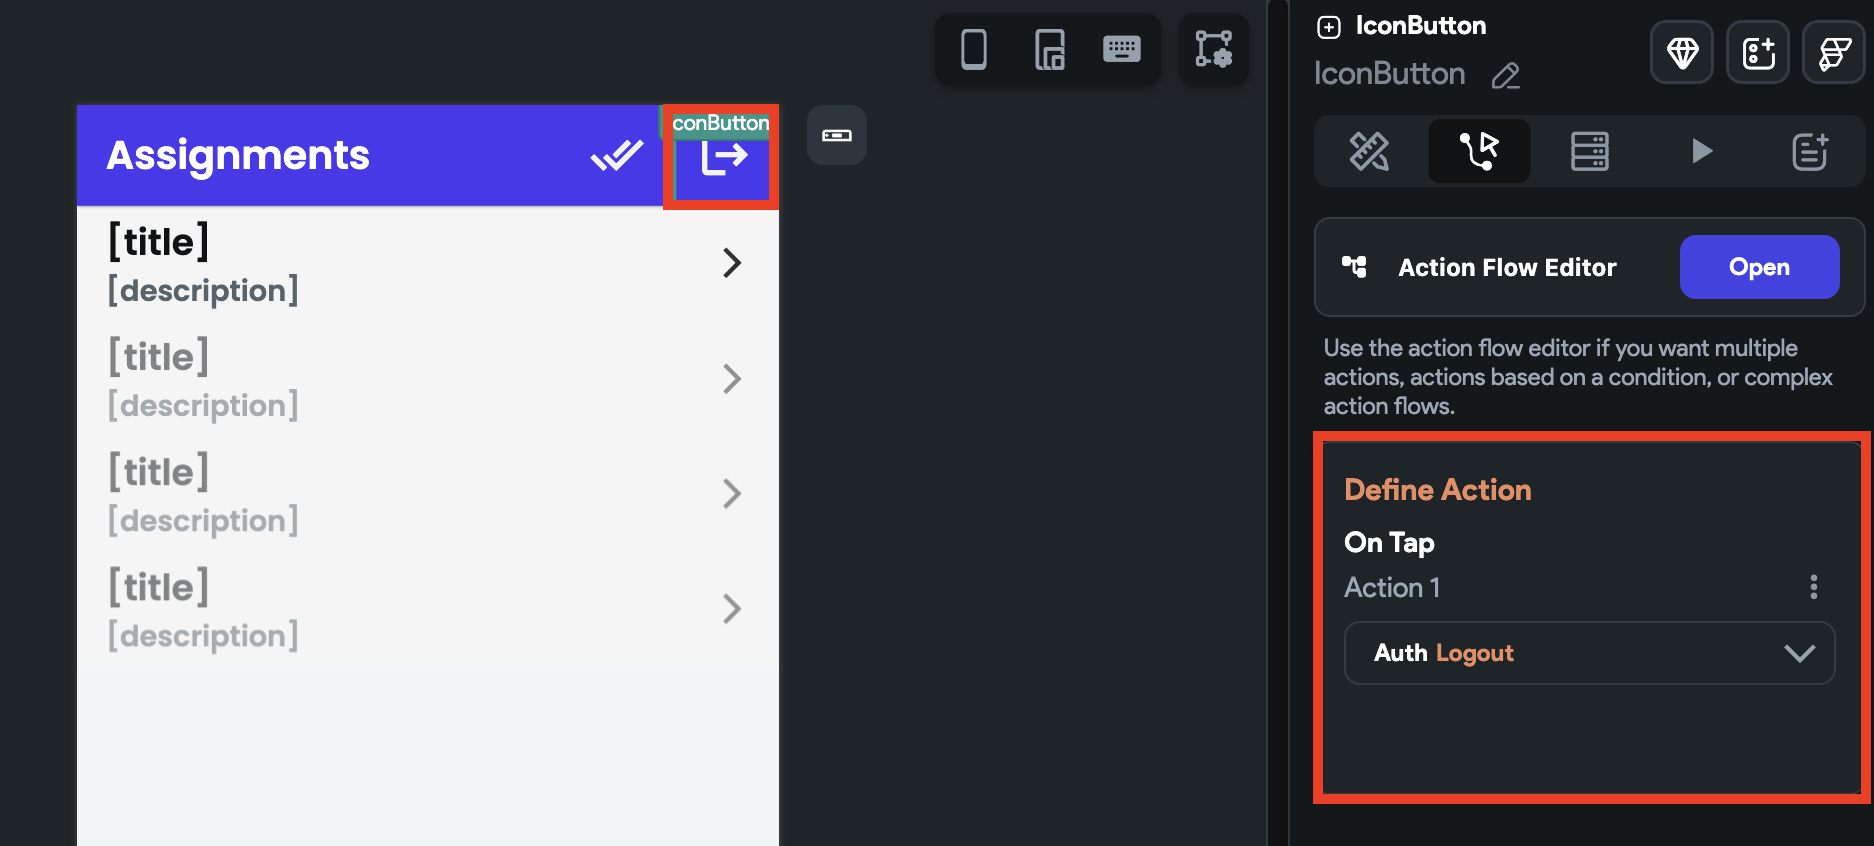
Log out [Action]
This action enables users to securely log out of their account and clear their session data from the app, which ensures that their account remains safe and secure.
Follow the steps below to add this action:
-
Select the widget (e.g., Button) on which you want to add the action.
-
Select Actions from the Properties Panel (the right menu), If it's the first action, click + Add Action button. Otherwise, click the "+" button below the previous action tile (inside Action Flow Editor) and select Add Action.
-
Search and select the Log Out (under Backend/Database > Supabase Authentication) action.

Send Reset Password Email [Action]
This action allows users to reset their password by sending a reset link to their registered email address.
To build the reset password functionality, you need to create the following two pages in your app:
- ForgotPassword Page: This page allows users to enter their email address and request a password reset link.
- UpdatePassword Page: This page allows users to set a new password after clicking on the reset link.
Here’s how you can add the Supabase reset password feature to your app:
- On the ForgotPassword Page, add the Send Reset Password Email action and set the Email Field dropdown to the widget that accepts the user's email address. This action will send the reset password link to the provided email.
- The reset link sent to the user will open the UpdatePassword Page. On that page, add the Update Password action and set the Password Field and Confirm Password Field to the respective input widgets.
- Copy the route name of the UpdatePassword Page and paste it into the Supabase Dashboard > Authentication > Email Templates > Reset Password > Source. After
"{{ .ConfirmationURL}}"add"/[here]"only if you're not using a custom redirect URL. If using a custom redirect URL, the confirmation URL will redirect directly to your specified path. - Deploy your app to the web.
- Copy the URL of your deployed project and paste it into the Supabase Dashboard > Authentication > URL Configuration > Site URL.
For mobile, you must set the deep link URL as the Site URL. To find this, navigate to FlutterFlow > Settings & Integrations > App Details > Routing & Deep Linking, open the URL Scheme tooltip, and copy the URL.

Use Custom Redirect URLs
Instead of relying on the default {{ .ConfirmationURL }} path, you could optionally configure a custom redirect URL in Supabase. This option allows you to bypass the default setup and send users directly to a custom page in your app for resetting their password.
To configure a custom redirect URL:
- When adding the Send Reset Password Email action in FlutterFlow, enter the Redirect To URL. For example
http://my-site.com/resetPassword. - Whitelist this custom URL by navigating to Supabase Dashboard > Authentication > URL Configuration > Redirect URL, and click Add URL to include it.
- Update the reset password template. Go to Supabase Dashboard > Authentication > Email Templates > Reset Password > Source and ensure only
{{ .ConfirmationURL }}is present in the template (remove any appended route names).
Delete User
At present, we do not support deleting Supabase user action. However, you can refer to this community video for guidance on how to do so.