General Settings
This section serves as the control center for configuring essential aspects of your app.
App Details
This section allows you to customize a wide range of settings that are crucial for the overall functionality and appearance of your application. From basic configurations like project and package (bundle) name to more advanced settings like theme customization and navigation control.
Change Project, Package, and Display Name
Modify the app or package name of your project from this settings. You can also define different package names based on the development environment selected.
You can set a different name for the App Store and Play Store using the Display Name.
After changing the package name, errors may appear on the toolbar due to invalidated Firebase config files. To resolve this, generate new config files by going to Settings & Integrations > Project Setup > Firebase > Regenerate Config Files.
Initial Page
You can specify your app's Entry Page and Logged In Page from this section.
- Entry Page: This serves as the home page for your app. When authentication is disabled, all users are directed to this page by default. If authentication is enabled, this page becomes the login, signup, or onboarding page for users who are not authenticated.
- Logged In Page (available only if auth is enabled): This page is displayed when the app starts for authenticated users. If a user successfully signs in, they are automatically redirected to the page specified here. If the user is already authenticated, this page bypasses the Entry Page.
To set the page, simply choose the page that you want to use from the dropdown menu.
Folder Organization
If you want the improved folder organization for your project, Enable Updated Folder Organization. This is especially helpful for older projects; for new projects, this is enabled by default.
Download Settings
- Run "dart fix": Enabling this will run the
dart fixcommand when downloading the code. This makes the generated code cleaner and potentially more performant. - Download Unused Project Assets: Enable this option to download all assets, including those that are not currently used in the project. This is useful when you need to access and use the assets in custom code or other parts of your project.
Routing & Deep Linking
Configure the global settings for navigation and deep link in your app. To learn, how to set up deeplinks, check out the Deep & Dynamic Linking guide.
Display Settings
The Display Settings section allows you to configure how text scales within your app. This is particularly helpful for accessibility, ensuring that users with visual impairments can comfortably read content.
- Min Text Scaling Factor: Defines the minimum allowable scale for text. This prevents text from shrinking below a certain threshold, helping maintain legibility for all users. For example, setting this to
1ensures text is never rendered smaller than its base size, regardless of device settings or user preferences. - Max Text Scaling Factor: Defines the maximum allowable scale for text. This limits how large text can appear, which is useful for preserving layout consistency on devices with accessibility text scaling enabled. For example, setting this to
10allows text to scale up to 10× its original size. - Persist Text Scaling Factor: When enabled, the current text scaling factor will be stored and applied even after the app is restarted. This ensures a consistent user experience across sessions. Note that this setting requires both Min and Max Text Scaling Factors to be set. If either is unset, persistence will have no effect.
Once the text scaling factors are set, you can use the Update Text Scaling Factor action to let users dynamically adjust text size.
Let’s understand this better with an example. Suppose the Min Text Scaling Factor is set to 1.0 and the Max Text Scaling Factor is set to 5.0. If a user's device requests a scaling factor of 2.5, FlutterFlow will accept it because it falls within the allowed range. So, if the base font size is 16.0, the final rendered size would be: 2.5 × 16.0 = 40.0
If a device requests a scaling factor higher than 5.0 (such as 6.0), it will be capped at 5.0. Thus, for a base font size of 16.0, the final rendered size will be: 5.0 × 16.0 = 80.0.
Similarly, if a device requests a scaling factor below 1.0 (for example, 0.5), it will be raised to 1.0 to ensure readability. The resulting font size would remain: 1.0 × 16.0 = 16.0.
App Assets
This allows you to upload the images to be used by the app. From here, you can upload the Initial splash image and the image for the app launcher icon.
Splash
Splash screens are the first thing users see when your app starts up. They give the app time to get ready while showing you something fun or informative. This screen typically contains the image or logo of the app.
The steps to configure the splash screen are as follows:
-
Navigate to the Setting and Integrations from the Navigation Menu > General section > App Assets.
-
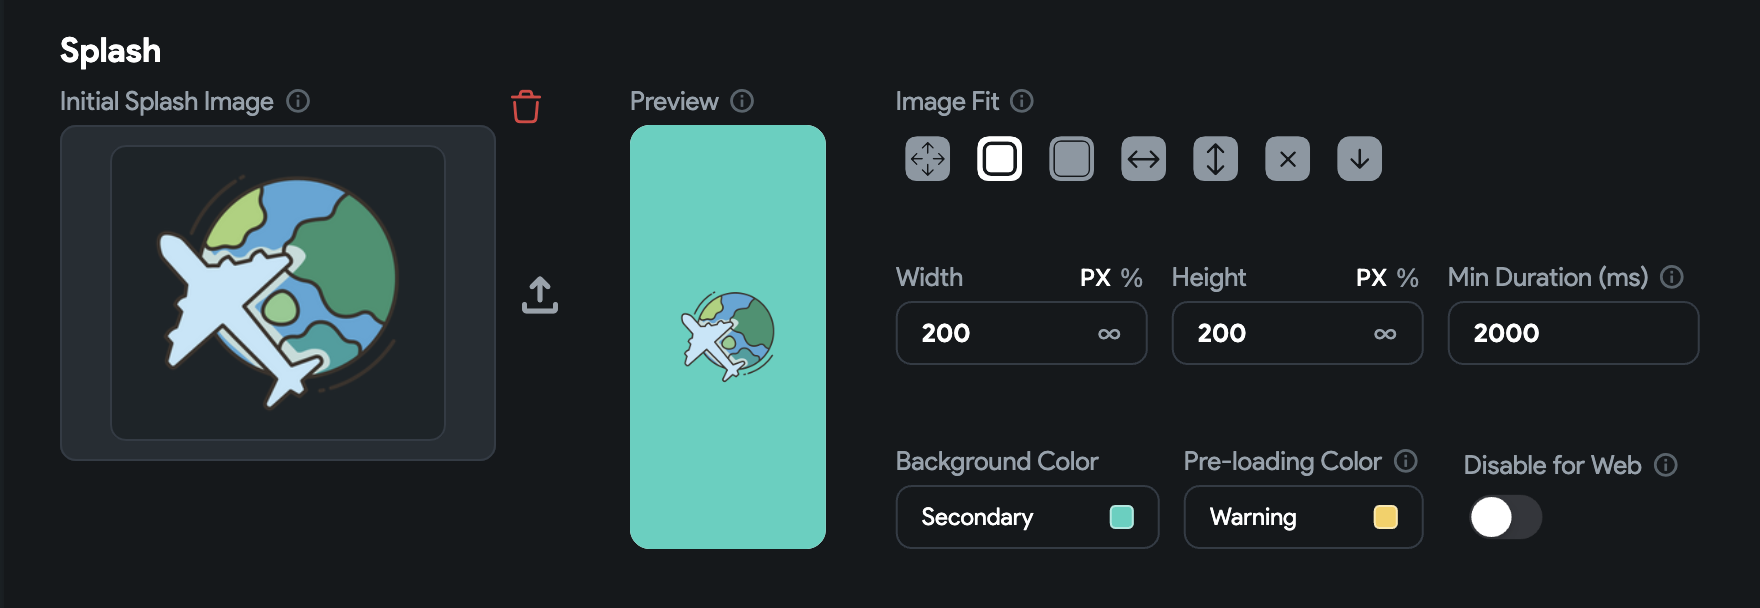
Under the Splash section, click on the Upload Image button and upload the image you would like to display on the splash screen.
-
You can try any of the Image Fit options to determine how the uploaded image should display on the splash screen.
-
To control the image dimension by yourself, you can set the width and height properties.
- To set an exact size, select PX and enter the desired values.
- To set the dimensions as a % of the screen size, select % and enter the desired value.
-
The Min Duration property helps you set the time for which the splash screen will be visible, where (1000ms = 1 second).
-
You can also set a Background Color to match the background of the image.
-
In mobile apps, you might occasionally notice a blank white screen briefly appearing (as the Flutter engine loads) before the splash screen is displayed. To change the color of this screen, use the Pre-loading Color property.
-
Typically, web apps don't use a splash screen, so If you prefer a more traditional web experience, you can choose to Disable for Web.
Launcher Icon
The launcher icon (also known as the app icon) represents your application. When you open the launcher app, it shows the app icons for all the installed apps. It acts as an entry point for your app. The image asset that you will upload here will be used as the app launcher icon.
To add the app launcher icon:
-
Click on the Setting and Integrations from the Navigation Menu (left side of your screen).
-
Under the General section, select App Assets.
-
Under the Launcher Icon section, click on the Upload Image button.
-
By clicking on the Unset dropdown menu, you can also select from the already uploaded images to the Project Media/Assets.
-
Download the project and run the following command in your terminal to generate the launcher icon:
flutter pub run flutter_launcher_icons:main -
Run your app on a real device or emulator to see the app launcher icon.
Android Adaptive Icon
Adaptive icons are a design specification that allows app icons to adapt to different device environments without losing consistency in appearance. Unlike traditional launcher icons, which are static and can appear out of place or poorly scaled on different devices, adaptive icons consist of two layers:
- Foreground layer: This layer usually contains the logo or main visual element of the icon.
- Background layer: This provides a fill (color or background image) behind the foreground, which can be manipulated by the device’s software.
Here are the steps to add adaptive icons:
-
Create an adaptive icon. You can either use this online tool or use these resources to create one.
-
Return to FlutterFlow and navigate to Setting and Integrations > General > App Assets > Android Adaptive Icon.
- Upload the Foreground Icon. If you use the online tool, you'll find it inside the
IconKitchen-Output > android > res > mipmap-xxxhdpi > ic_launcher_foreground.png. - For Background Type, you can either set the Color or Image. It's recommended to use a color that aligns with your app's branding for a cohesive look.
- Upload the Foreground Icon. If you use the online tool, you'll find it inside the
-
Download the project and run the following command in your terminal to generate the launcher icon:
flutter pub run flutter_launcher_icons:main -
Run your app on a real device or emulator to see the app launcher icon.
![]()
Useful resources
See the following resources for more information on Android adaptive icons.
Create Adaptive Icon
- Create app icons in Android Studio
- Figma template (requires login)
- Affinity Designer template
- Bjango templates include adaptive icons
- Adobe XD template