Libraries
Libraries enable you to share and reuse entire FlutterFlow Studio projects as dependencies across multiple projects. This allows teams and developers to modularize their apps by creating shared libraries that include components, API calls, custom code, and more. By using libraries, development becomes more efficient and scalable.
Imagine you’re building an e-commerce app, and different teams are working on various features. One team develops a complex payment system. By using the Libraries, they can publish the payment system as a reusable library and allow other teams to easily import and integrate it into multiple projects without duplicating development efforts.
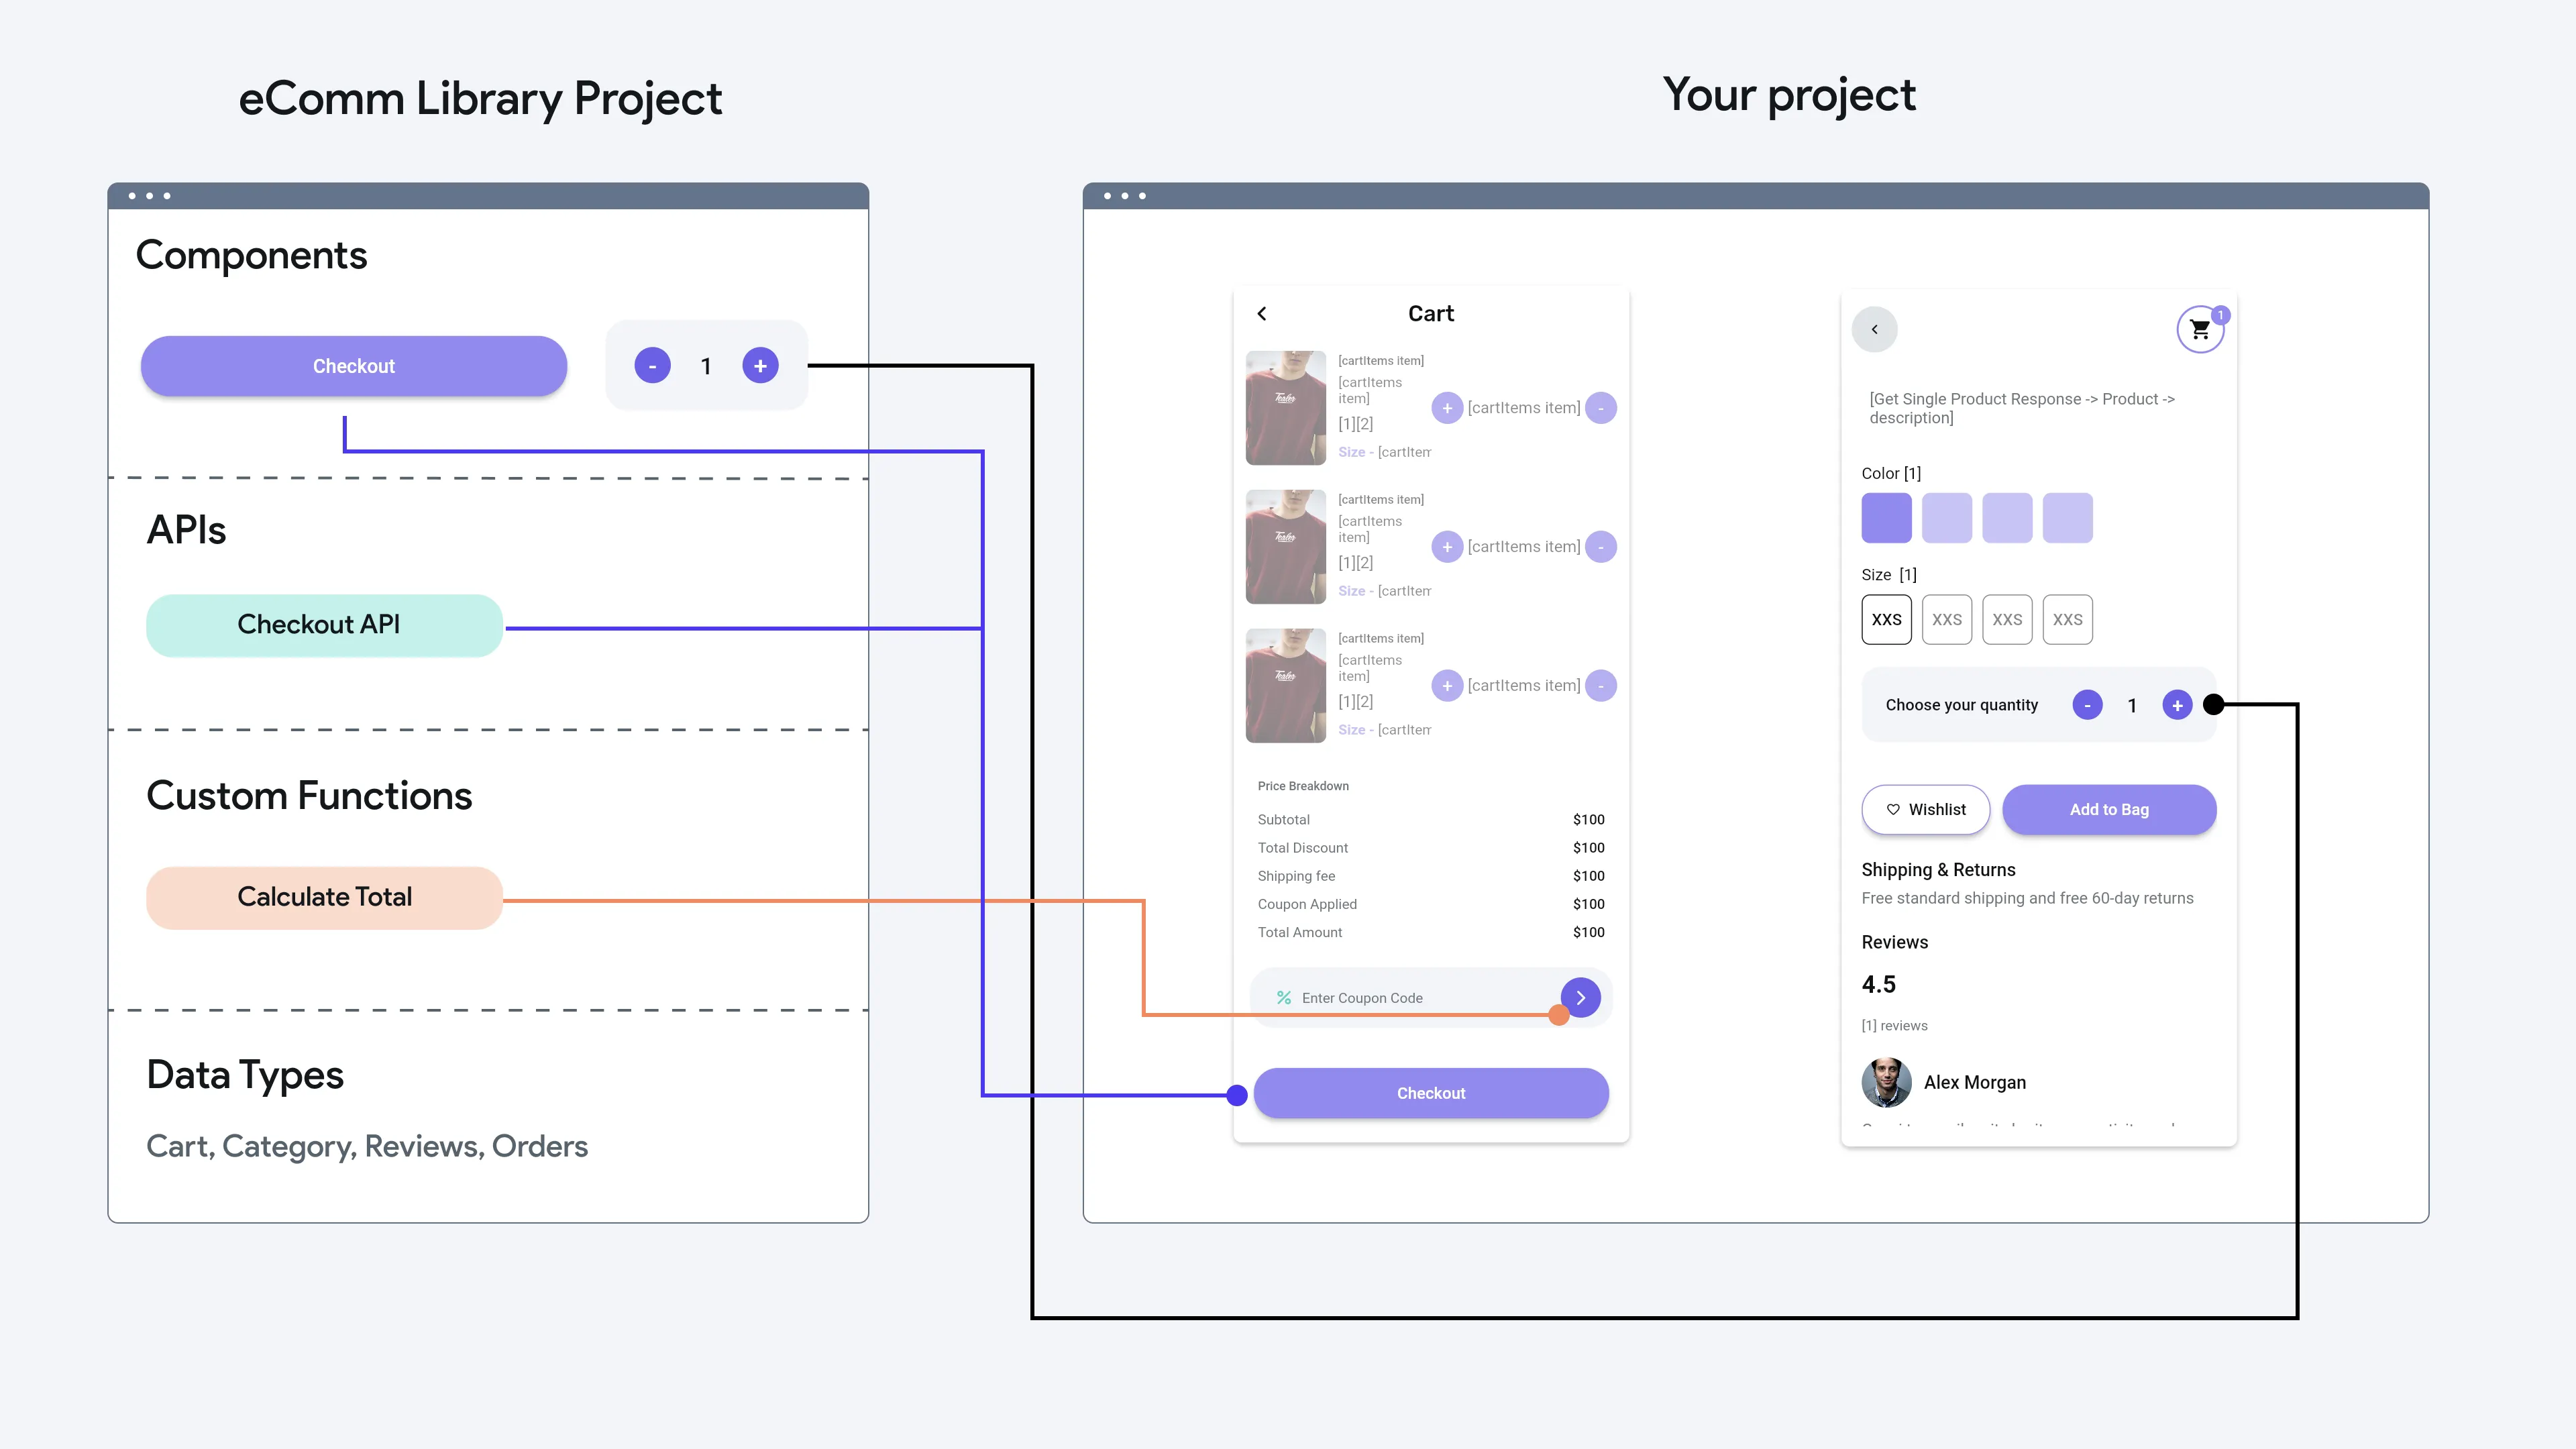
Importance of Libraries
Previously, FlutterFlow Studio offered several methods to share resources between projects, such as team code libraries, design systems, API libraries, and by leveraging marketplace items. However, these methods had limitations, including the inability to share custom data types or custom functions alongside components or API calls and the absence of version control.
With Libraries, you can publish the complete FlutterFlow Studio project as a library and import it as a dependency into other projects.
Publishing a Library
To make the resources in your project available for others to use, publish your project as Library.
When you publish your project as a Library, your project will become a Library Project, and certain features will no longer be available.
To publish a FlutterFlow Studio project as a library, start by creating a FlutterFlow Studio project as you normally would, then follow these steps:
Disabled Features in a Library
When a project is converted into a library, the following features are disabled to ensure compatibility and functionality limitations:
- App settings
- Supabase
- Development environments
- Authentication
- Push notifications
- Mobile deployment
- Web deployment
- Stripe
- Braintree
- Razorpay
- Google Analytics
- OneSignal
- Mux
Importing a Library
To import a library project into another FlutterFlow Studio project, you must go Settings and Integrations > Project Setup > Project Dependencies . Here you can specify the library project and version you are importing.
Dependency Conflicts
A Dependency Conflict occurs when two or more libraries added by a project depend on different versions of the same dependency. This creates a situation where the project cannot resolve which version to use, leading to a project error.
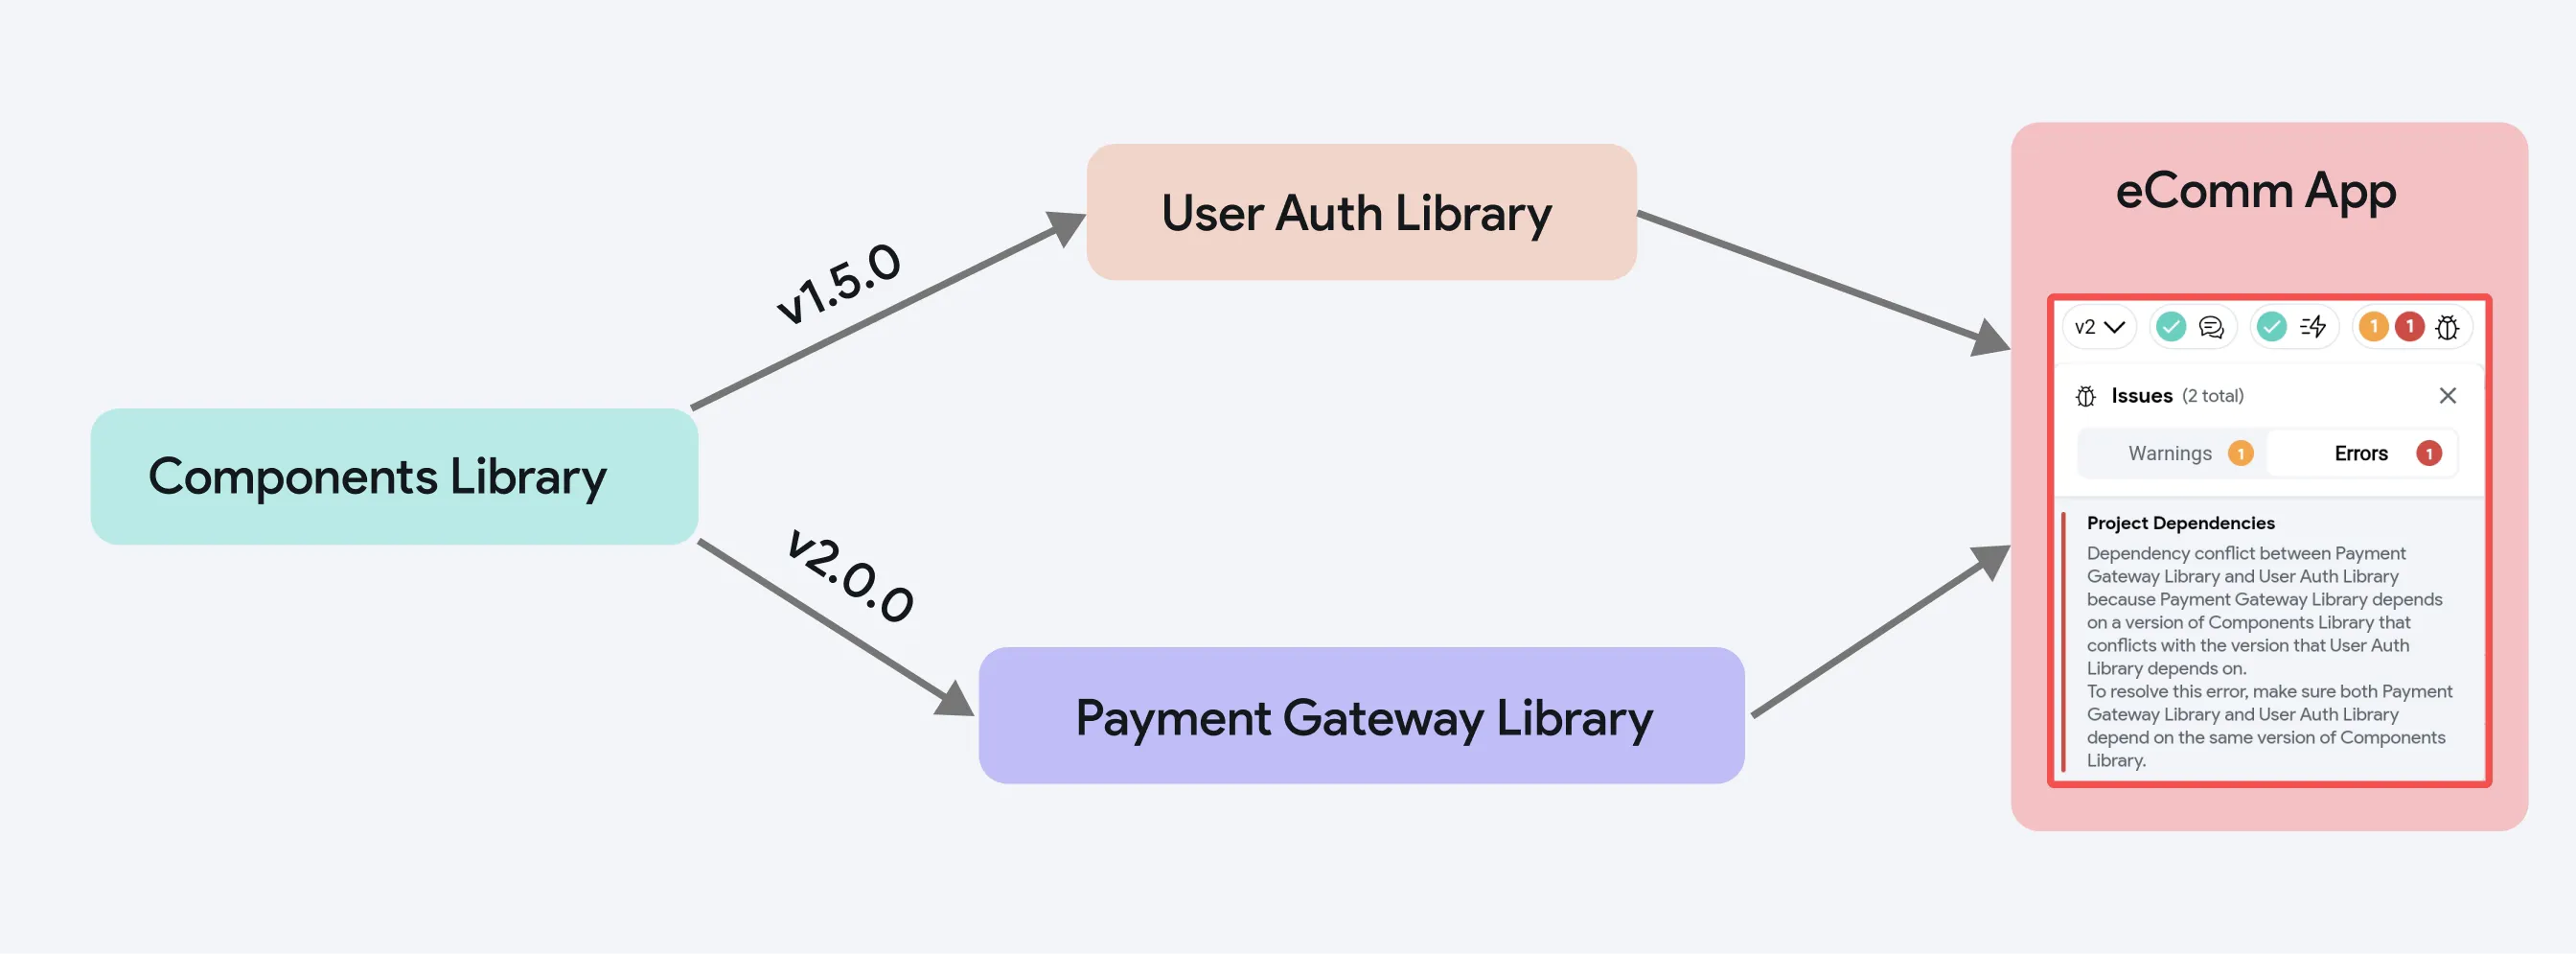
Let’s say you are building an eCommerce app that uses multiple libraries for different purposes:
- User Auth Library is used for handling user authentication.
- Payment Gateway Library is used for managing the payment gateway.
Both library projects depend on a common library called Components Library but imports different versions respectively:
- User Auth Library depends on
Components Library v1.5.0. - Payment Gateway Library depends on
Components Library v2.0.0.
In this scenario, the eCommerce project will detect the dependency conflict because it can’t add both v1.5.0 and v2.0.0 of the Components Library at the same time.
Fixing Dependency Conflicts
Follow these steps to ensure both libraries rely on the same version of Components Library:
- Upgrade both libraries: If updates are available, start by upgrading both the User Auth Library and Payment Gateway Library to their latest versions. Often, newer versions of libraries are designed to use the latest version of the Components Library, which can help resolve conflicts.
- Modify Libraries: If you have access to the library projects, adjust the dependencies of either User Auth Library or Payment Gateway Library (or both) to use the same version of the Components Library.
- Contact Library Maintainers: If you do not own the library yourself, reach out to the maintainers of the library projects. They may provide guidance, suggest workarounds, or release a version that addresses the conflict.
Access Library Resources
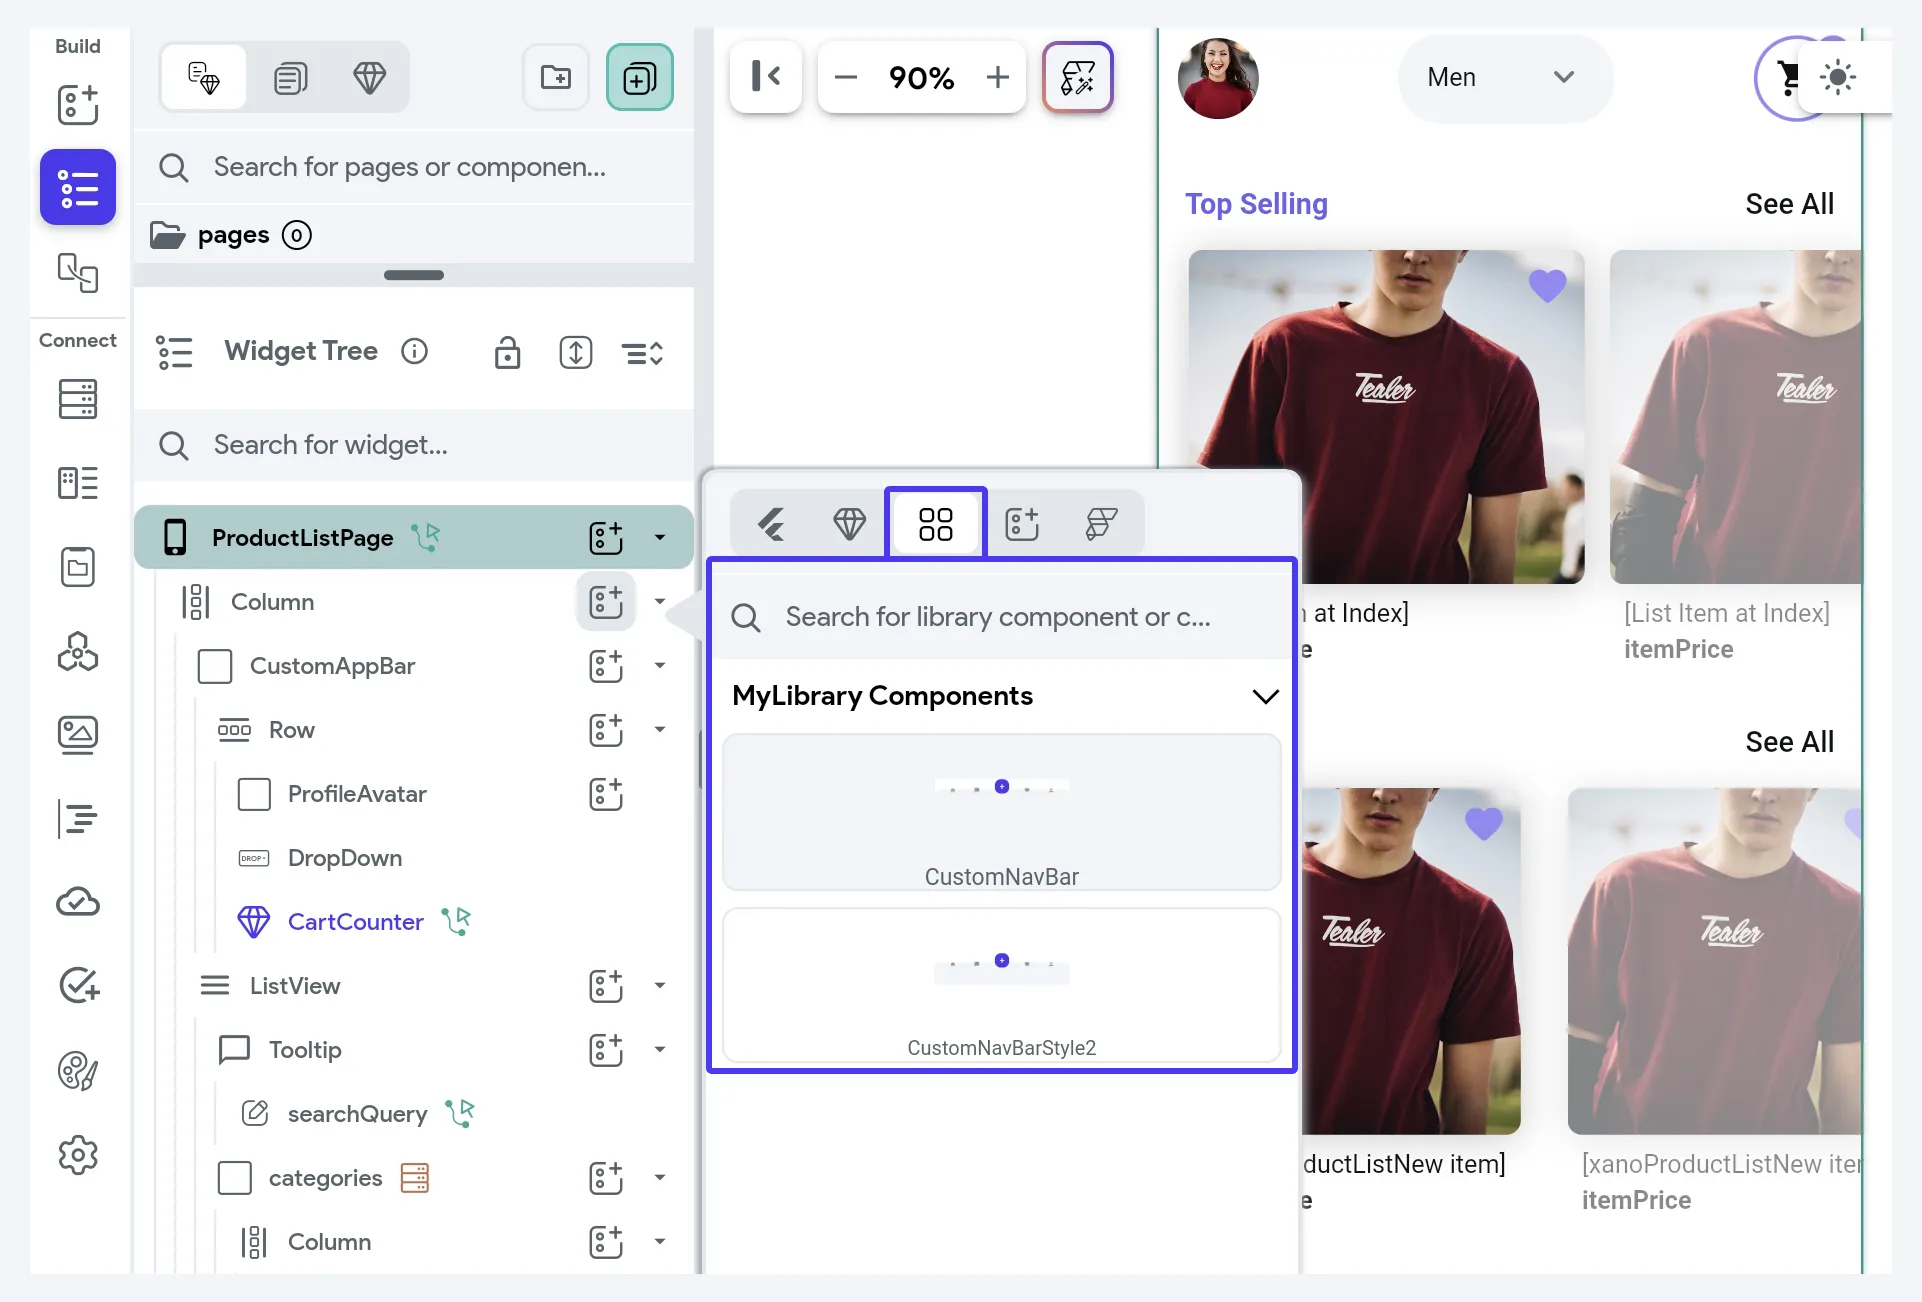
Once the library is imported, following resources are accessible for use:
- Components
- Data Types & Enums
- App State Variables
- Constants
- API Calls
- Action Blocks
- Custom Functions, Actions, and Widgets
- Assets (Note: These are not versioned)
- Code Files
It’s important to note that these resources show up where they are instantiated. For example:
- Components appear in the widget palette.
- API calls appear when making API calls in the action flow editor.
- Custom Functions are available when setting up actions or functions within the app.
- Code Files (Dart files containing classes or enums) become available when creating instances, allowing you to access their fields and methods. They also appear in the action flow editor when adding custom class actions.
This ensures that only relevant resources are shown where they are needed, optimizing performance and discoverability.
Library Versioning
Library versioning allows you to manage different versions of a library project over time. Using versioning, library users can control which version of a library to use in a project, ensuring compatibility and reducing the risk of breaking changes.
Publish New Version
When you’re ready to update your library, ensure that all modifications are committed to the main branch of the library project and then publish as per instructions here.
Import Specific Version
When importing a library into a project, you have the flexibility to choose which version of the library to use. By default, the latest version will be selected.
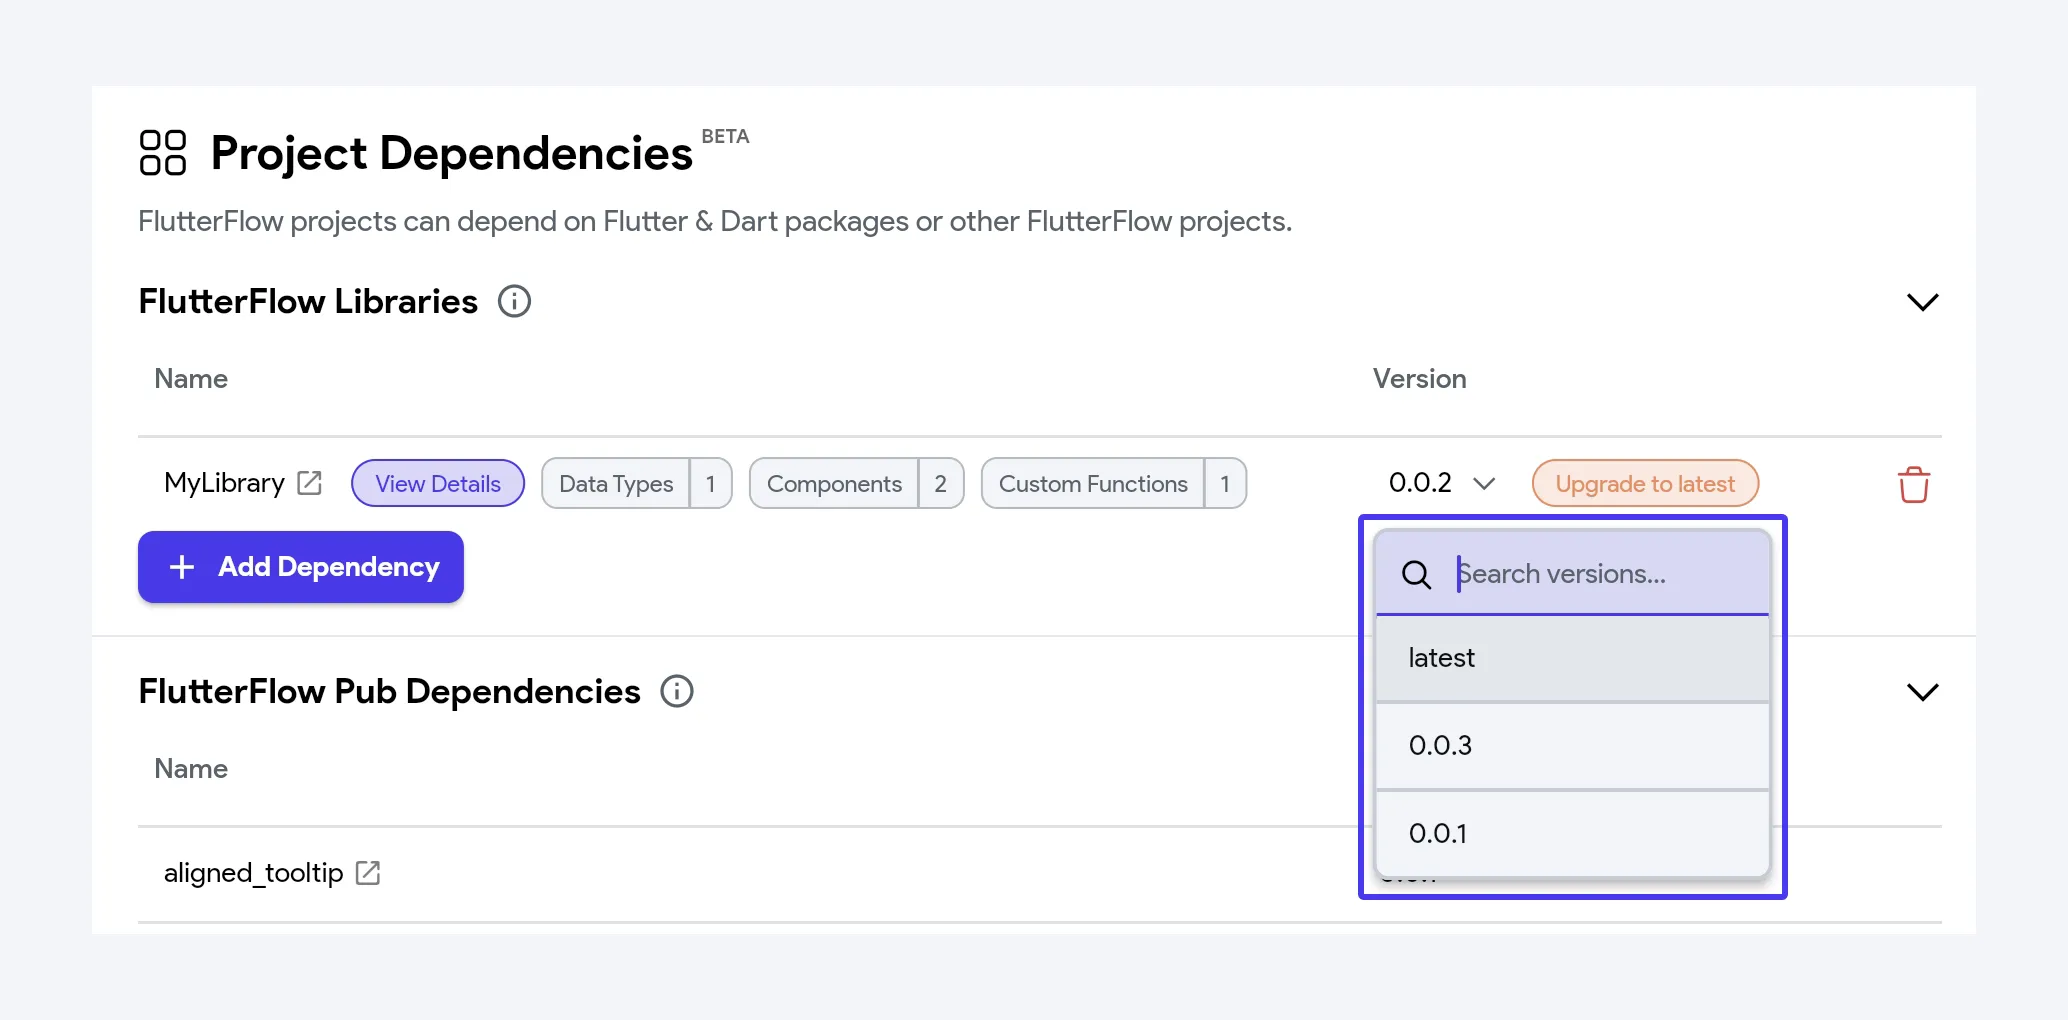
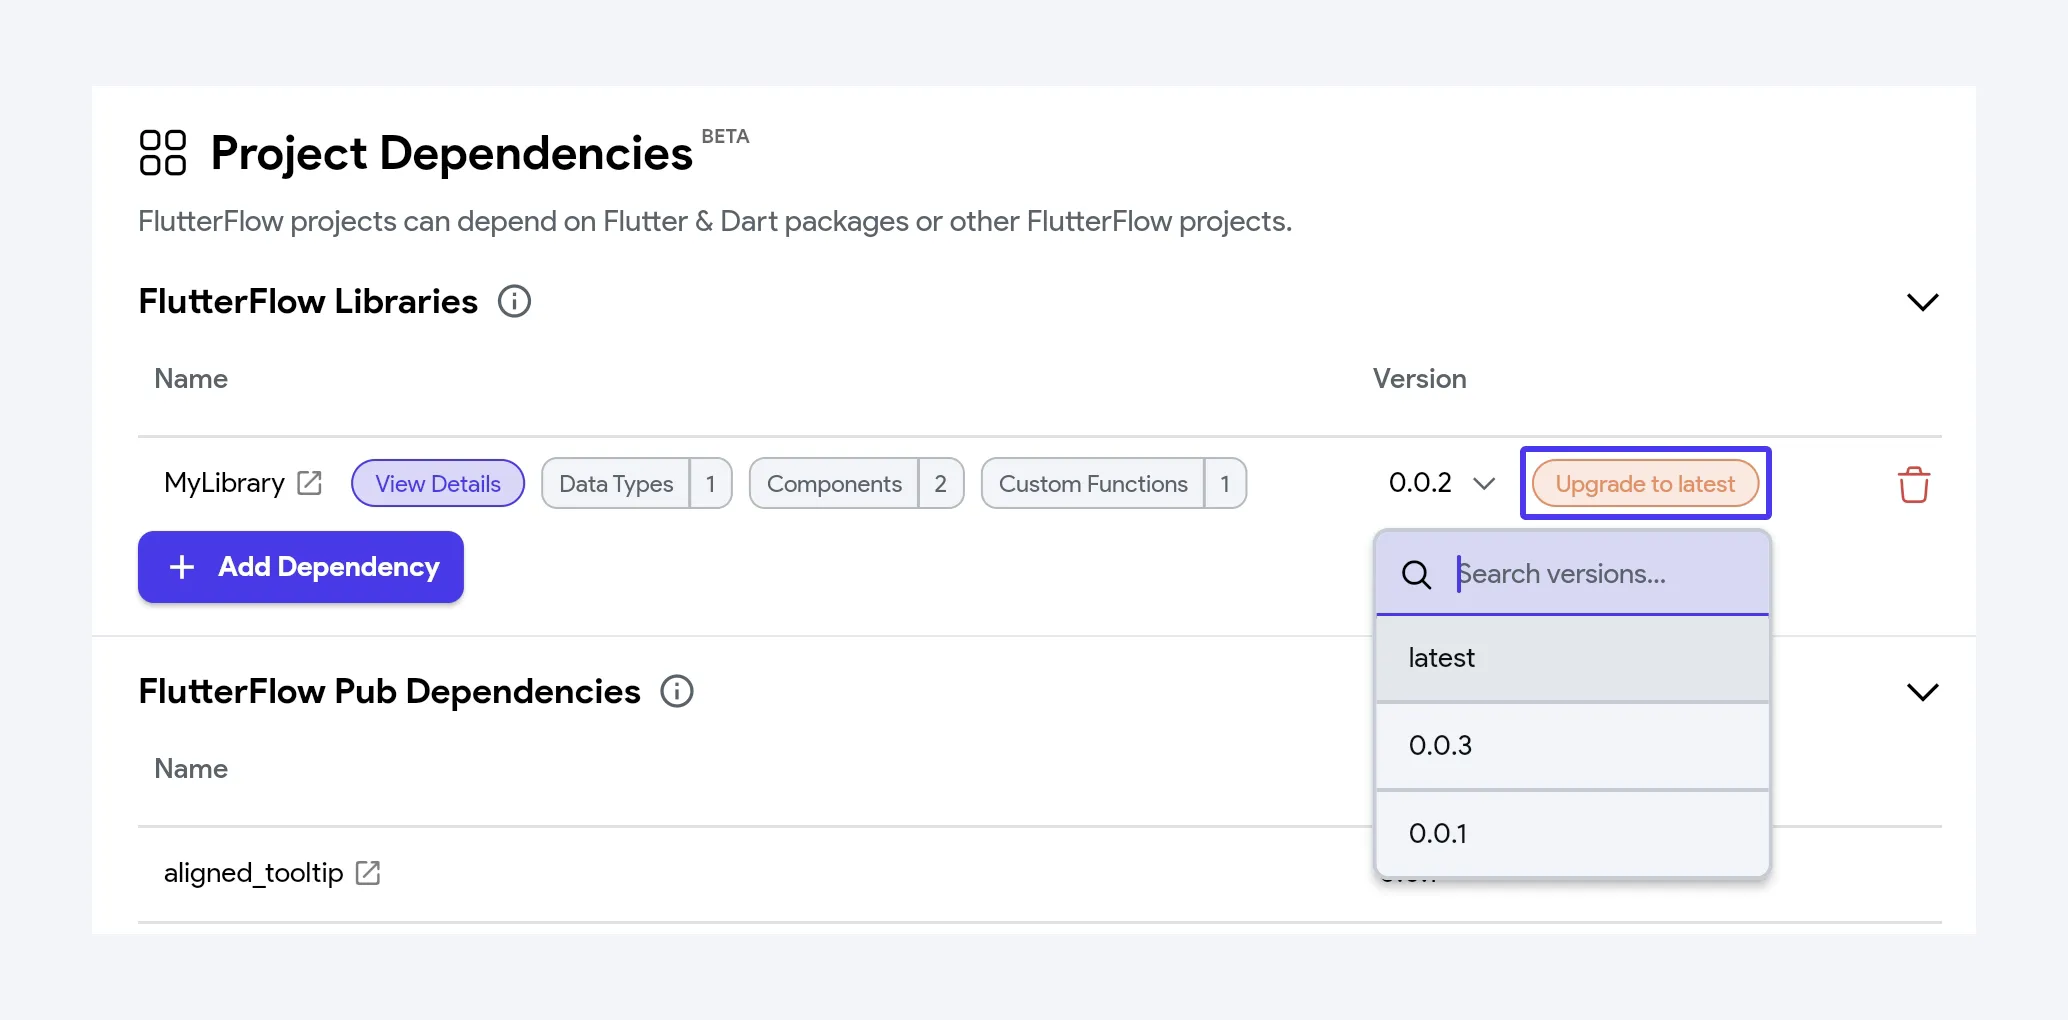
Update to Latest Version
You can easily upgrade to newer versions of the libraries as they become available.
Prerelease Versions
A prerelease is a version of a library that you publish from a non-main branch. It lets you test in-progress library work in another project without merging to the main branch or publishing a release. A prerelease version has a label after the version number, such as 1.2.4-checkout-redesign.
Publish a Prerelease
- Open the library project on the branch that has the changes you want to test.
- Go to Settings and Integrations > App Settings > Publish as Library.
- In the Version field, enter a prerelease version. FlutterFlow Studio suggests one for you, based on the next patch version and the branch name (for example,
1.2.4-my-branch). If you publish again from the same branch, the suggestion includes a numeric suffix (for example,1.2.4-my-branch.2). - Optionally, enter a Description of the changes.
- Click Publish Prerelease. If you have uncommitted changes, the button reads Commit Changes and Publish and commits them first.
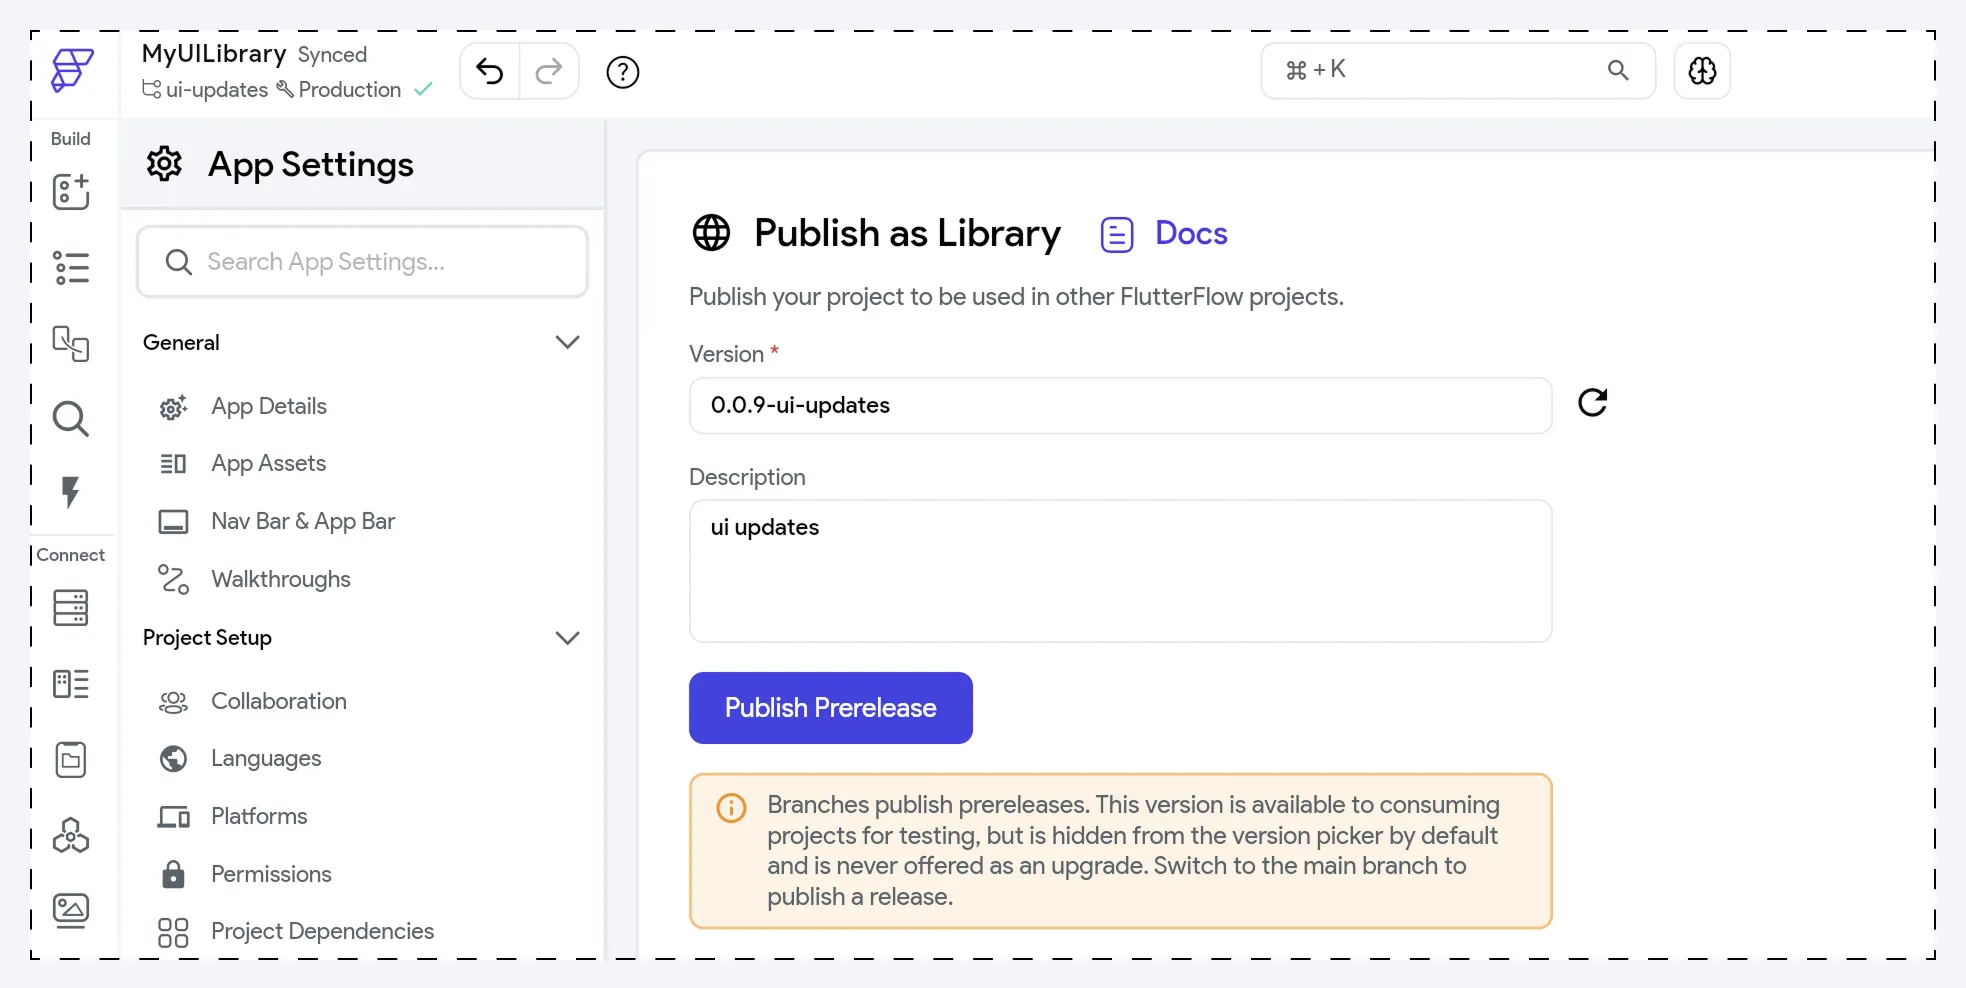
The published prerelease is listed in the publish history with a Prerelease badge. Hover over the badge to see the branch it was published from.
Test a Prerelease in Another Project
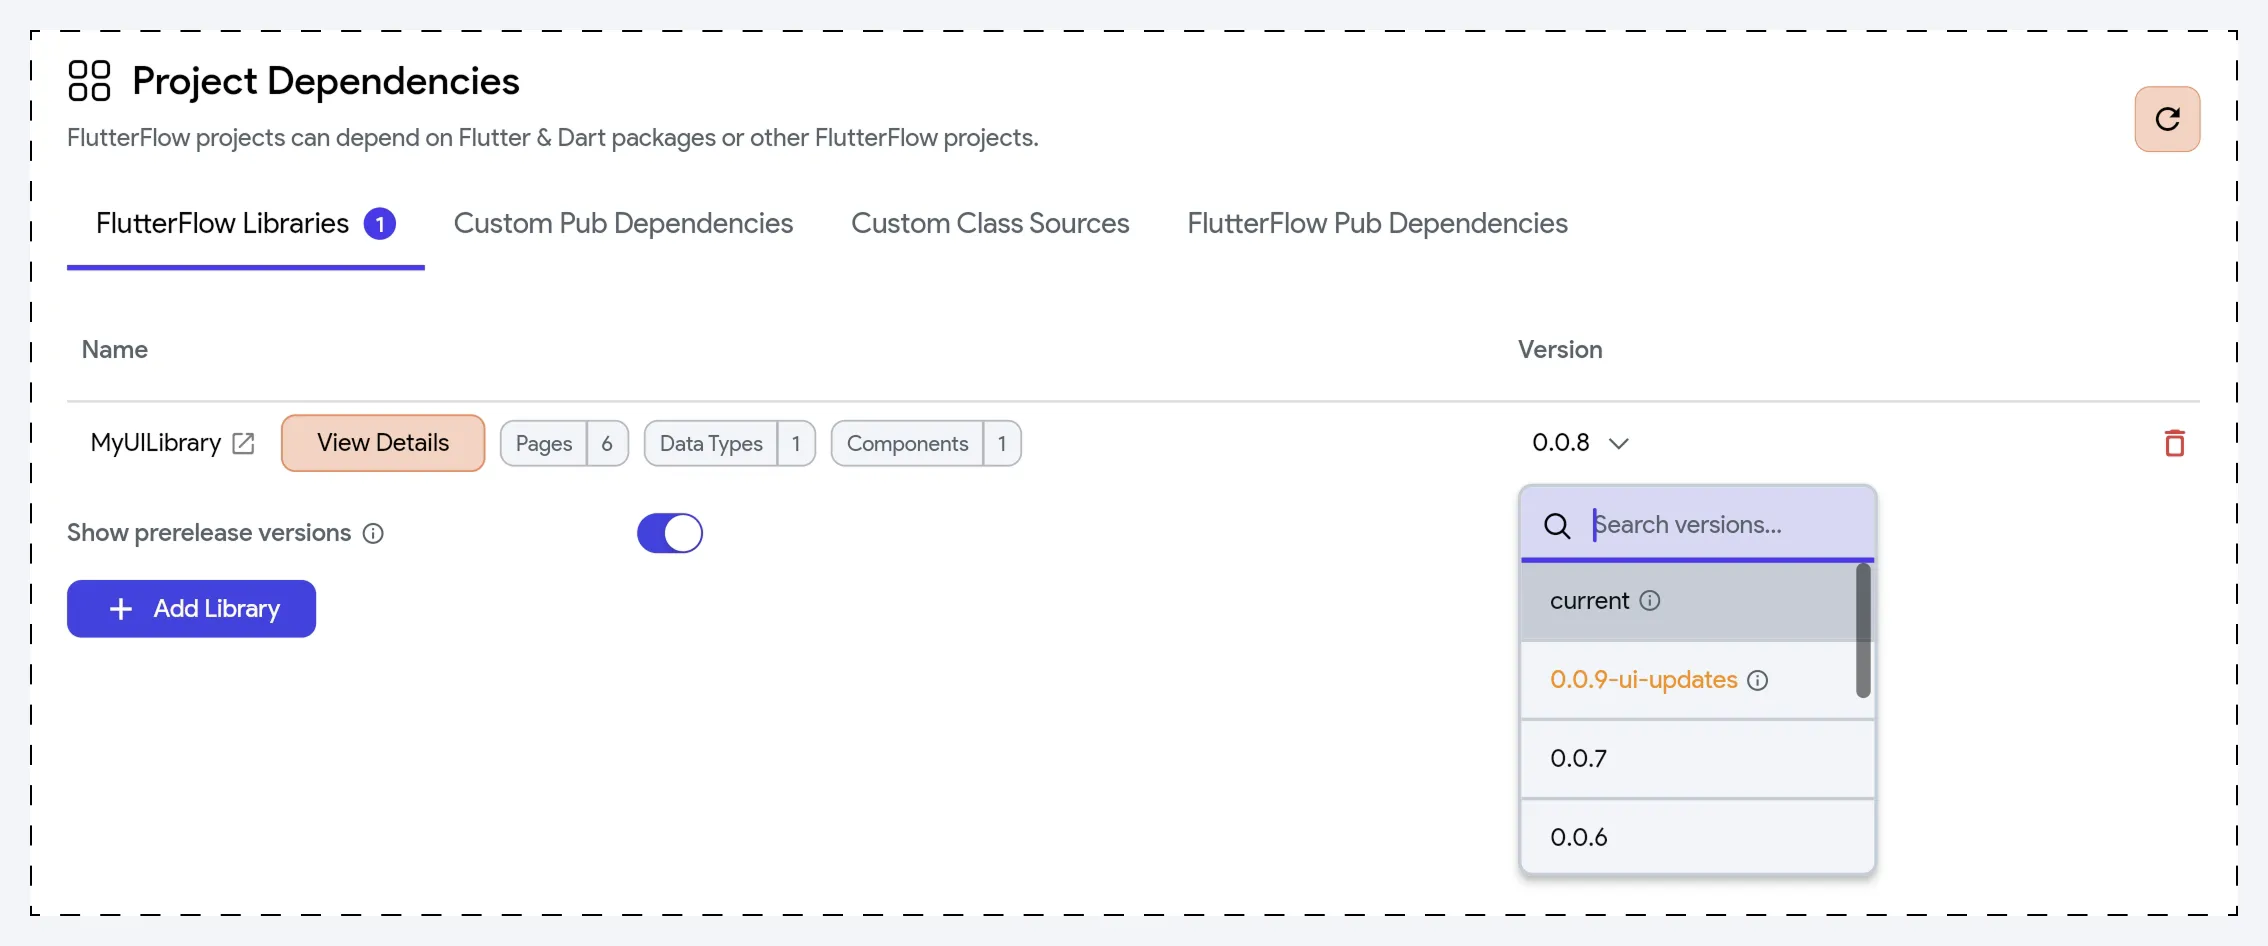
Prereleases are hidden by default to prevent accidental selection.
- In the project that uses the library, go to Settings and Integrations > Project Setup > Project Dependencies.
- Turn on Show prerelease versions. This toggle appears only when one of your libraries has a prerelease.
- In the Version column, open the version dropdown for the library and select the prerelease.
Prerelease versions appear in a warning color in the dropdown and the dependency list. Hover over the information icon next to a prerelease to see the branch it was published from.
Library Pages
When you publish a library, all the pages included in the library become available for use in the consumer project. These pages function like any regular project page in your app; they support navigation, parameters, state management, and transitions.
Library Pages offers a modular approach to development, making it ideal for large teams and complex, multi-feature apps. For example, instead of recreating common flows like onboarding and payment flows, you can build them in a library once and use them wherever needed.
When users import or update the library, they can override the default route names to prevent conflicts between the library and their project. Library pages then appear in navigation actions just like any regular page.
Library Pages in NavBar
Library pages can also be used in the NavBar, allowing users to add reusable flows into the app’s primary navigation structure. For example, in a Super App, you can import ride booking, food delivery, or payment pages from separate libraries and add them directly to the bottom navigation, giving users quick access to each module.
To display a library page on the NavBar, navigate to Project Dependencies > FlutterFlow Studio Libraries, then click on Pages for the relevant library to open its details. In the list of pages, locate the desired page and click Nav Bar Settings, then enable Show on NavBar. You can also customize additional settings, such as label and icon, as needed.
To confirm, go to the Nav Bar & App Bar section, where you’ll see the library page listed as part of the NavBar items.
Library Values
Library values are essentially variables created and used by a library author and intended to have their values set by the library user. These values allow library author to create configurable variables that are useful in different contexts, such as public or client-side API keys, global settings, or other project-specific configurations. These values allow library users to input specific data required for the library to function properly in their project.
For example, if someone builds a payment gateway library, they might define Library Values for configuration settings, such as:
- Default currency: USD
- Region: US
- Default Payment method: Card
This allows the user importing the library to provide their own payment preferences without modifying the internal code of the library.
Create Library Values as Author
The library author defines the variable name, data type (e.g., string, enum), whether the variable is nullable, and an optional default value.
To create library values, navigate to Settings and Integrations > App Settings > Publish as Library > Library Values section and click + Add Value.
Use Library Values
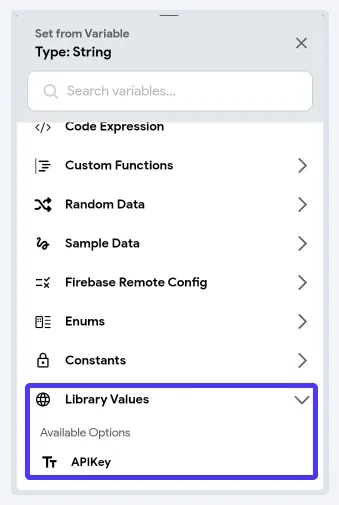
After setting Library Values, they function just like any other variable in FlutterFlow Studio. You can bind them to components, actions, API calls, or any property that allows you to configure dynamic values across your library project. You can access Library Values via the Set from Variable menu.
Set Library Values as User
To set library values, navigate to Settings and Integrations > Project Setup > Project Dependencies page. When you import a library, you’ll be prompted to set values for required Library Values. If the library has already been added, click on View Details, which will open a dialog and then you can enter a value.
Libraries with Firebase
You can create collections and enable various Firebase features in library projects without connecting a separate Firebase project.
In library projects, you won’t see an option to link to a Firebase project. Instead, the project that imports the library handles the actual Firebase connection.
Any indexes or security rules defined in the library are recognized by the importing project and deployed accordingly.
Library Collections in Your Project
Firestore collections defined in a library appear in any project that imports the library. To see them, open the Firestore page in the importing project and go to the Collections view.
- Library collections are listed under the name of their library, after your project’s own collections. Subcollections are grouped under their parent collection.
- Select a library collection to open its schema. The view shows the collection name, a badge with the library name, and each field’s name and data type under Field Name and Data Type.
- Library collection schemas are read-only in the importing project. To change a schema, click Open Library Project, which opens the library project in a new tab.
- If your project has no collections of its own, the view opens on the first library collection instead of showing No Collections Created.
The collection schemas remain defined in the library rather than becoming your project’s own collection schemas.
If your team has multiple projects that share a common Firebase feature, turning it into a library is a great idea. This ensures the same logic is used and connects to the same Firestore project across all apps.
Here are some examples of library projects you can build with Firebase:
- Basic Analytics or Tracking: A library that logs events to Firestore; useful for aggregating usage data at an application level.
- Configuration or Settings: A library that serves app-wide configurations (like feature flags, UI themes, or layout choices) is handled in Firebase Remote Config.
FAQs
What will happen to existing team libraries?
Team code and API libraries will be migrated to library Projects. These projects will be imported as a library with the latest version specified as the version. The components within team design systems will move into their own projects, while design systems will continue to exist but only containing the theme settings.
Do libraries work with Marketplace?
Yes, you can add and import a Marketplace project as a library.
How do libraries work with themes (design systems)?
By default, the design system of the parent project takes precedence over the imported library’s design system. If you want to use a library’s design system, you must select or set the library in the Design System page.
How are API keys shared?
We’re working on Library Values, which will allow users to set specific values when they import a library. This feature will be available soon.
How does nested dependencies work?
Projects can import libraries that themselves have imported other Libraries as dependencies. However, if the project and the library share the same dependency, the version must match exactly to avoid conflicts.
Why do I get collision errors when importing a duplicated project as a library?
When you duplicate a project and publish it as a library, the unique identifiers (keys) for components and other resources are not automatically changed. If you then import this library back into the original project, it causes key collisions between the original and duplicated resources.
To help with this, FlutterFlow Studio shows a dialog that offers to automatically delete the original resources in your base project and update all references to point to the library versions.
If you prefer to resolve this manually, you can duplicate individual components within the library after importing, this will generate new keys and avoid the collision.
Last updated on