Manage Custom Code In GitHub

FlutterFlow allows you to create almost any kind of app. However, for some reason, you may still want to introduce a custom code in your app. This page describes how you can add your custom code and manage it using Github so that FlutterFlow does not override your custom code.

The Flow

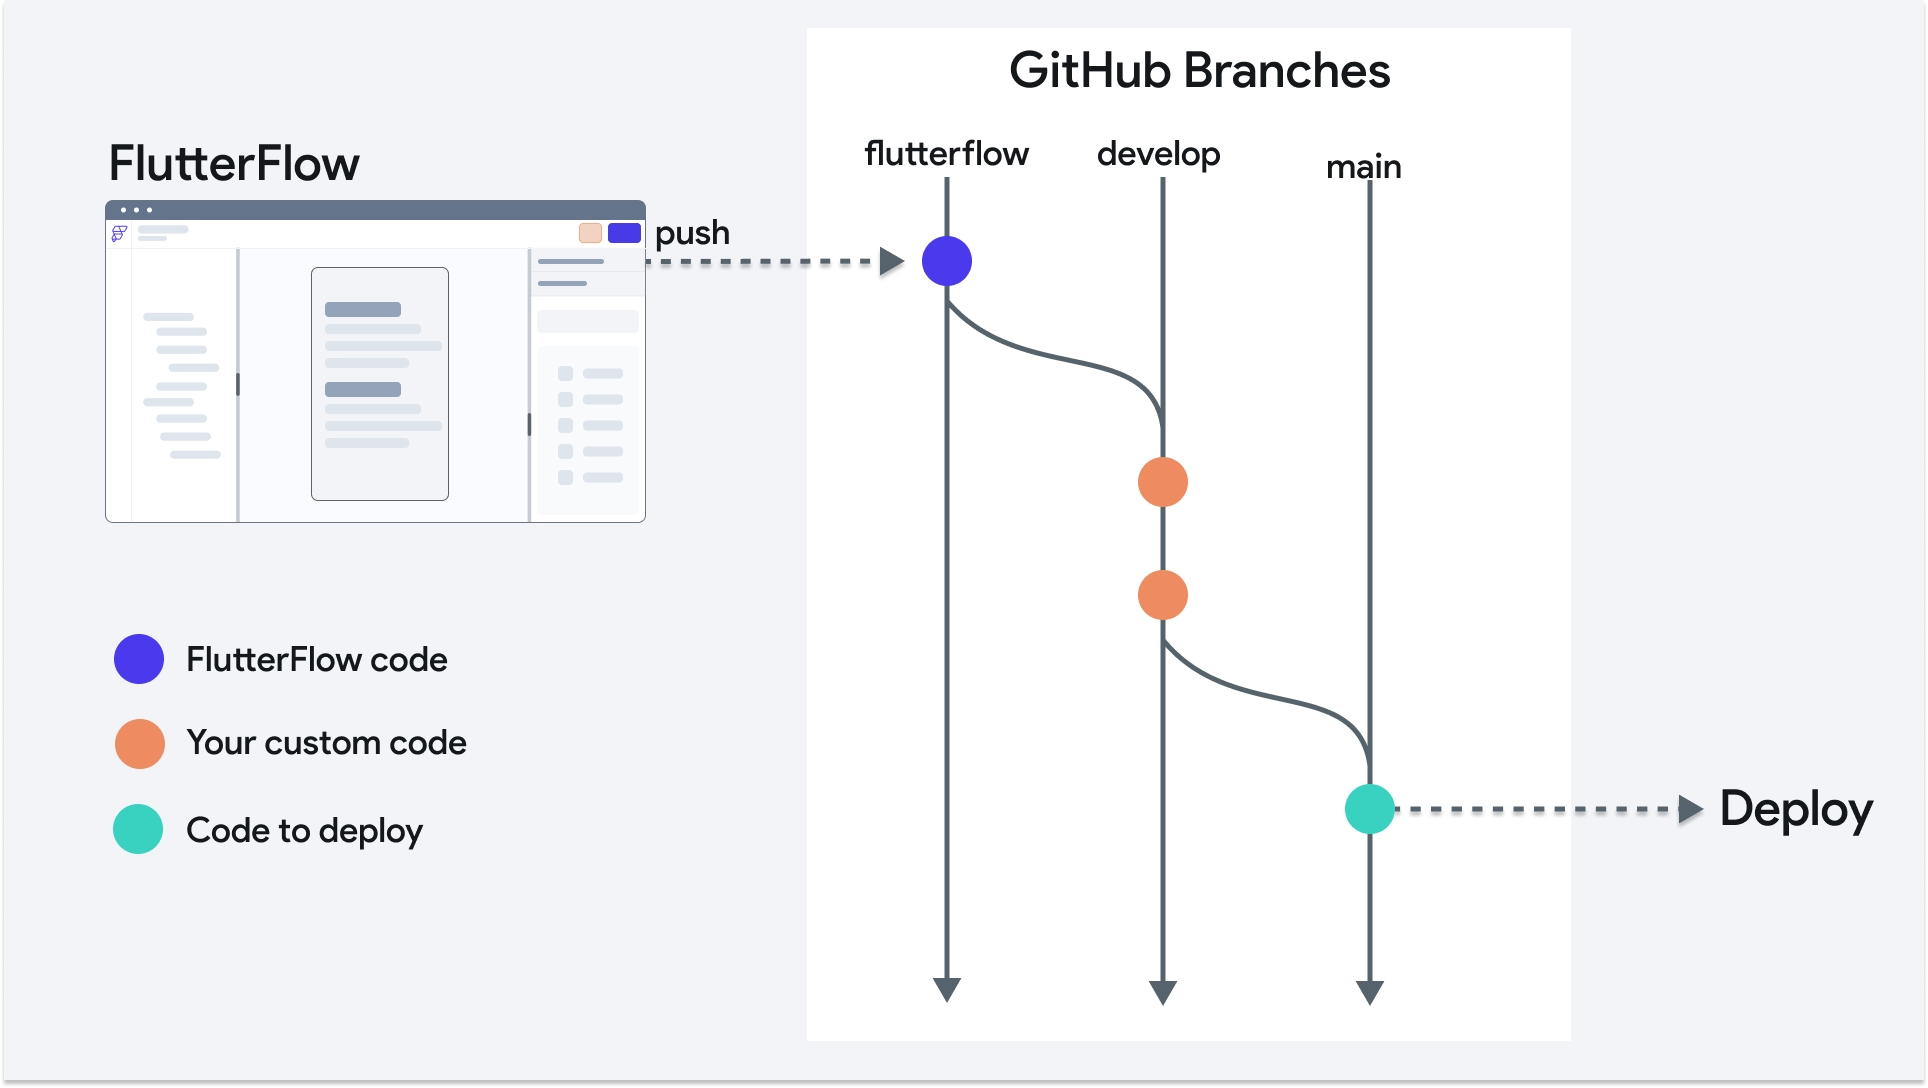
To manage the custom code, you must incorporate a flow/process. The following flow allows you to leverage all the features from FlutterFlow and deploy your app with a custom code.

Let's understand this flow step by step:

1. Complete GitHub Setup

The very first step is to connect your FlutterFlow project to Github. Here are the steps if you haven't already done so.

2. Create a Develop Branch

When you click on Push to Repository, FlutterFlow creates a branch called 'flutterflow' in Github. If you make changes or add custom code in the same branch, your code will be overwritten next time when you click on the Push to Repository button.

In order to prevent your custom code from being overwritten by FluttterFlow, create a new branch called 'develop'.

Here are the steps to create a develop branch with all code from flutterflow:

  1. Go to Github and open your repository.

  2. Click on main inside the top-left dropdown menu.

  3. Select the flutterflow branch.

  4. Now, click on the flutterflow inside the top-left dropdown menu.

  5. Inside the Find or create a branch input field, enter the branch name as develop.

  6. Click on Create branch: develop from 'flutterflow'.

  • You can click on the dropdown menu any time to see all the branches in your Github repo.

  • We recommend making these branches protected, meaning that commits should only be allowed through pull requests or after team review.

3. Add Custom Code in Develop Branch

Once you create a new develop branch, You can now add your custom code to it.

To add custom code in develop branch:

  1. Clone the Github repo in your machine. If you are not sure how to clone a repo, follow the instructions here.

  2. Open the cloned project in your preferred IDE. Instructions for setting up IDE can be found here.

  3. Switch to the existing develop branch using git checkout develop. Find out more about switching a branch in git here.

  4. Modify/Add Custom code.

After you add a custom code, make sure to commit and push the code into the repository. You can use your IDE to commit and push the code. Learn more about committing a code here and pushing changes here.

4. Make Changes to FlutterFlow Project

Add features or make some changes to your FlutterFlow project as usual and then push the latest changes to the Github repository.

5. Merge FlutterFlow Changes Into Develop Branch

To be able to test your latest changes from FlutterFlow with your custom code, merge the FlutterFlow changes into develop branch.

FlutterFlow changes are merged into develop branch by creating and merging a PR in Github.

Here's is how you do that:

  1. Go to Github and open your repository.

  2. Select the Pull Requests tab.

  3. Click on the New Pull Request button at the top right side of your screen.

  4. Set the base branch to develop and compare branch to flutterflow.

  5. Click on Create Pull Request. You will notice the changes at this point.

  6. Enter the suitable comment and click on Create Pull Request again.

  7. Click on Merge Pull Request and then Confirm Merge.

6. Resolve Conflicts If Any

While merging the FlutterFlow branch into the develop branch, you may face some conflict issues. The conflict occurs if there are changes on the same line in the same file.

For example, if you changed the app title in develop branch and also in your FlutterFlow project then you will face a conflict issue and will see the following message in Github.

Here is how you resolve the conflicts:

  1. Click on the Resolve conflicts button. This will open a new page in the same browser window.

  2. Click on the file from the left menu.

  3. Scroll down to find the highlighted section which indicates the conflict.

  4. Determine which change you would like to keep and remove the other change. Make sure you don't keep any of these symbol <<<<<<<, =======, >>>>>>>.

  1. Click on Mark as resolved and then Commit merge.

  2. Click on Merge Pull Request and then Confirm Merge.

If Github is unable to resolve your conflicts, it's advisable to use an IDE.

7. Test Develop Branch

Once your FlutterFlow code is merged into develop branch. You can now test the code.

Test on Local Device

To test on the local device:

  1. Get the latest code from Github's develop branch into your local develop branch using the git pull origin develop command.

  2. Run the code on your local device.

Here are the instructions for setting up your machine to test code locally.

8. Merge Develop Into Main Branch

Once you have fully tested your app with custom code, you can merge the develop branch into the main branch using the following instructions:

  1. Go to Github and open your repository.

  2. Select the Pull Requests tab.

  3. Click on the New Pull Request button at the top right side of your screen.

  4. Set the base branch to main and compare branch to develop.

  5. Click on Create Pull Request. You will notice the changes at this point.

  6. Enter the suitable comment and click on Create Pull Request again.

  7. Click on Merge Pull Request and then Confirm Merge.

9. Deploy From The Main Branch

Your code to deploy is residing under the main branch in Github. Use the Deployment Source under the Deployment feature of FluterFlow to release your app from the main branch.

To deploy from the main branch:

  1. From FlutterFlow, navigate to Settings & Integrations --> Deployment.

  2. Find the Deployment Settings section and click on the arrow icon on the right to open it.

  3. Under the Deployment Source, checkmark the Use Github repo: 'your repo URL'.

  4. Enter the Branch Name as main.

Last updated