JWT Token Authentication
JWT token sign-in allows you to log in and use the Firebase services such as Firebase Database and push notifications using the account created on your own server/backend.
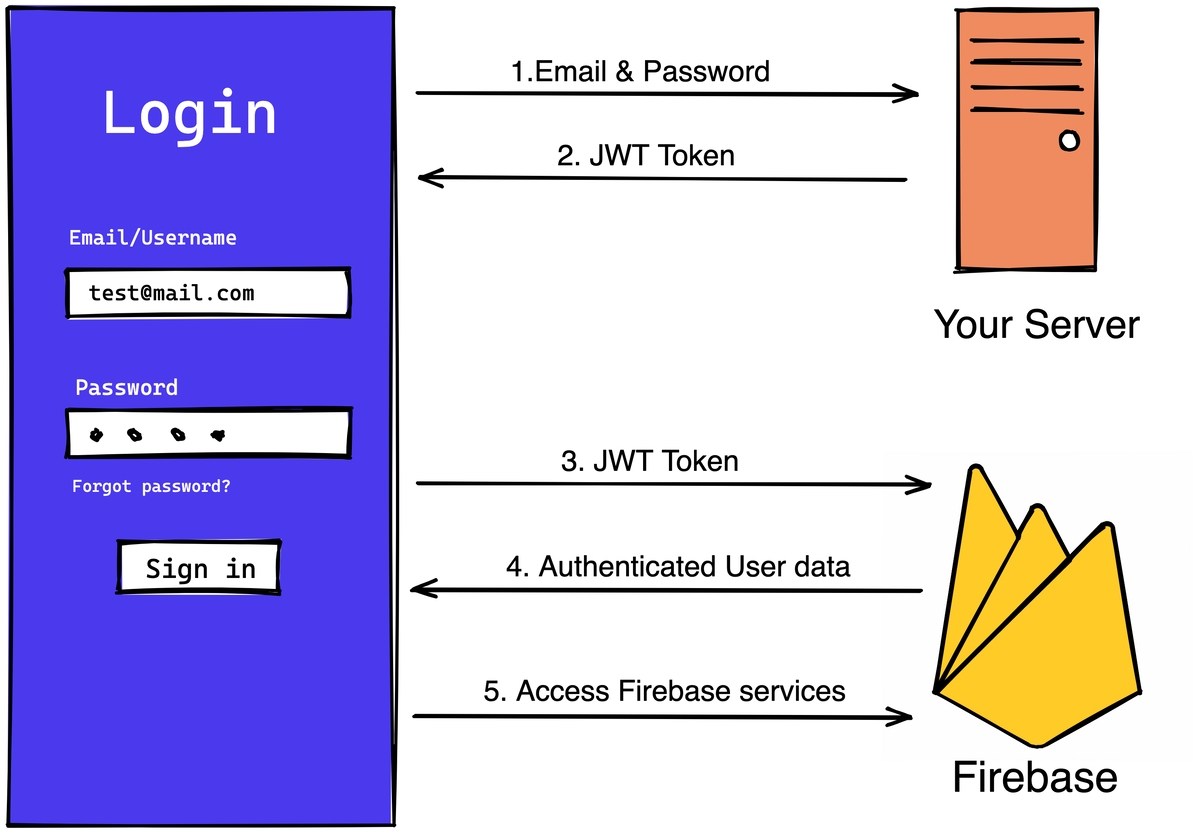
In JWT token authentication, you send login credentials, like email and password, to your server through an API endpoint. The server then creates a user account, generates a custom JWT token, and returns it to your app. This JWT token allows you to log in to Firebase and access its services.
You can learn more about Firebase and JWT tokens here.
Adding JWT token authentication
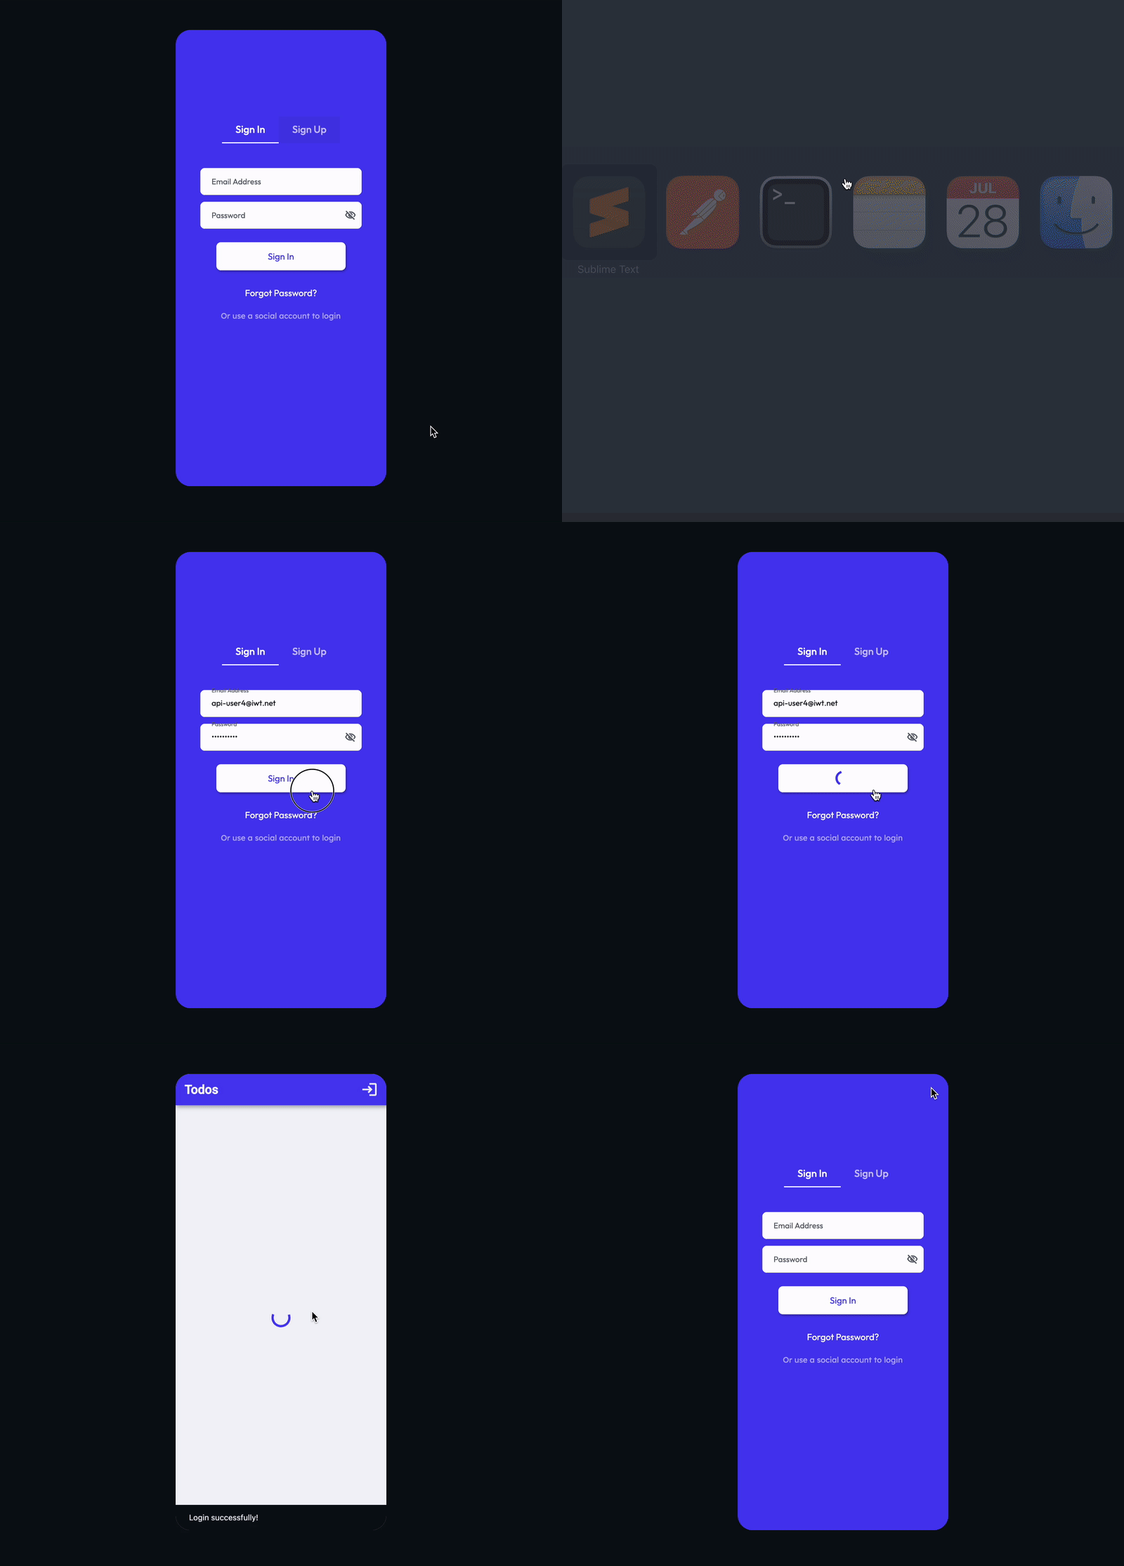
Let's build an example that uses a JWT token to log into the app. Here's how it looks when completed:
Before getting started with this section:
- Complete Firebase Setup.
- Complete Initial setup required for authentication.
Adding JWT token authentication comprises the following steps:
1. Add login API
You must create an API endpoint on your server that accepts email/username and password. If the credentials are valid, it generates the JWT token and passes it back in response.
At your server, you can generate the JWT token either using the Firebase Admin SDK or a third-party JWT library. You can find the detailed instructions here.
Alternatively, you can integrate Supabase authentication into your app and use the JWT token generated after account creation.
The API endpoint should be similar to the following (Tip: Expand and see the '200 OK' section):
Login API to be created on your server
POST /login
Request Body
| Name | Type | Description |
|---|---|---|
| email* | String | |
| password* | String |
200: OK
{
    "user": {
        "id": 1,
        "role_id": 1,
        "name": "james",
        "email": "james@yopmail.com"
    },
    "token_type": "Bearer",
    "expires_in": 3600,
    "jwt_token": "eyJraWQiOiItSE5TUmtwMWdXcG9QcC1wWVBmU1U4UW1fdng4Q0VwdzRSdTZTQU9WLThRIiwiYWxnIjoiUlMyNTYifQ.eyJ2ZXIiOjEsImp0aSI6IkFULi1PaG5EdWREUG9qWklsZjMtVDRVWHlTWW5ERElHQ3dYTUdQcXk1c1JUbjAub2FydGh3ZmxpbzhZOVZJbHc0eDYiLCJpc3MiOiJodHRwczovL2Rldi00NTc5MzEub2t0YS5jb20vb2F1dGgyL2F1c2hkNGM5NVF0RkhzZld0NHg2IiwiYXVkIjoiYXBpIiwiaWF0IjoxNjU5MDAyOTQ5LCJleHAiOjE2NTkwMDY1NDksImNpZCI6IjBvYWhkaGprdXRhR2NJSzJNNHg2IiwidWlkIjoiMDB1aGVuaDFwVkRNZzJ1ZXg0eDYiLCJzY3AiOlsib2ZmbGluZV9hY2Nlc3MiXSwiYXV0aF90aW1lIjoxNjU5MDAyOTQ5LCJzdWIiOiJhcGktdXNlcjRAaXd0Lm5ldCJ9.g2TyTQECo-HCSjn58Fmazki8DBCtCq2hkG6OGQOJgr0JUq3uHgj8ulojoBI5ckv3e3TcVGFg1x9KknSwgiZo0LxRpbAdbF27hfF8truExjEv7hGKoV_oAOaiD56be5K-HjYkp6j-b5S6gXe4N10T1NtovLI7L6MZvmqCL_26qzXni5hNkCjgRm8Rd6GnJwbjDLpV3snp51bVNYNqhoAhOPBqjmOErFQvO2Wmfkj8DuVXzsvRqm_xfb8-7Oosx5oGVMVR3liXW5NZsRWes4TXXwsEou3qCyVy5fAhzm7rKjIk1zWv9vm0IOWMFwHHYTgEc_LTYWMovWtkuBx4ia546Q",
    "refresh_token": "dlIOQHHAmweyOrVkDlpNYpi1XM-DwX5Cgx70LoKIbTI"
}
In most cases, you would make the app content available right after creating a new account. Hence, you should also generate and return the JWT token on the success of create account API and use it to login into the Firebase.
If you want to try the JWT token authentication without creating an API endpoint right now, you can generate the JWT token locally for testing.
2. Adding login page
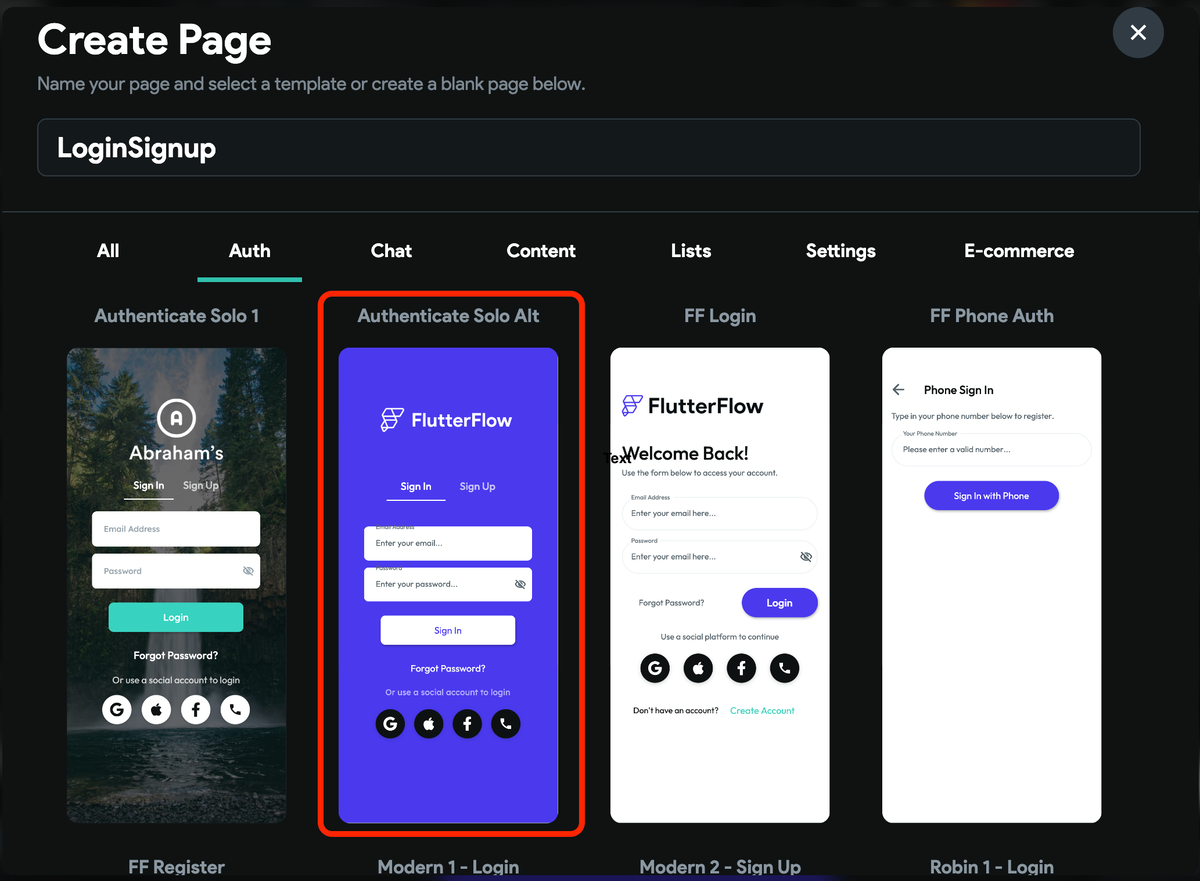
Let's add a sign-in page from the templates and choose the Authenticate Solo Alt from under the Auth tab. Tip: After adding, remove the other social sign-in buttons.
3. Add login action
The login process involves two steps. First, you trigger an API call to your server. Upon successful call completion, you'll use the returned JWT token in the JWT Token action.
Here are the step by step instructions:
-
Select the Widget (e.g., Sign In) on which you want to define the action.
-
Select Actions from the Properties Panel (the right menu), and click Open. This will open an Action Flow Editor in a new popup window.
-
Add the login api and provide the Action Output Variable Name. If the call succeeds, this will be used to retrieve the token.
-
Inside the TRUE section, click on the + button and select Add Action.
-
On the right side, search and select the Log in (under Firebase Authentication) action.
-
Set the Auth Provider to JWT token.
-
Now, you must provide the actual JWT token. To set the token from an API response:
- Click on the UNSET and select the Action Outputs -> Action Output Variable Name (that you specified in the API call section.)
- Set the API Response Options to JSON Body and Available Options to JSON Path.
- Enter the JSON Path to locate the token in API response, such as
$.token,and click Confirm.
-
(Optional) add the snackbar action to display the success message.
-
(Optional) Inside the False section, add the snackbar action to display the failure message.
4. Adding logout action
To let users log out of your app, you can use the Logout action.
5. Verify user creation
To confirm the successful integration and the creation of users, navigate to your Firebase project > Authentication > Users and check the user entries. Tip: Notice the 'userid' (originally created by your server) is added inside the User UID column.
Create a JWT token locally
Sometimes you might want to build and test the JWT authentication before the login or create account API is ready. You can achieve this by creating the JWT token locally and passing it inside the login action.
Use this method only for testing purposes. Ideally, you should be doing this on the server side.
Below are steps to create a JWT token locally using Node.js:
-
In the Firebase dashboard of your project, navigate to the far left menu. Select Project Settings( ) -> Service accounts.
-
Select Generate new private key. This will open a new popup. Again, click Generate key and save the
.jsonfile in some folder. You will need it while generating the token. -
Now, download and Install node.js.
-
Open a terminal at the folder where you have saved the
.jsonfile and enter this command:npm install firebase-admin. This will install Firebase Admin SDK inside the folder. -
In the same folder, create an
index.jsfile and add the below content.
const admin = require('firebase-admin');
const ServiceAccount = require('./[YOUR_SERVICE_ACCOUNT_JSON_FILE_NAME].json');
admin.initializeApp({
	credential: admin.credential.cert(ServiceAccount)
});

const uid= 'userid1'; // This user id will be stored in Firebase.

admin.auth().createCustomToken(uid)
  .then((customToken) => {
    console.log(customToken);
  })
  .catch((error) => {
    console.log('Error creating custom token:', error);
  });
-
To run this
index.jsfile inside the terminal (at the same location where this file is located), hit this command:node index.js. This will print the JWT token in the console. -
Copy this JWT token, return to FlutterFlow, and save it in the app state variable (String Datatype).
-
Open the JWT token action, click on UNSET (or a variable if you have already set it), and select the App State -> variableName (that holds the JWT token).
Accessing Firebase Database
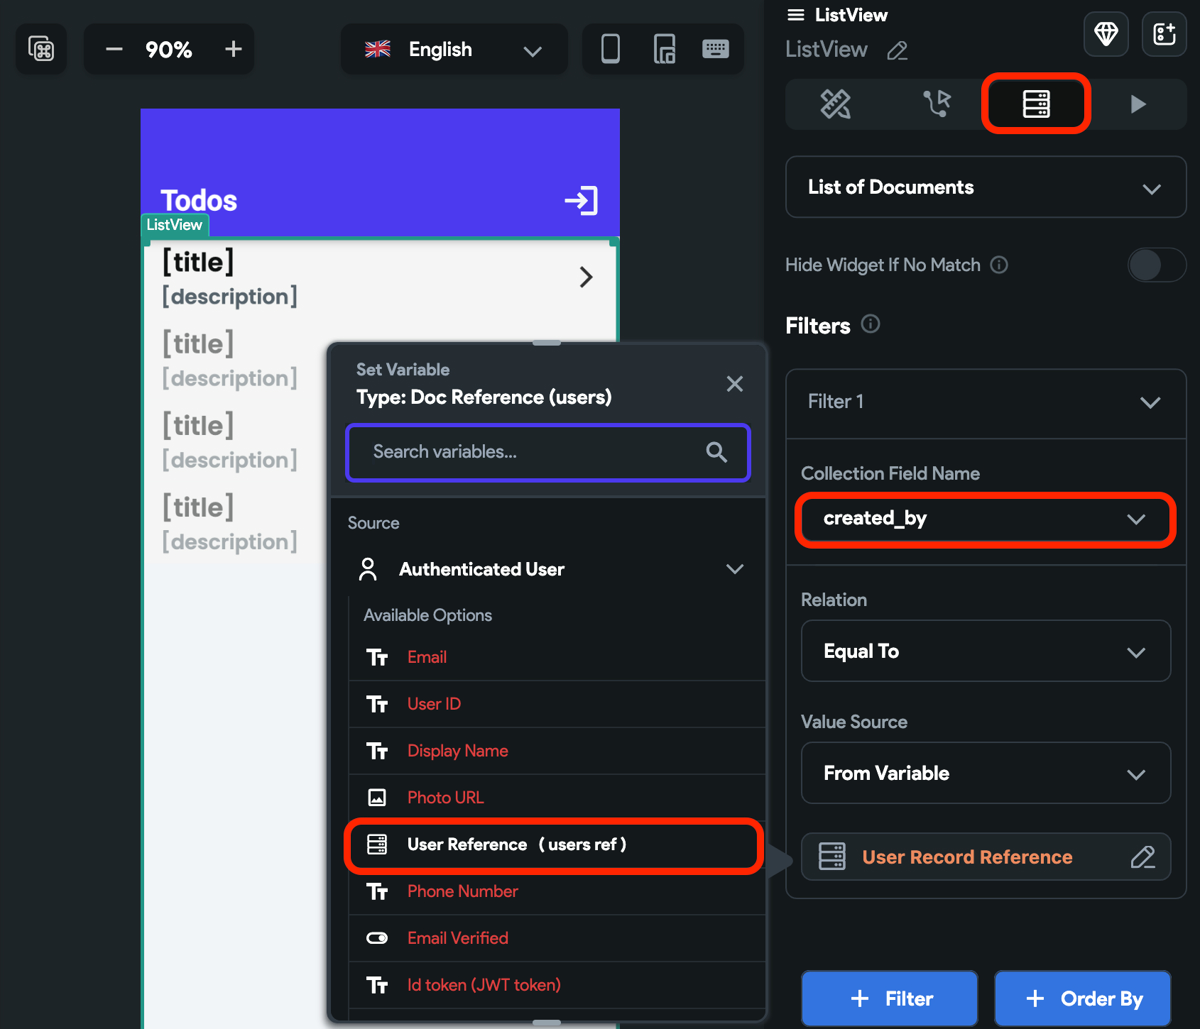
Once you log in via the JWT token, the Authenticated User object is available. This object contains the fields (i.e., logged-in user's data), especially User Reference (users ref), that you may need to provide while adding or retrieving Firestore documents.
Here's an example of how you can use the Authenticated User object to filter the to-do items based on the user who created it.
Sending push notifications
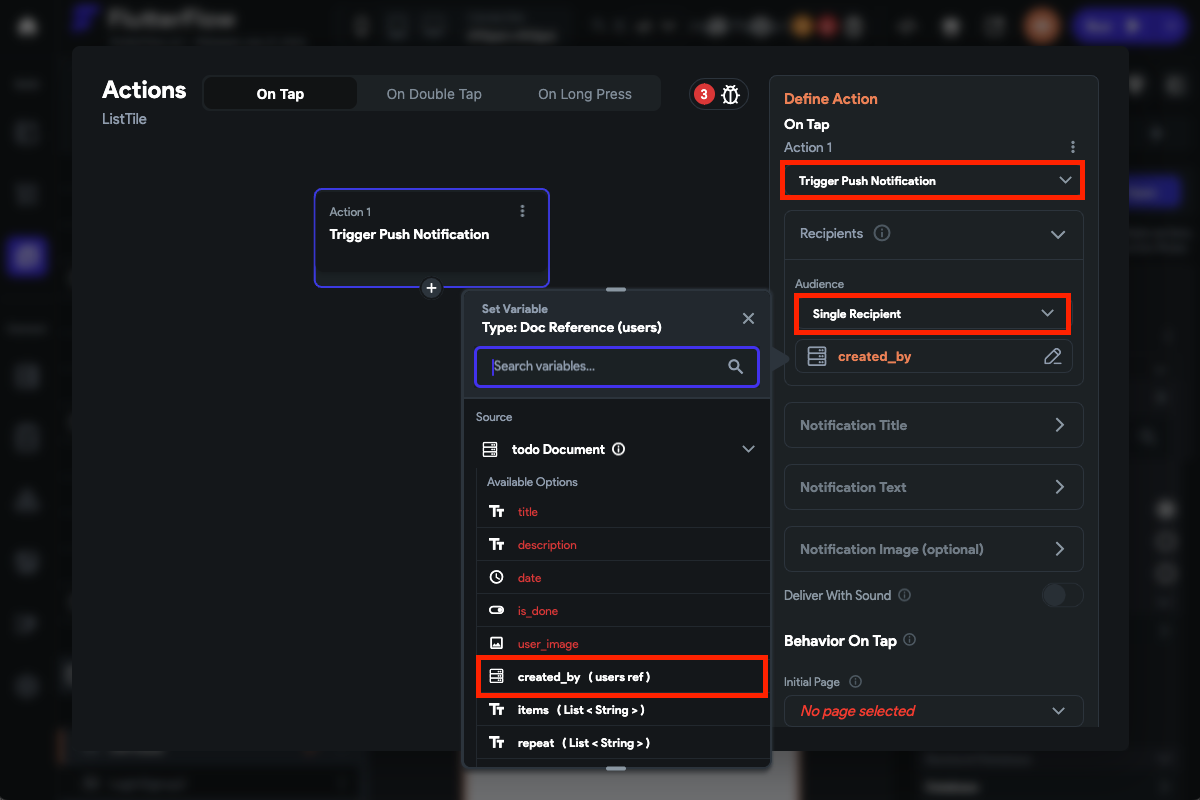
Once you log in via the JWT token, the Authenticated User object is available. This object contains the fields (i.e., logged-in user's data), especially User Reference (users ref), that you may need to provide while adding or retrieving Firestore documents.
When such user reference is stored inside the Firestore documents, you can use them inside the Single or Multiple Recipient while defining the Audience inside the Trigger Push Notification action, as shown in the image below:
To learn more about how to use user references for sending push notifications, please check the push notification section.