Introduction to Pages
In FlutterFlow, a Page represents a single screen in your app. Under-the-hood pages use a Scaffold, a foundational widget from Flutter that provides a structured layout for a screen within your app. The Scaffold offers essential elements like the AppBar and Body, allowing you to easily build screens.
Pages are composed of various UI elements, or widgets. Widgets are added to a page when they are added to the page's Widget Tree.
The Widget Tree is a structural representation of how widgets are organized within a Page. To learn more, check out the Widget Overview documentation.
In FlutterFlow, pages are automatically configured to handle routing. Additionally, pages can have input parameters and state variables.
For more details on how to use Scaffold and the various Page Elements in FlutterFlow, see the dedicated Page Elements guide.
Creating a Page
In FlutterFlow, you can seamlessly craft a page tailored to your needs and design preferences. Whether you're starting from scratch, using a template, or leveraging AI tools, there are several pathways to achieve the desired functionality and aesthetic of your desired Page.
When you create a page in FlutterFlow, a Widget class and a corresponding Model class are automatically generated. You can view these in the Code Viewer. To explore the details of the generated Model class, take a closer look at the code.
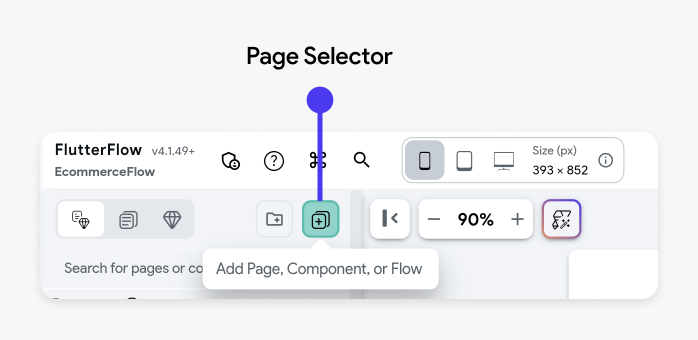
FlutterFlow allows you to easily create new pages using the Add Page, Component, or Flow button, which is available from the Page Selector tab in the Navigation Menu. This will help you quickly start and add new pages to your app.

Create an Empty Page
When creating your page in FlutterFlow, one option is to start with an empty page, providing you with a blank canvas. This approach allows you to build your UI from the ground up by composing widgets and components together according to your specific design vision and functional requirements.
To create an empty FlutterFlow Page from scratch, follow the steps:
Create a Page from a Popular Template
FlutterFlow simplifies the process of page creation by offering a variety of popular template use cases. These templates provide a basic structure for your pages, which you can quickly customize with your own styling, widgets, and text.
To utilize a template from FlutterFlow, follow these steps:
Create an AI Generated Page
You can quickly create a page using FlutterFlow AI by describing what you want in natural language. The AI uses your description or visual reference, along with your project context, to build the page with relevant widgets. This is especially helpful when you're starting from scratch or prototyping ideas rapidly.
To create and add an AI-generated page, open the Widget Tree, click Generate with AI (magic wand) button, and select the Page tab. Next, describe the page you want to build, and hit the Send (up arrow) button.
FlutterFlow will process your request and display progress in the AI Generation History panel in the toolbar. Once the page is ready, you can preview it in both light and dark themes and apply various color schemes. If you're happy with the result, give it a name and add it to your project.
- You can also upload a screenshot or image of the page you want to build. FlutterFlow AI will use it as a reference to generate the layout.
- While the AI is generating your page, you can continue working on other tasks within FlutterFlow, but make sure you don’t close the FlutterFlow app.
Import from Figma Frame
You can also quickly turn your Figma designs into functional pages in FlutterFlow. By providing a Figma Frame URL, FlutterFlow AI will analyze the design and automatically generate UI layouts that closely match your mockup.
To import from a Figma Frame, first, connect your Figma account, import the Figma theme, and map your colors and typography accordingly. Next, open the Generate with AI dialog and click the Plus (+) button. Select Import from Figma, enter your Figma frame URL, and press Send.
A preview of the frame you are importing will appear. To finalize the import, click Send again. Once completed, the page will appear in the AI Generation History, where you can preview and add it to your project.
Currently, we don't support importing SVG elements from Figma frames. However, you can manually add the SVGs directly to your project assets after generation is complete, or replace them in Figma with supported image formats like PNG or JPEG.