Expandable

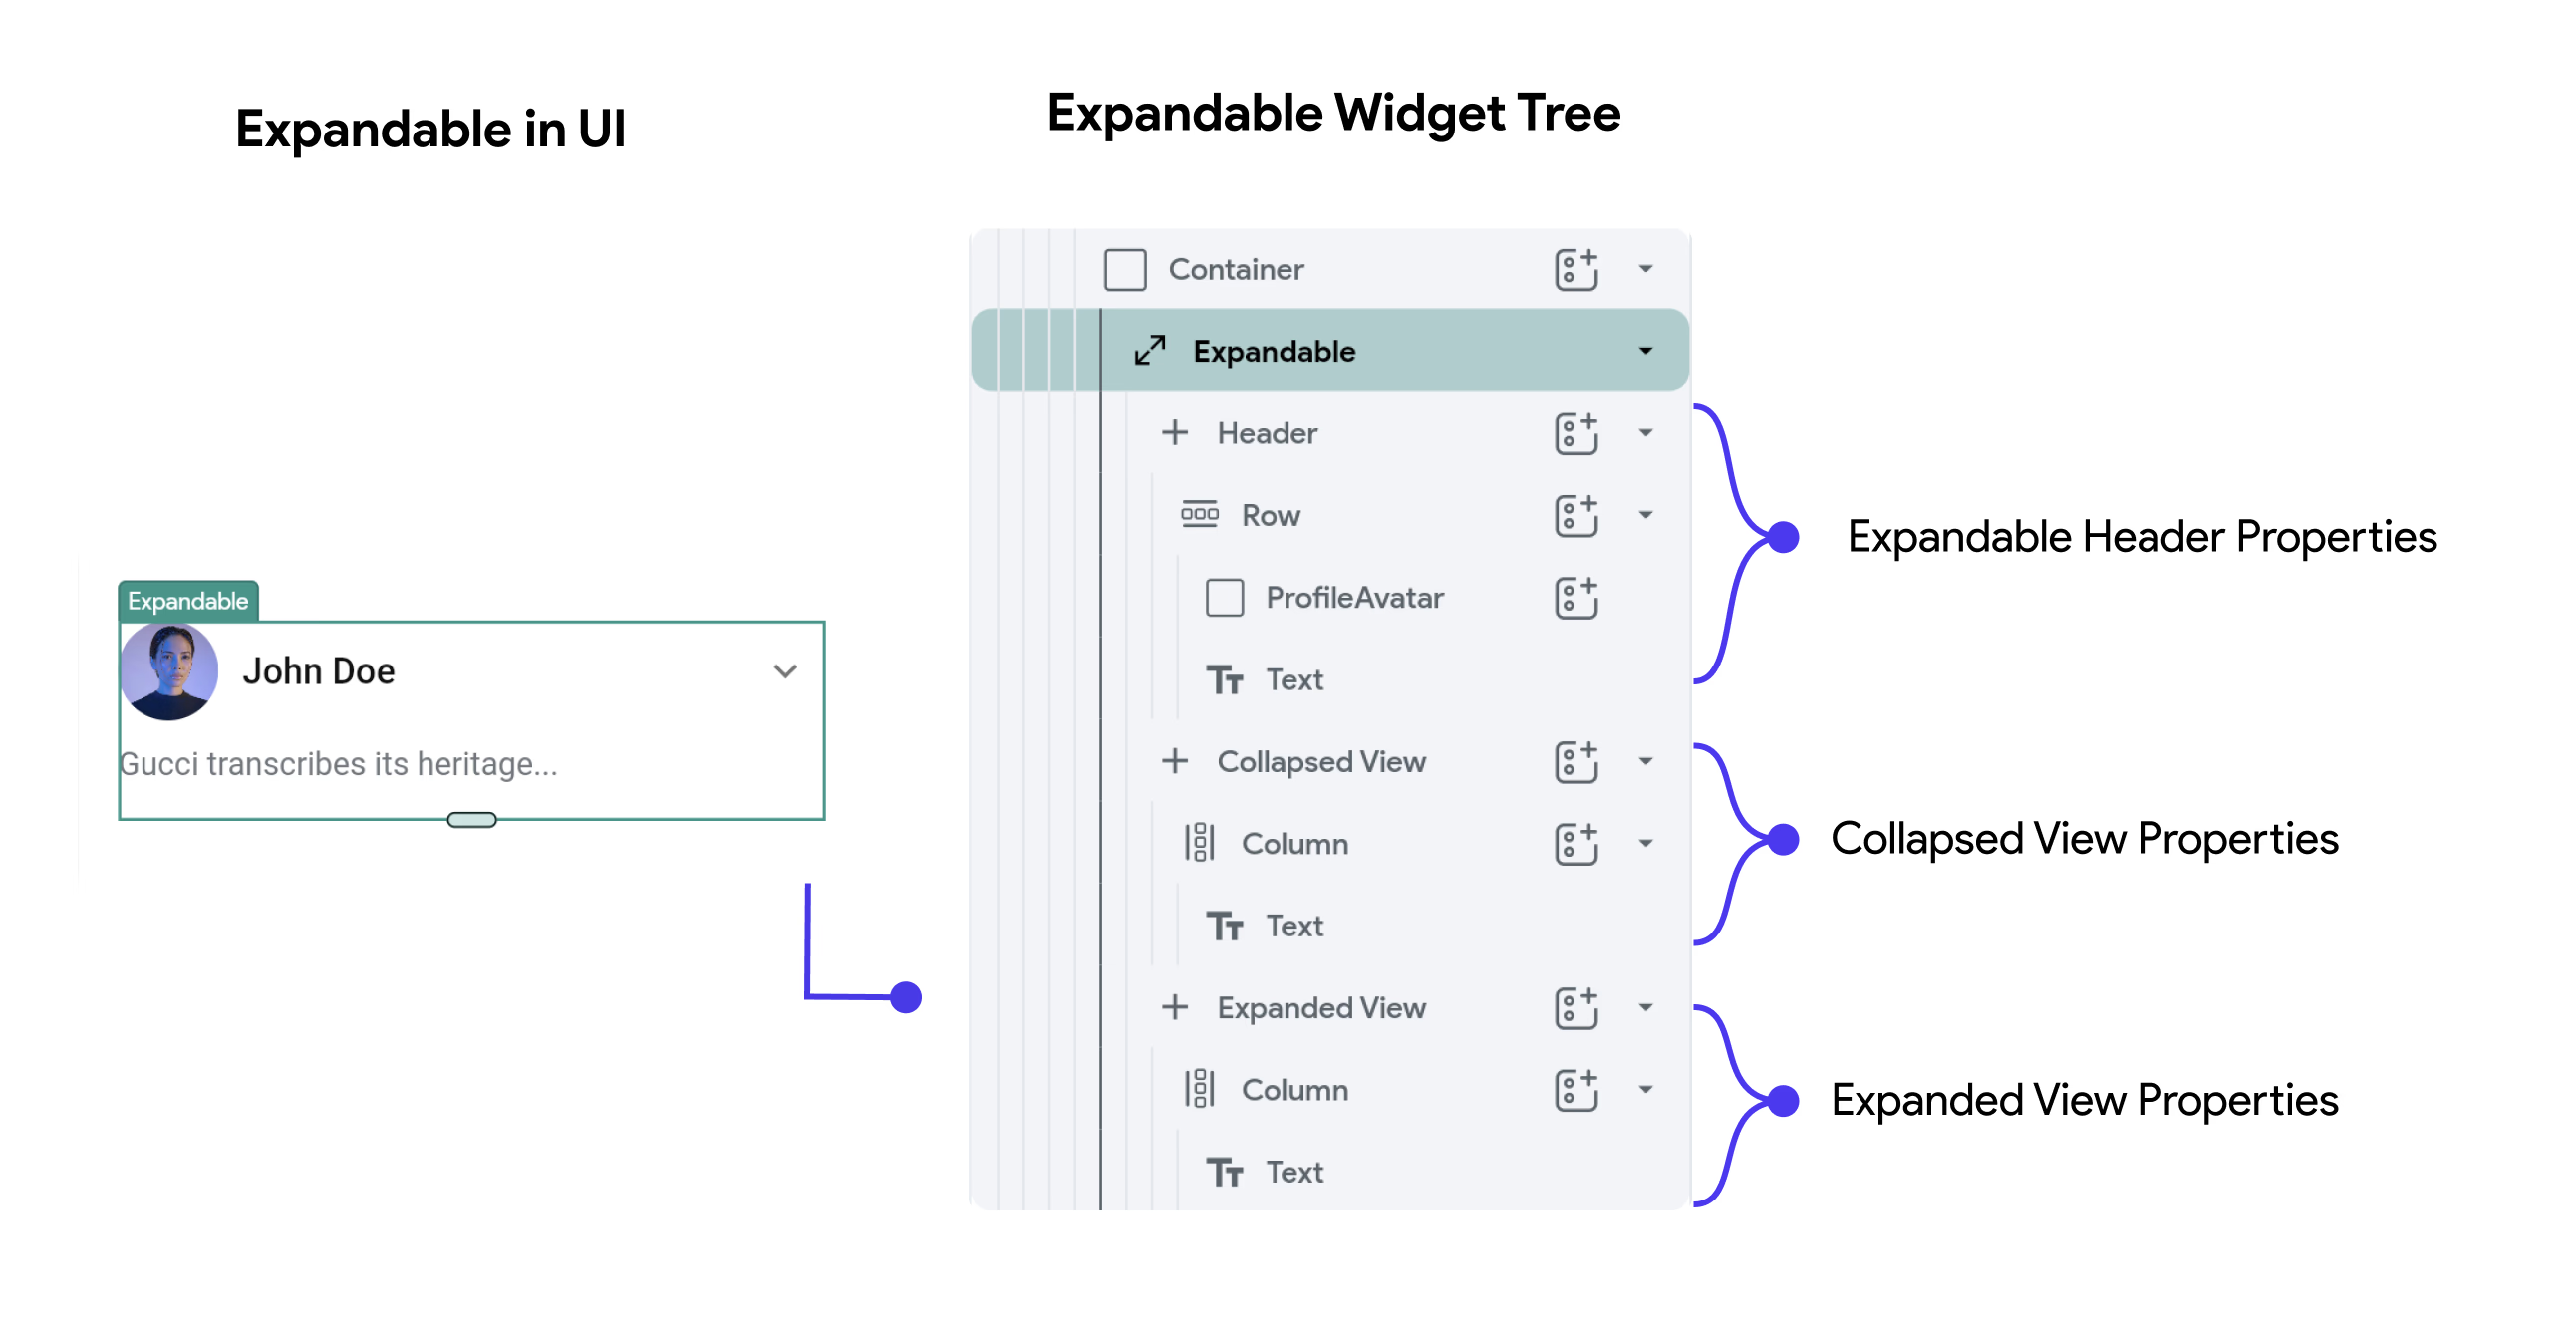
The Expandable widget expands or collapses to reveal or hide the item details. It consists of Header, Collapsed View, Expanded View. The Expandable widget is typically used to populate a ListView to create the 'expand/collapse' item entry.

For example, you can use the Expandable to show a list of book chapters or a list of hotels that shows minimum details at first and reveals more information when expanded.

Add Expandable to Your Project

Here's an example of how you can use an Expandable widget in your project:

  1. First, drag the ListView widget from the Layout Elements tab (in the Widget Panel) or add it directly from the widget tree.

  2. Drag the Expandable widget from the Layout Elements tab and drop it inside the ListView.

  3. If you see the Container widget wrapped around the Expandable widget, select it and remove its height.

  4. Under the Header, select the Text widget and set its text to Chapter 1.

  5. Under the Collapsed View -> Container, select the Text widget and set its text to 2 Sections.

  6. Under the Expanded View -> Column, select the Text widget and change its text the Section 1.

  7. Under the Expanded View -> Column, add a few more Text widgets.

  8. Under the Expanded View -> Column, bring the image to the top and make it a first child of the Column.

When you add the Expandable widget, The Header, Collapsed View, and Expanded View are filled with some dummy data.

At this point, you have one item added to the list. To fill the ListView with more items simply copy-paste the Expandable widget.

To copy-paste the Expandable widget:

  1. Select the Container wrapped around an Expandable widget.

  2. Right-click on it and select Copy. You can also use the keyboard shortcut Ctrl+C or Command+C.

  3. Select the ListView widget.

  4. Right-click on it and select Paste. You can also use the keyboard shortcut Ctrl+V or Command+V.

  5. Edit the new entries.

After adding a number of items, the list created using Expandable looks like this:

Trigger action on expand or collapse

Let's see how to trigger an action when the widget is expanded or collapsed. This is helpful when you want to load content only when the widget is expanded to optimize performance and reduce initial loading times.

To do so:

  1. Select Expandable widget, select Actions from the properties panel (the right menu), and click + Add Action.

  2. You will notice that the Type of Action (aka callback) is already set to On Toggle. That means actions added under this will be called whenever the widget is either expanded or collapsed.

  3. You can check if the current widget is expanded or collapsed using the Set from Variable menu > Widget State > [Expandable widget name] is expanded property.

  4. From here onwards, you can add any action.

Here is an example of displaying the snackbar message only when the widget is expanded.

Showing Firestore Data

To show the data retrieved from your Firestore collection and document into the widget, ensure you:

  1. Completed all steps in the Firebase Setup section for your project.

  2. Retrieved Data from either collection or document.

  3. Finally, to show data into the Expandable widget, follow the steps here.

Customizing

You can customize the appearance and behavior of this widget using the various properties available under the properties panel.

Toggle Expanded/Collapsed View in Editor

Changing the Expanded/Collapsed view helps you edit/design each type of view in the editor.

To toggle the Expanded/Collapsed view in the editor:

  1. Select the Expandable from the widget tree or from the canvas area.

  2. Move to the Property Editor (on the right side of your screen) and scroll down to the Expandable Properties section.

  3. Find the Active View property, change it to Collapsed or Expanded.

You can also see the Collapsed/Expanded view in the editor by selecting it from the widget tree on the left.

Showing Item as Expanded

Sometimes you may want to show the item as expanded prior to the user interaction. This can help users know about the expand/collapse interaction. You can do so by using the Initially Expanded property.

To make the item show expanded view initially:

  1. Select any Expandable from the widget tree or from the canvas area.

  2. Move to the Property Editor and scroll down to the Interaction Properties section.

  3. Checkmark the Initially Expanded property. (Click on it)

Disable Tap on Header

Sometimes you may want to allow users to toggle the expand/collapse view only when they click on the arrow icon.

To disable tap on header:

  1. Select any Expandable from the widget tree or from the canvas area.

  2. Move to the Property Editor and scroll down to the Interaction Properties section.

  3. Uncheck the Tap Header to Toggle. (Click on it)

Show Expanded View on Body Tap

When the item is collapsed, the expanded view opens when you tap either on the header or arrow icon. However, you can also open the expanded view on the tap of the body i.e collapsed view.

To show expanded view on tap of the body:

  1. Select any Expandable from the widget tree or from the canvas area.

  2. Move to the Property Editor and scroll down to the Interaction Properties section.

  3. Checkmark the Tap Body to Expand. (Click on it)

Show Collapsed View on Body Tap

When the item is expanded, the collapsed view opens when you tap either on the header or arrow icon. However, you can also open the collapsed view on tap of the body i.e expanded view.

To show collapsed view on tap of the body:

  1. Select any Expandable from the widget tree or from the canvas area.

  2. Move to the Property Editor and scroll down to the Interaction Properties section.

  3. Checkmark the Tap Body to Collapse. (Click on it)

Changing Header Background Color

To change the background color of the Expandable header:

  1. Select any Expandable from the widget tree or from the canvas area.

  2. Move to the Property Editor and scroll down to the Style Properties section.

  3. Find the Background Color property, click on the box next to Unset, select the color, and then click Use Selected Color or click on Unset and enter a Hex Code directly. You can also choose the color by clicking on the Palette and Simple button.

Aligning Header

To align the header text in a vertical direction:

  1. Select any Expandable from the widget tree or from the canvas area.

  2. Move to the Property Editor and scroll down to the Style Properties section.

  3. Find the Header Alignment dropdown and select from the options that include Top, Center, Bottom.

Changing The Size

To change the size of the Expandable widget:

  1. Select any Expandable from the widget tree or from the canvas area.

  2. Move to the Property Editor and scroll down to the Style Properties section.

  3. Find the Width and Height property.

  4. There are three ways to set dimensions:

    1. To set to an exact size, select PX and enter the desired values.

    2. To set the dimensions as a % of the screen size, select % and enter the desired value.

Keeping the height property empty will adjust the height as per the content inside the expanded view.

Hiding Arrow Icon

In a very rare case, you may want to hide the arrow icon (which is used to control the expand/collapse behavior).

To hide the arrow icon:

  1. Select any Expandable from the widget tree or from the canvas area.

  2. Move to the Property Editor and scroll down to the Icon Properties section.

  3. Uncheck the Has Icon property. (Click on it)

If you decide to hide the arrow icon, make sure you keep the Tap Header to Toggle property enabled. Otherwise, you won't be able to open the expanded view.

Changing Collapsed Icon

The Collapsed icon is the icon that is shown when the collapsed view is visible.

To change the collapsed icon:

  1. Select any Expandable from the widget tree or from the canvas area.

  2. Move to the Property Editor and scroll down to the Icon Properties section.

  3. Find the Collapsed Icon property, click on the None button then search and select the icon name from the image picker popup.

Changing Expanded Icon

The Expanded icon is the icon that is shown when the expanded view is visible.

To change the expanded icon:

  1. Select any Expandable from the widget tree or from the canvas area.

  2. Move to the Property Editor and scroll down to the Icon Properties section.

  3. Find the Expanded Icon property, click on the None button then search and select the icon name from the image picker popup.

Changing Icon Size and Color

To change the Icon size and color, please find the instructions here.

Adding Icon Padding

To add some space around the icon:

  1. Select any Expandable from the widget tree or from the canvas area.

  2. Move to the Property Editor and scroll down to the Icon Properties section.

  3. Find the Icon Padding property and enter the desired value.

Set color dynamically

See how to set a color from variable to any property of this widget.

Common widget properties

See how to work with Widget Styling, Visibility, Padding & Alignment, and Testing.

Last updated