Deep & Dynamic Linking
On August 25th, 2025, Firebase Dynamic Links will be shut down. Read more about the announcement here. It's recommended to start exploring alternative solutions like Branch.io for link management and deep linking.
Adding deep and dynamic linking allows you to share a special type of link that takes the user right inside the specific page of your app. You can also send the custom data with a link to load the page content based on the data.
For example, you could share an interesting social media post with your friends, and they can directly access its content without manually searching the post inside the app. It just works like any website link would work.
The figure below illustrates how it works:
When you click on the link, first, it checks if the app is installed. If not, the link opens the Playstore or Appstore (based on your device) to install the app. After installing, if the page requires authentication, you'll see a login page. After successful login, you can access the content shared with you.
The best thing to note here is that even if the app has a different flow for accessing the page content (e.g., Home Page -> All Posts -> Single Post), you can bypass the flow and directly open a specific page (e.g., Single Post).
Deep Link
The deep link allows you to create a URL that will open a specific page in your app. For the deep links to work, you must have the app installed on your device.
URL Scheme (structure)
The deep link consists of three parts. It begins with the scheme followed by the host and page name,
such as designersapp://designersapp.com/profile.
If the page name is not provided (i.e. designersapp://mydesignersapp.com/)It will open the app's
landing page.
Adding Deep Link
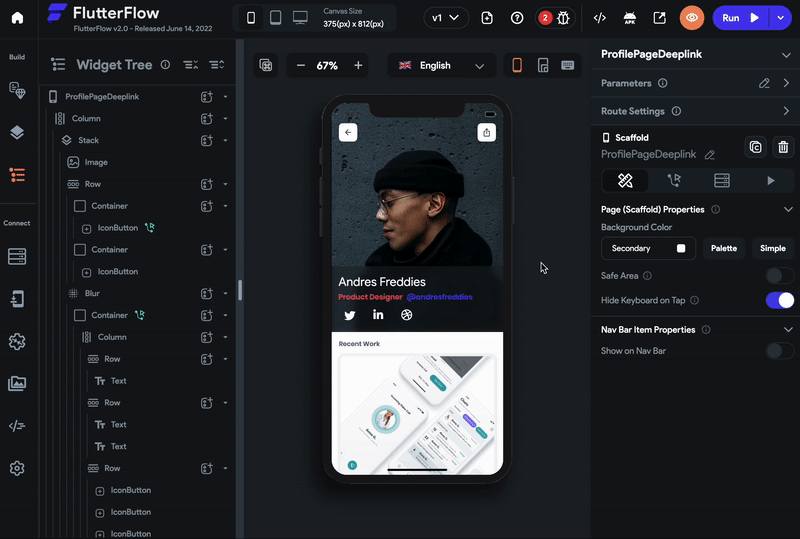
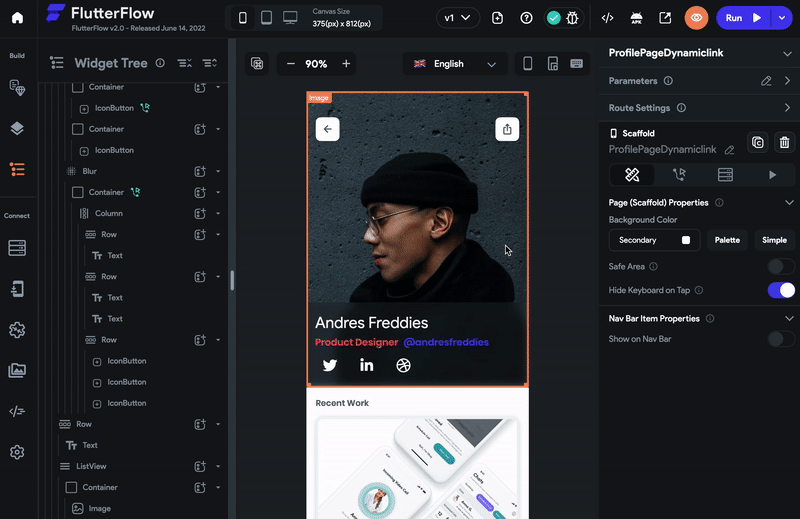
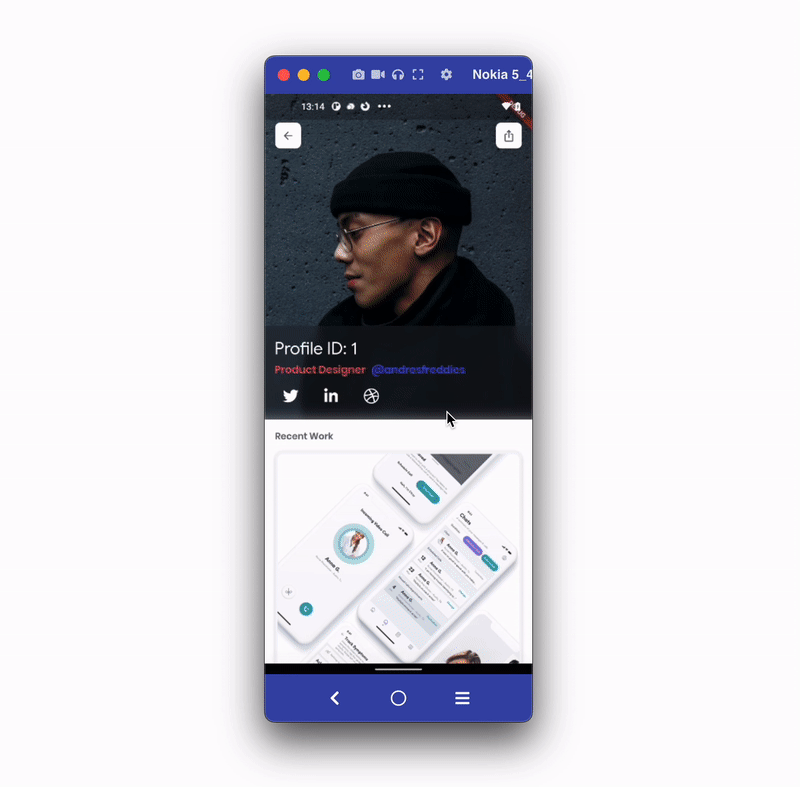
Let's build an example of sharing and opening a profile page using the deep link. The example looks like the below:
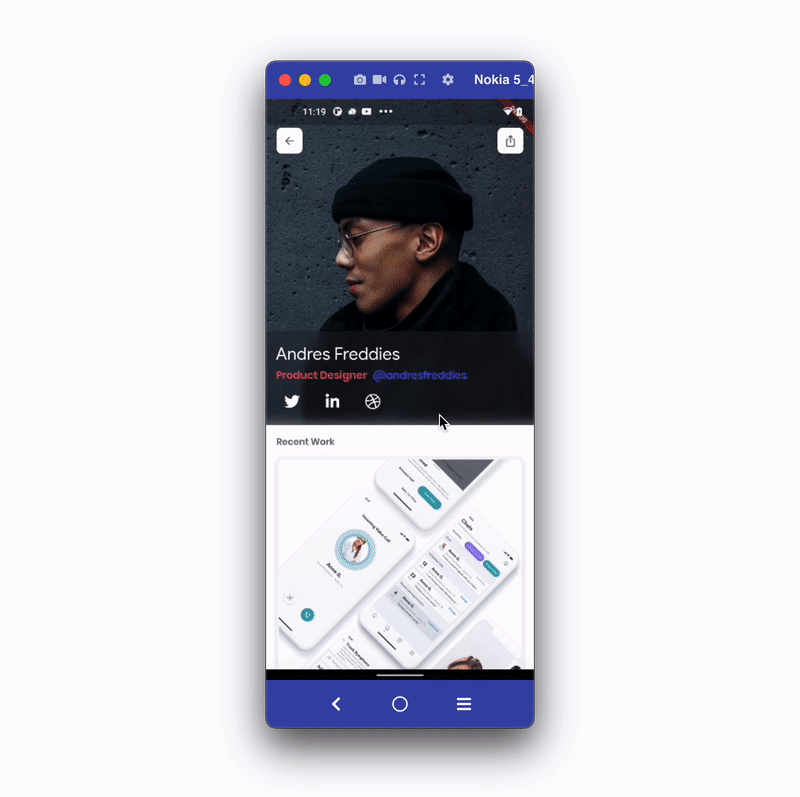
The steps to add the deep link are as follows:
1. Set URL scheme
In this step, You will set the URL scheme. To do that:
-
Navigate to Settings & Integrations > General > App Details.
-
If you want to add deep linking on multiple pages and all of them require users to log in, turn on the Pages Requires Authentication by Default.
-
In URL scheme fields, by default we add the values based on your project name. To change it, enter the scheme name (before "://") and hostname (after "://").
-
If you want users to navigate back to the home page instead of closing the app when they press the back button from a deep link page, enable the Pages Are Subroutes of Root Page option.
We recommend enabling this option to increase user engagement with your app.
2. Setting page URL
The page URL points to the specific page in your app, which is used on the Web and for deep linking on mobile.
To set the page URL:
-
Select the page that you would like to open via a deep link.
-
Move the properties panel on the right and open the Route Settings section.
-
By default, the Route is the current page name. Edit this if you want a different name in the page URL.
-
By default, the page does not require authentication when it opens via the deep link. However, checkmark the Requires Authentication if your app works only after login.
3. Sharing deep link
You can share the deep link of the current page by adding the share action.
To share the deep link of the current page:
-
Select the page that you would like to open via a deep link.
-
From that page, select any widget (e.g. share button) from the widget tree or the canvas area.
-
Select Actions from the Properties Panel (the right menu), and click Open. This will open an Action flow Editor in a new popup window.
- Click on the + Add Action.
- On the right side, search and select the Share action.
- Set the Value Source to From Variable.
- Set the Source to Global Properties.
- Set the Available Options to Link To Current Page and click Close.

4. Testing deep link
Deep links can not be tested in Run Mode. Instead, you will need to test the deep links on a real device/emulator.
Before you test the deep link, you need to get it first. The easiest way to get it is to run the app on a device/emulator, click on the share button and then copy the deep link.
Now, you can test the deep link in two ways:
Using CLI tools
If you have Android Studio with the SDK platform tools installed, you can run the following command in the terminal and replace it with your deep link.
Copy
adb shell am start -a android.intent.action.VIEW \
    -c android.intent.category.BROWSABLE \
    -d "designersapp://designersapp.com/profile"
Using Firefox mobile browser
You can also test the deep link in a Firefox mobile browser. To do so, open the browser, paste the URL in the search bar, open the options menu and click on the Open in app.
Here is how you do it:
Dynamic Links with Firebase Dynamic Links [Deprecated]
The dynamic link opens a specific page in your app. Unlike the deep link, the dynamic link survives the app install. That means if the user has not installed the app, they can be taken to the respective store to install the app. After the app is installed, users can be taken straight to the intended app page.
For the dynamic link to work, you need to enable the deep link. You can think of a dynamic link as the additional benefit of the deep link.
FlutterFlow uses Firebase Dynamic Link (a product from Firebase) to create dynamic links.
Let’s walk through an example of sharing and opening a profile page using a dynamic link. The example will look like this:
The steps to add the dynamic link are as follows:
- Setting up a domain
- iOS setup
- Set URL scheme
- Setting page URL
- Sharing dynamic link
- Testing dynamic link
1. Setting up a domain
The dynamic link requires a domain name that will be used as the URL prefix in the link.
To set up the domain name, follow the steps below:
-
Open the Firebase console, and click on **Dynamic Link ** (on the left side menu).
-
Click on the Get Started button. This will open a popup.
-
Enter the domain name. If you don't own a domain, you can select the free Google Provided Domain that ends with a page.link. To set up your own domain, follow the guide here.
-
If you chose Google Provided Domain, you could Finish the setup.
 >
>
2. iOS setup
You must complete additional configuration for the dynamic link to work on the iOS devices.
Setting up iOS includes:
2.1 Add App Store and Team ID to the Firebase project
To add the App Store and Team ID to the Firebase project:
-
Open the Firebase console, and click on Project Overview (on the left side menu).
-
Select the iOS project and click on the Settings (gear) icon inside.
-
Scroll down to see your selected iOS project.
-
Find the App Store ID field, click on the edit icon (pencil icon), enter the ID, and click * Save*. To know where is your App Store ID, click on the question mark icon beside the label.
-
Similarly, find the Team ID field, click on the edit icon (pencil icon), enter the ID, and click Save. To know where is your Team ID, click on the question mark icon beside the label.

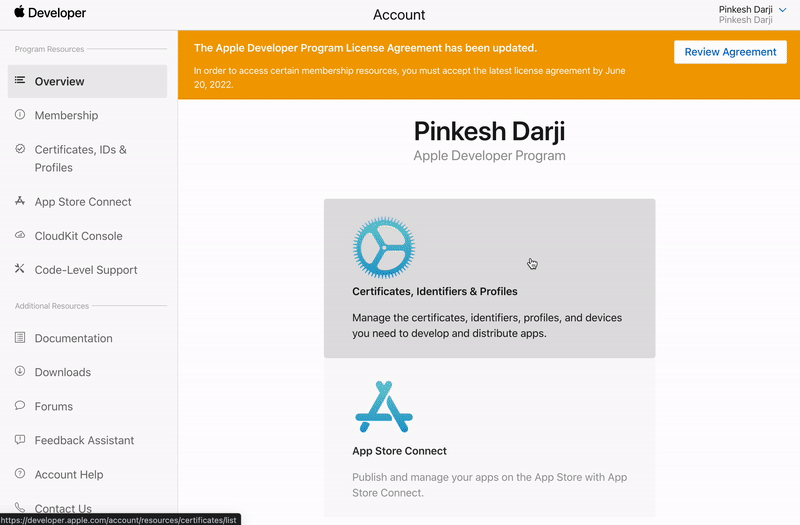
2.2 Adding Associated Domain capability to App Store
To add the Associated Domain capability on App Store:
-
Open the Apple Developer homepage and select * Certificates, IDs & Profiles*.
-
Select Identifiers (far left menu) and then click on your app identifier.
-
Checkmark the Associated Domains and click Save.
3. Set URL scheme
In this step, You will set the URL scheme. To do that:
-
Navigate to Settings & Integrations > General > App Details.
-
If you want to add deep linking on multiple pages and all of them require users to log in, turn on the Pages Requires Authentication by Default.
-
Also, turn on the Use Firebase Dynamic Links.
-
In URL scheme fields, by default, we add the values based on your project name. To change it, enter the scheme name (before
://) and hostname (after://). -
If you want users to navigate back to the home page instead of closing the app when they press the back button from a deep link page, enable the Pages Are Subroutes of Root Page option. * Tip*: we recommend enabling this option to increase user engagement with your app.
4. Setting page URL
The page URL points to the specific page in your app, which is used on the Web and for deep linking on mobile.
To set the page URL:
-
Select the page that you would like to open via a dynamic link.
-
Move the properties panel on the right and open the Route Settings section.
-
By default, the Route is the current page name. Edit this if you want a different name in the page URL.
-
By default, the page does not require authentication when it opens via the dynamic link. However, checkmark the Requires Authentication if your app works only after login.

5. Sharing dynamic link
You can share the dynamic link of the current page by adding the **Generate Current Page Link ** action and then sharing it using the Share Action.
To share the dynamic link of the page:
-
Select the page that you would like to open via a deep link.
-
Select any widget (e.g., share button) from the widget tree or the canvas area.
-
First, add the action to Generate Current Page Link.
-
Now chain the next action to share the dynamic link.
-
To do that, click on the + button at the bottom of the box and select Add Action.
-
On the right side, search and select the Share action.
-
Set the Value Source to From Variable.
-
Set the Source to Widget State.
-
Set the Available Options to the Current Page Link and click Close.
6. Testing dynamic link
Dynamic links can not be tested in Run Mode. Instead, you will need to test the links on a real device/emulator.
Before you test the dynamic link, you need to get it first. The easiest way is to run the app on a device/emulator. Click on the share button and then copy the dynamic link.
Now you can test the link in a Firefox mobile browser. To do so, open the browser and paste the URL into the search bar.
Here is how you do it:

Passing Data with a Link
In most cases, you might want to pass custom data with a link. For example, you send the product page link with a discount code and share the profile page with its profile ID. Passing custom data with the link can be used to retrieve the information required to display on the page.
To pass custom data with the link, you need to have the following:
- Make sure you have a parameter defined on a page you want to pass in a dynamic link.
- In the Route Settings, include a parameter as part of the route by prefixing it with a
colon (:) for example,
profilePage/:profileId.
That's all you need to pass custom data with a Deep Link or Dynamic Link.
Deep Links with Branch.io
Since Firebase Dynamic Links have been deprecated and can no longer be used for new Firebase projects, we can integrate a powerful alternative: Branch.io — a cross-platform solution for deep linking and deferred linking.
With Branch, we can support robust deep linking inside FlutterFlow apps without writing a backend from scratch.
Branch.io Configuration
Start by setting up your project in the Branch Dashboard. Once you’ve created a project:
1. Note down your Branch Key
Once you create a project, the first thing you’ll need to do is note down your Branch Key.
This key uniquely identifies your app and will be required later when setting up your FlutterFlow configuration.
2. Set up Redirect Links
In the Branch dashboard, you’ll find settings to define fallback URLs — these determine where users are sent if your app isn’t installed. Typically, you would redirect users to the App Store, Play Store, or a custom landing page.
Setting up redirects is important because it ensures that your links don't break and that users always have a seamless experience, even if they need to install the app first.
3. Create a Smart Link
After setting up your project and redirects, you can create a new Smart Link from the Quick Links tab in the Branch dashboard. Here you’ll be able to set a link title, alias, add analytics tags, and customize the social media preview (such as the image, title, and description).
Once saved, Branch will generate a Smart Link that’s ready to use across your campaigns and app flows.
Here's a short demo:
FlutterFlow Configuration Setup
To make Branch Smart Links work in your FlutterFlow app, you’ll need to update the native configuration files via the Custom Code tab in your project.
-
First, create environment variables for:
branchHostUrl(e.g.,brnch4.app.link)branchKey(your Branch key, use it for production and optionallybranchKeyTestfor dev environments. You can toggle modes through Branch dashboard and also through FlutterFlow environment toggling).
-
Then navigate to, FlutterFlow > Custom Code
🔧 Android Setup
-
Create two variables in
AndroidManifest.xmlfile namedbranchKeyandbranchHostUrland bind them to the environment variables we earlier created. -
Add an
intent-filterblock to your Main Activity through the Activity Tags hook:
<intent-filter android:autoVerify="true">
  <action android:name="android.intent.action.VIEW"/>
  <category android:name="android.intent.category.DEFAULT"/>
  <category android:name="android.intent.category.BROWSABLE"/>
  <data android:scheme="https" android:host="{{branchHostUrl}}"/>
</intent-filter>
- Add an App Component block for meta-data:
<meta-data android:name="io.branch.sdk.BranchKey" android:value="{{branchKey}}"/>
<meta-data android:name="io.branch.sdk.TestMode" android:value="false"/>
🍎 iOS Setup
-
In
Info.plist, add a new variable calledbranchKeyand bind it to the environment variable. -
In
Info.plist, add the following code snippet.
<key>branch_key</key>
<string>{{branchKey}}</string>
-
In
Runner.entitlements, add a new variable calledbranchHostUrland bind it to the environment variable. -
In
Runner.entitlements, add the following code snippet.
<key>com.apple.developer.associated-domains</key>
<array>
  <string>applinks:{{branchHostUrl}}</string>
</array>
Branch automatically hosts and serves the apple-app-site-association file needed for Universal Links. You don’t need to manually upload it to your domain.
FlutterFlow Routing Setup
FlutterFlow also defines a Custom URI Scheme (like myapp://) by default. Even if you're using Branch for web-based Smart Links, it’s a good idea to keep this in sync.
-
Go to: Settings & Integrations > App Settings > App Details
-
Scroll to Routing & Deep Linking section.
-
Under Custom URI Scheme, match the URI host/domain to what’s defined in your Branch dashboard (e.g.,
brnch4://ordreambrush://).
Even if your links mainly use https://, FlutterFlow's routing engine may still use the custom URI internally. Keeping this field consistent prevents confusion or route mismatches.
You're now ready to use Branch Smart Links in a FlutterFlow app with seamless deferred deep linking, App/Universal Link verification, and environment-based configuration.
Integrate Flutter Branch SDK
To integrate Branch with your FlutterFlow app, you'll use the flutter_branch_sdk Dart package. This will allow your app to listen to Branch links and respond accordingly.
- Go to your FlutterFlow project > Settings and Integrations > Pubspec Dependencies tab, and add the following dependency.
flutter_branch_sdk: ^5.0.1
Make sure to use the latest version available from pub.dev
- Create a Custom Action to initialize the Branch SDK. This ensures the Branch session is set up when your app starts.
import 'package:flutter_branch_sdk/flutter_branch_sdk.dart';

Future initBranch() async {
  // Add your function code here!
  await FlutterBranchSdk.init();
}
Call this action inside the Final Actions of your main.dart.
- Create another custom action to listen for Branch link clicks and optionally route the user:
// Automatic FlutterFlow imports
import '/flutter_flow/flutter_flow_theme.dart';
import '/flutter_flow/flutter_flow_util.dart';
import '/custom_code/actions/index.dart'; // Imports other custom actions
import '/flutter_flow/custom_functions.dart'; // Imports custom functions
import 'package:flutter/material.dart';
// Begin custom action code
// DO NOT REMOVE OR MODIFY THE CODE ABOVE!

import 'dart:async';
import 'package:flutter_branch_sdk/flutter_branch_sdk.dart';
import 'package:flutter/services.dart';

StreamSubscription<Map>? _branchSubscription; // stream subscription that listens for branch links
final Set<String> _handledBranchLinks = {};

Future handleBranchDeeplink(Future Function(dynamic data) onLinkOpened) async {
   // Add your function code here!

   if (_branchSubscription != null) return; // If already listening, ignore link

   _branchSubscription = FlutterBranchSdk.listSession().listen(
           (data) async {
      final clicked = data['+clicked_branch_link'] == true;
      if (!clicked) return;

      final uniqueId = data['~referring_link'] ?? data['deeplink_path'] ?? '';

      if (_handledBranchLinks.contains(uniqueId)) return;
      _handledBranchLinks.add(uniqueId);

      await onLinkOpened(Map<String, dynamic>.from(data)); // call action defined by user & pass the link data.
   },
   onError: (error) {
      if (error is PlatformException) {
         print('[Branch] PlatformException: ${error.code} - ${error.message}');
      } else {
         print('[Branch] Unknown error: $error');
      }
   },
);
}
You can pass custom key-value pairs like "page": "paywall" or "navigation_type": "bottom_sheet" when creating the Branch link, and retrieve them here to decide which screen to navigate to in FlutterFlow.
Be sure to test both fresh installs (deferred deep links) and existing app sessions to confirm that your actions run as expected.
For a complete walkthrough, check out the tutorial video:
Branch Deeplinking Library
If you’d prefer not to integrate Branch.io from scratch, we have introduced the Branch Deep Linking Library that you can import from the Marketplace completely free.
This library sets up everything you need for routing users into your app using Branch’s smart links — with native configuration, link handling, and deep link helpers already wired in.
Install Library
You can install the Branch Deeplinking Library from the Marketplace. Refer to the Add Library Item instructions to see how to add it to your account.
Branch Setup
You’ll need three values from your Branch dashboard:
-
Branch Key: Your production or test key from the Branch dashboard.
-
Custom Link Domain: Your primary Branch link domain (e.g., yourapp.app.link). This is used to generate and handle smart links.
-
Alternate Link Domain: An additional Branch domain (e.g., yourapp-alternate.app.link) that points to the same link data and behavior. This is recommended for ensuring better deliverability across platforms and channels, and must be included in your platform configuration.
We recommend storing these values in Environment Variables so you can:
- Manage them per environment (e.g., dev vs prod Branch keys).
- Easily assign them to the library’s configuration when adding it to a project.
Adding Library Values
When you add the Branch Deep Linking Library to your project (ensure you are on +0.0.7 and above), it will prompt you to provide four values:
branchApiKeybranchLinkDomainbranchAlternateLinkDomainisTestMode
Use the environment variables you created to populate these values.
isTestMode should be set to false when running your app in production.
Here’s a quick demo to show how to configure those values inside your library panel.
Initialize the Branch SDK
Open your main.dart file in FlutterFlow and add the initBranch custom action under the Final Actions section. This ensures the Branch SDK is initialized when your app launches.
Handle Branch Deeplink [Custom Action]
To receive and act on deep link data, go to your Entry Page or Logged-In Page and add the handleBranchDeeplink action as the first action in the page flow.
This handleBranchDeeplink action listens for incoming Branch Deeplinks and handles routing logic. This action should be added to your Entry Page or Logged-In Page under the onPageLoad trigger. It initializes a stream listener that waits for Branch links to be opened (either deferred or direct). Ensure this is the first action of your on Page Load action trigger.
onLinkOpened Action Callback
When a link is received, the onLinkOpened callback is triggered with
the link data, allowing you to perform custom navigation or logic. You can perform your navigation logic in this action callback.
linkData Action Parameter
The handleBranchDeeplink action receives a linkData object that contains all the metadata sent with the link. The linkData parameter is a Map containing useful information from the Branch link.
In the Dreambrush app example, we get the following link data:
{
   "$og_title": "Check out my Ai Image on DreamBrush!",
   "$publicly_indexable": true,
   "imageId": "QiC94EaGNoonEKzln07A",
   "~creation_source": 4,
   "$og_description": "This image was created with DreamBrush app. You can check it out here.",
   "+click_timestamp": 1750099254,
   "$match_duration": 100000,
   "~feature": "Ai Image Creation",
   "$tags[0]": "generation",
   "+match_guaranteed": true,
   "$alias": "",
   "$canonical_identifier": "/imageDetails/QiC94EaGNoonEKzln07A",
   "+clicked_branch_link": true,
   "~id": "1461141612502859827",
   "+is_first_session": false,
   "~campaign": "Image Generation",
   "~referring_link": "https://dreambrush.app.link/DZ9liDTc6Tb",
   "~channel": "Share"
}
Your link data might not look exactly like the example shown above. However, it will follow a similar structure with comparable keys and values.
Some of the important keys we should know about:
-
$canonical_identifier: The original route path used when the link was generated (e.g.,/imageDetails/:id). You can explicitly set this value when creating a link through the Generate Link action. If you don’t set it, Branch will infer it based on the link's destination or content metadata. -
~referring_link: The full Branch URL that was clicked. -
$og_title: This is the headline that will appear in the link preview. This is set by the user through the Generate Link action. -
$og_description: This is the description text shown below the title in the link preview. This is set by the user through the Generate Link action. -
~channel,~feature,~campaignand$tags[0]are part of Branch’s user-defined analytics and attribution metadata. These fields are explicitly set by users when creating a link (e.g., via the Generate Link action), and they help organize and analyze your link performance across platforms and campaigns. -
page: This is a suggested custom key that can be set by the user when generating the link. It typically defines the target page or screen the app should navigate to when the link is opened (e.g., "paywall", "productPage", "onboardingStep2"). While not a reserved Branch key, it's a commonly used naming convention for handling deep links and routing logic within the app. -
Any other custom parameters added during link creation (e.g.,
productId,referrer, etc.). Ensure the key and value are bothString.
This lets you write flexible, conditional navigation logic based on what was shared. For example, in the following example, we can even show a bottom sheet based on the page value.
Use the link data from this callback to:
- Navigate to a page.
- Show a bottom sheet.
- Load content from Firestore using a referenced ID.
Using Global Context to Navigate
In certain app structures, especially when the home page is removed from the navigation stack early, standard navigation using the local context may fail. To ensure deep linking and routing continue to work reliably in these scenarios, you can override the local context with the global navigator context.
This approach ensures that navigation logic is not tied to the widget hierarchy at the time of execution, making it more robust and flexible.
See a detailed example using the DreamBrush app.
It’s recommended to test deep links on a physical device, as link verification (especially for Universal Links or App Links) may not consistently work on emulators or simulators. We recommend using Local Run to run your apps on physical devices.
Generate Link [Custom Action]
The generateLink action allows you to create a custom Branch Smart Link directly from your FlutterFlow app.
This is especially useful when you want to let users:
- Share app content (like a post, product, or image).
- Invite others with referral codes.
- Trigger deep links that take recipients to specific app screens.
The action accepts the following parameters:
-
canonicalIdentifier– A unique path for the content (e.g.,/imageDetails/:id). This becomes the key reference used when routing the user back into the app. -
title– The link's title (used in social previews or analytics). -
description– (Optional) A short description of the content. -
metadata– A dynamic map of custom parameters to include with the link (e.g., page: "imageDetails", imageRef: "abc123", etc.) -
linkProperties– A dynamic map for configuring how the link behaves (e.g., set thefeature,channel,campaign, orstagefor analytics).
Due to a limitation, if you plan to leave map-type variables (like metadata or linkProperties) empty, you must still pass them as empty maps, not null.
Ensure all keys and values are plain strings, avoid nested JSON or non-string types.
Incorrect structure may cause the Link Generation action to fail silently.
Branch Helper Functions
These functions help you safely work with deep link data, extract values, and conditionally navigate based on link metadata.
-
isTargetingPage(linkData, targetPage)- Checks whether the page value in the link data matches a specific screen name. Thepageparameter is set by the user when generating the link from Branch dashboard or FlutterFlow. For example, if the target page value in your deep link is "paywall", you can use this function to check for this value and navigate accordingly. -
getCanonicalIdentifierFromLink(linkData): Helper function that returns the canonical path (e.g.,/imageDetails/abc123) that was originally attached to the smart link. Useful for extracting the base route or content reference associated with the shared link. -
getReferringLinkFromLink(linkData): Helper function that retrieves the full Branch smart link URL from the data (typically under the~referring_linkkey). Useful for tracking, analytics, or verifying the source of the link. -
getLastPathSegmentFromMap(linkData, key): Extracts the last path segment (e.g.,abc123) from a URI stored inside a link data field (e.g.,/imageDetails/abc123). This is especially useful when your deep link contains a structured path, like/imageDetails/abc123and you want to retrieve just the ID (abc123). -
getLinkValue(linkData, key): Safely retrieves any single value from the link data Map. Returns null if not found. (e.g., retrievingshowPromoattribute value from thelinkData).
If you're trying to retrieve default Branch keys like ~channel or $canonical_identifier, make sure to include the special character (e.g., ~ or $) as part of the key string.
createLinkProperties(...): Returns a Branch Link Properties map used when generating a smart link. You can define values like: feature, campaign, stage, channel, alias or tags or custom fallback URLs. Useful for organizing and tracking generated links for marketing or referrals.
DreamBrush Example
In the DreamBrush app, we can use generateLink after a user finishes generating an image. The link could include:
- canonicalIdentifier: Current Page Route that is
/imageDetails/:imageRef. - page: Target page name
imageDetails. - title: "Check out my AI image!"
This link can then be shared via WhatsApp, email, or social media — and when clicked, it brings the recipient directly to that content inside the app.
Here's a quick example of generating a Branch link from a page that uses a Firebase Document ID as a route parameter.
Now in your handleBranchDeeplink action callback, add the additional logic to handle such custom links:
To demonstrate how to use the global context for navigation, add a new Execute Custom Code Action just before the Navigate To Action, and insert the following code.
final context = appNavigatorKey.currentContext!;
This ensures that the navigation logic uses the global navigator context, which is essential if your app structure removes the home page early in the lifecycle. In such cases, relying on a local context may cause deep linking to fail—using a global context guarantees that navigation still works reliably.
Note: The Execute Custom Code Action is available only on the paid plans.
FAQs
Why isn't my deep link working when I navigate to another page from the home page?
This often happens because the Home Page gets removed from the navigation stack, especially when Allow Navigate Back is disabled in the Navigate To Action.
Since the deep link handler is typically defined on the Home Page, it gets disposed once the page is removed, causing deep links to stop working when triggered later.
✅ Preferred Solution: Use Global Context for Navigation
Instead of relying on the Home Page's presence to handle deep links, configure your navigation logic to use the global navigator context. This ensures navigation will work even if the Home Page has been removed from the stack.
You can do this by adding an Execute Custom Code Action before the Navigate To Action.
See the complete example.
✅ Alternative (but limited) Solution: Keep the Home Page in Stack
If you're not using global context, you can prevent this issue by keeping the Home Page in memory:
Enable "Allow Navigate Back" on any navigation actions from your Home Page, even if the navigation isn't triggered from deep links directly.
This keeps the Home Page alive so it can continue listening for deep link events.
Why is my Branch link generation failing?
This often happens because one or more of the inputs passed to the action (like metadata or linkProperties or customParams when using createLinkProperties helper function) contains invalid JSON formatting.
Branch expects these values to be passed as a map of plain String key-value pairs, not as nested JSON, objects, or dynamic types.
Ensure both Key and Value's expected type is String and String and try again.
Why isn’t deep linking working when testing from a simulator?
Deep linking, especially Universal Links and deferred deep linking may not work reliably on iOS or Android simulators/emulators due to platform limitations.
Simulator Limitations:
-
iOS: Simulators cannot verify Universal Links properly (no App Store, limited AASA domain support).
-
Android: Some versions fail to auto-verify App Links or handle deferred deep links without Play Services.
✅ Recommended:
Always test deep linking on a physical device for accurate behavior.