Custom Code
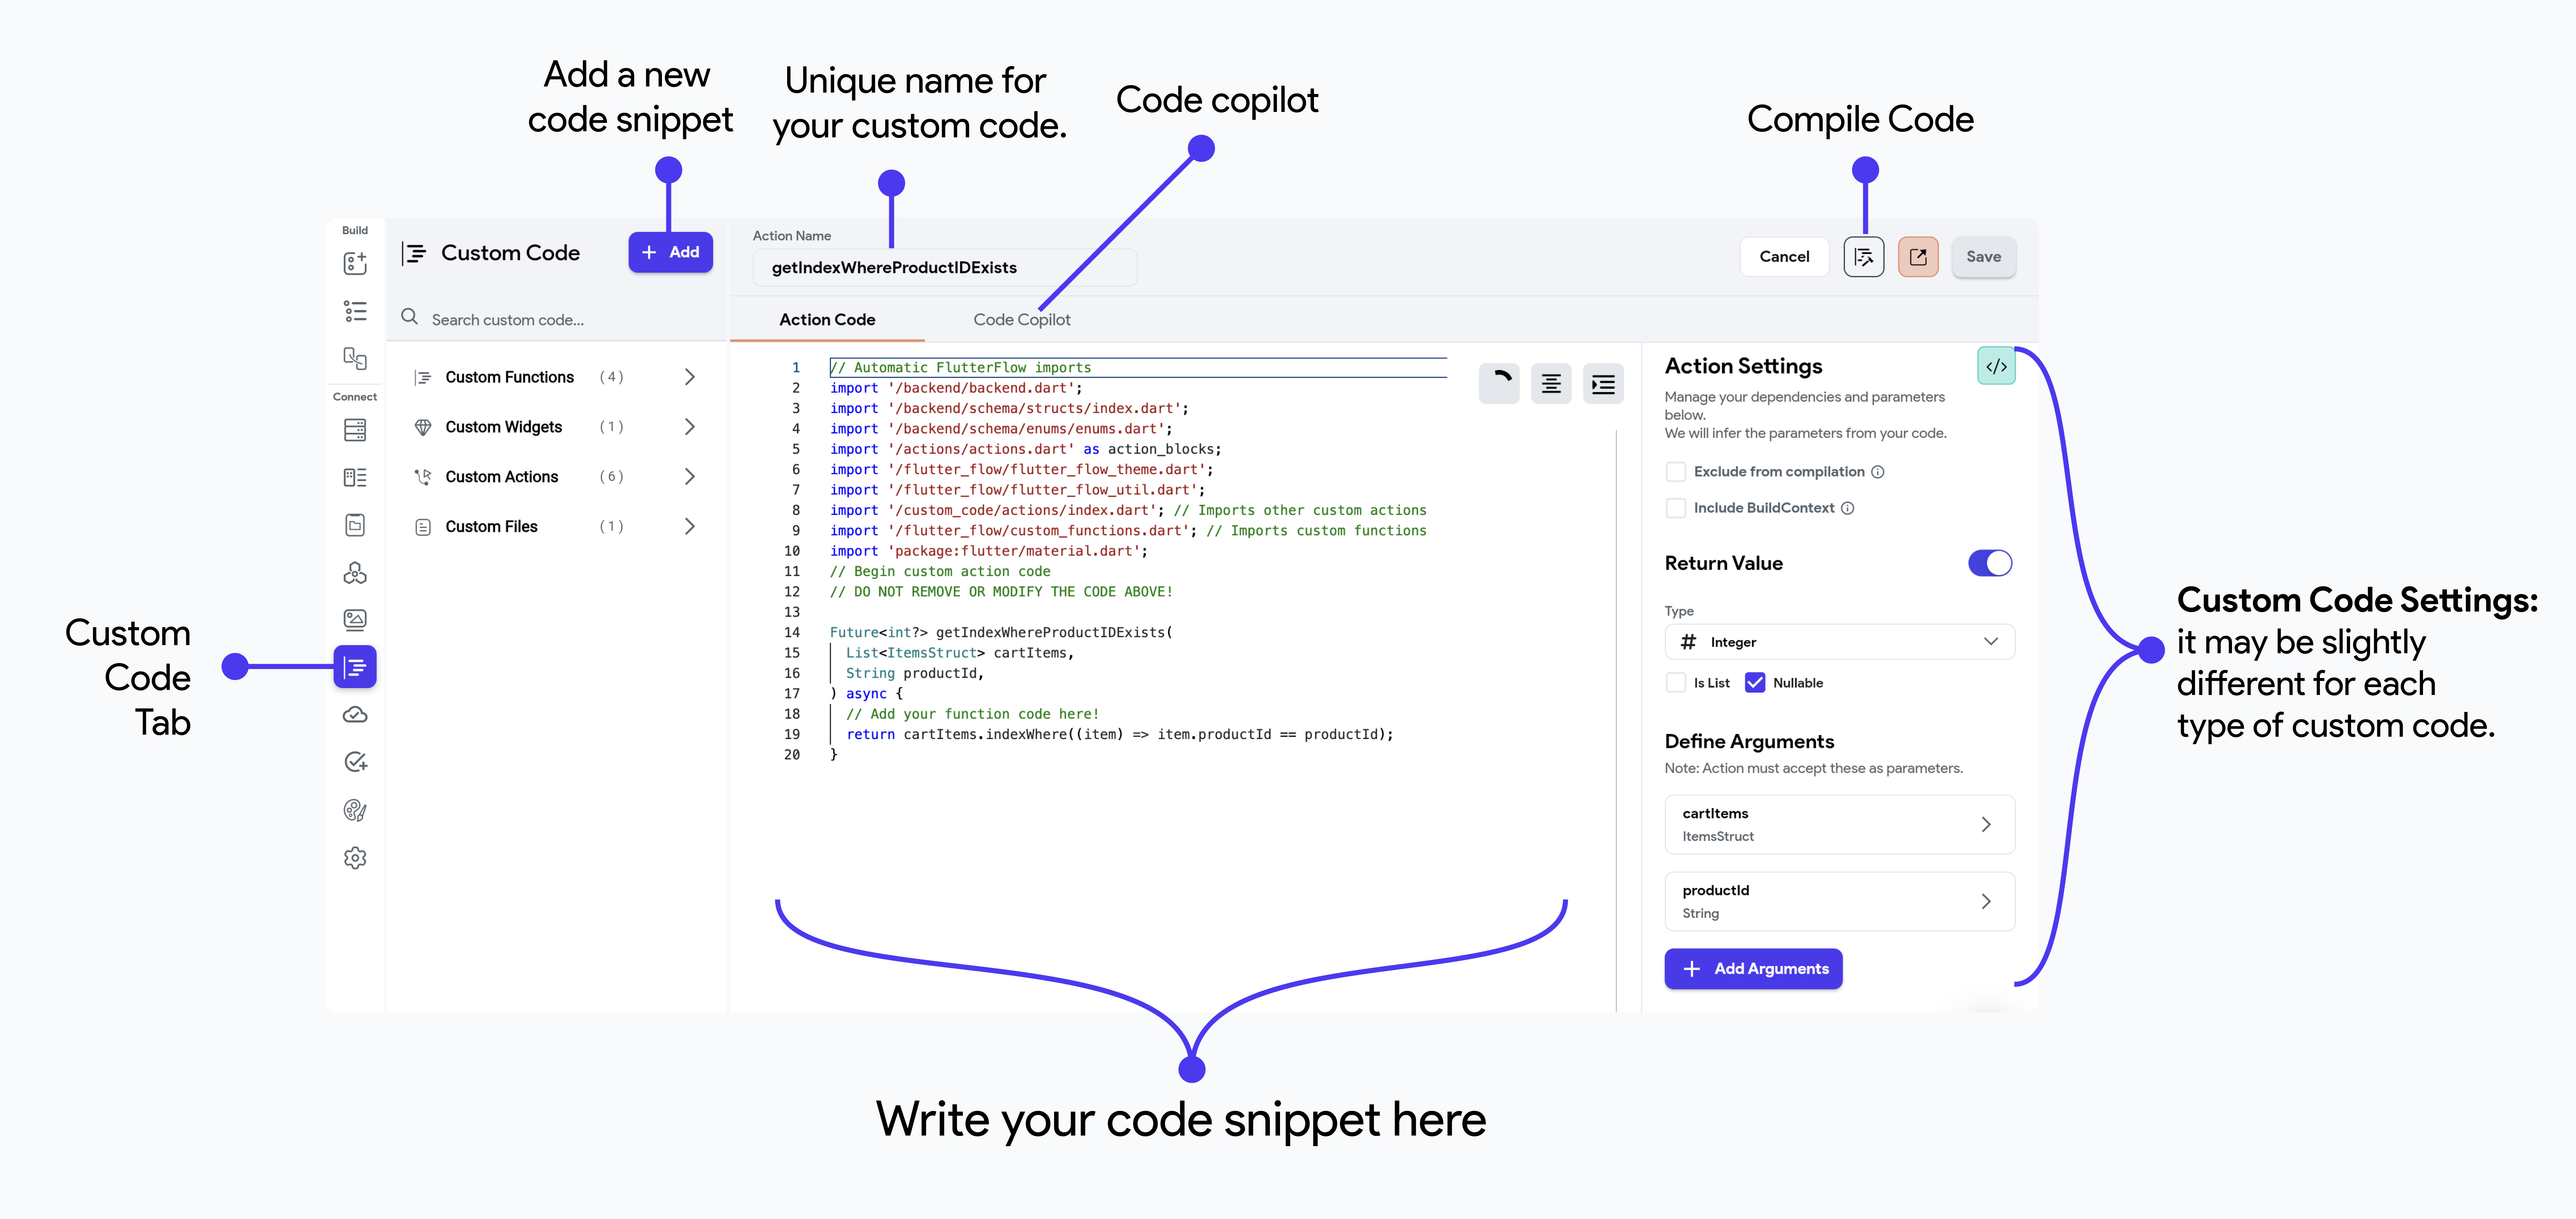
While FlutterFlow provides a wide range of pre-built components and functionalities, there may be times when you need to extend your app with custom logic or UI components that are not available out of the box. This is where writing custom code comes into play.
There are a few different ways to make custom code accessible in FlutterFlow:
- Custom Functions: Custom Dart functions that can be used to set Widget or Action properties.
- Custom Actions: Custom Dart functions that can be triggered by Action Triggers or used as nodes in an Action Flow. These are usually
asyncfunctions and are able to import custom package dependencies. - Code File: You can define custom classes, enums, and logic to manage your app’s data and behavior.
- Custom Widgets: Custom Flutter widgets that can also import custom package dependencies and be used in the same way as Components throughout your project.
- Configuration Files: You'll have the ability to edit native files for Android and iOS.
- Extend Functionality: Add features that are not included in the standard FlutterFlow components.
- Custom Integrations: Integrate with third-party packages or APIs / databases that require specific handling.
- Unique UI Elements: Create unique user interface elements that require custom rendering or interactions.
Writing Custom Code
There are two main ways to write custom code in FlutterFlow:
- Using the In-App Code Editor
- Using the Visual Studio Code Extension
Using the In-App Code Editor
You can use the In-App Code Editor to view and edit custom code directly in the FlutterFlow application.
To leverage the capabilities that go beyond our in-app code editor, you can click on the VS Code icon to open and edit your custom code directly in VS Code using the FlutterFlow VSCode extension.
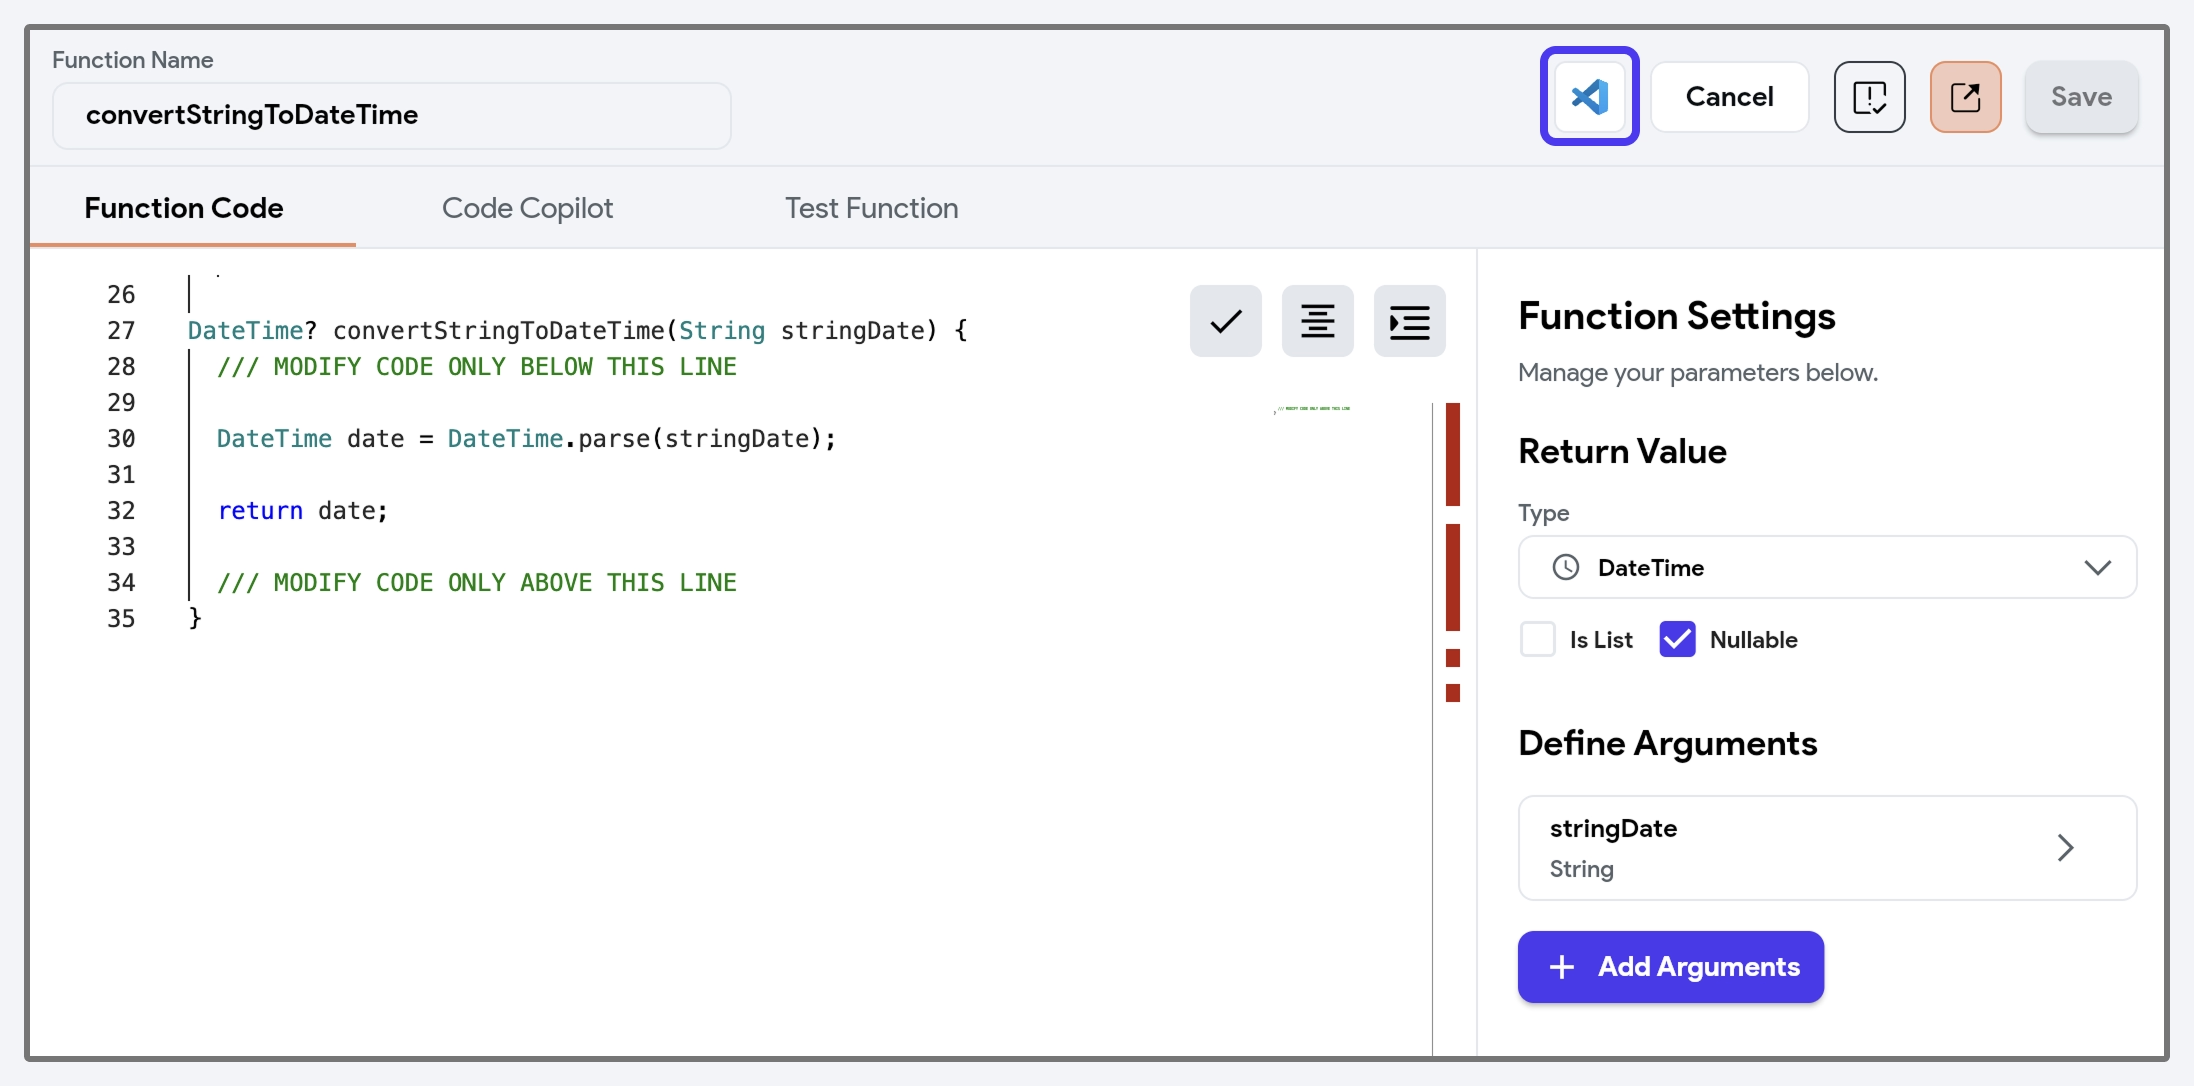
Note that the desktop version of the In-App Code Editor is limited. We recommend using the Web editor or the VSCode Extension.
Code Copilot
Code Copilot is an AI-assisted feature that helps you generate code snippets, functions, or entire blocks of code based on natural language descriptions of what you want to achieve. It simplifies the app-building process by allowing you to describe the functionality you need, such as 'calculate the total price of items in a cart', and then the Copilot generates the necessary code.
This can significantly speed up the building process and reduce the need for in-depth programming knowledge, making it especially useful for custom functions and actions.
Your prompt must be at least 3 words and no more than 500 characters.
Compile Code
When you are done adding your code snippets, you can compile it to ensure there are no compilation errors and that your code can be transformed into something that can execute when your app is running.
To do so, click the Compile Code button.

To run your app, you must make sure Custom Functions are compiled.
Custom Widgets and Actions don't need to be compiled to export code or test your app. However, you won't be able to preview Custom Widgets in the builder until they are compiled. You'll see a project warning if you don't compile Custom Widgets or Actions.
Compiling Custom Functions should be pretty fast, but sometimes, compiling Custom Actions and Widgets takes a while.
Code Analyzer
The code analyzer is available in all your custom code snippets and ensures the quality and correctness of your custom code. It automatically checks your Dart code for errors and warnings, providing real-time feedback as you write.
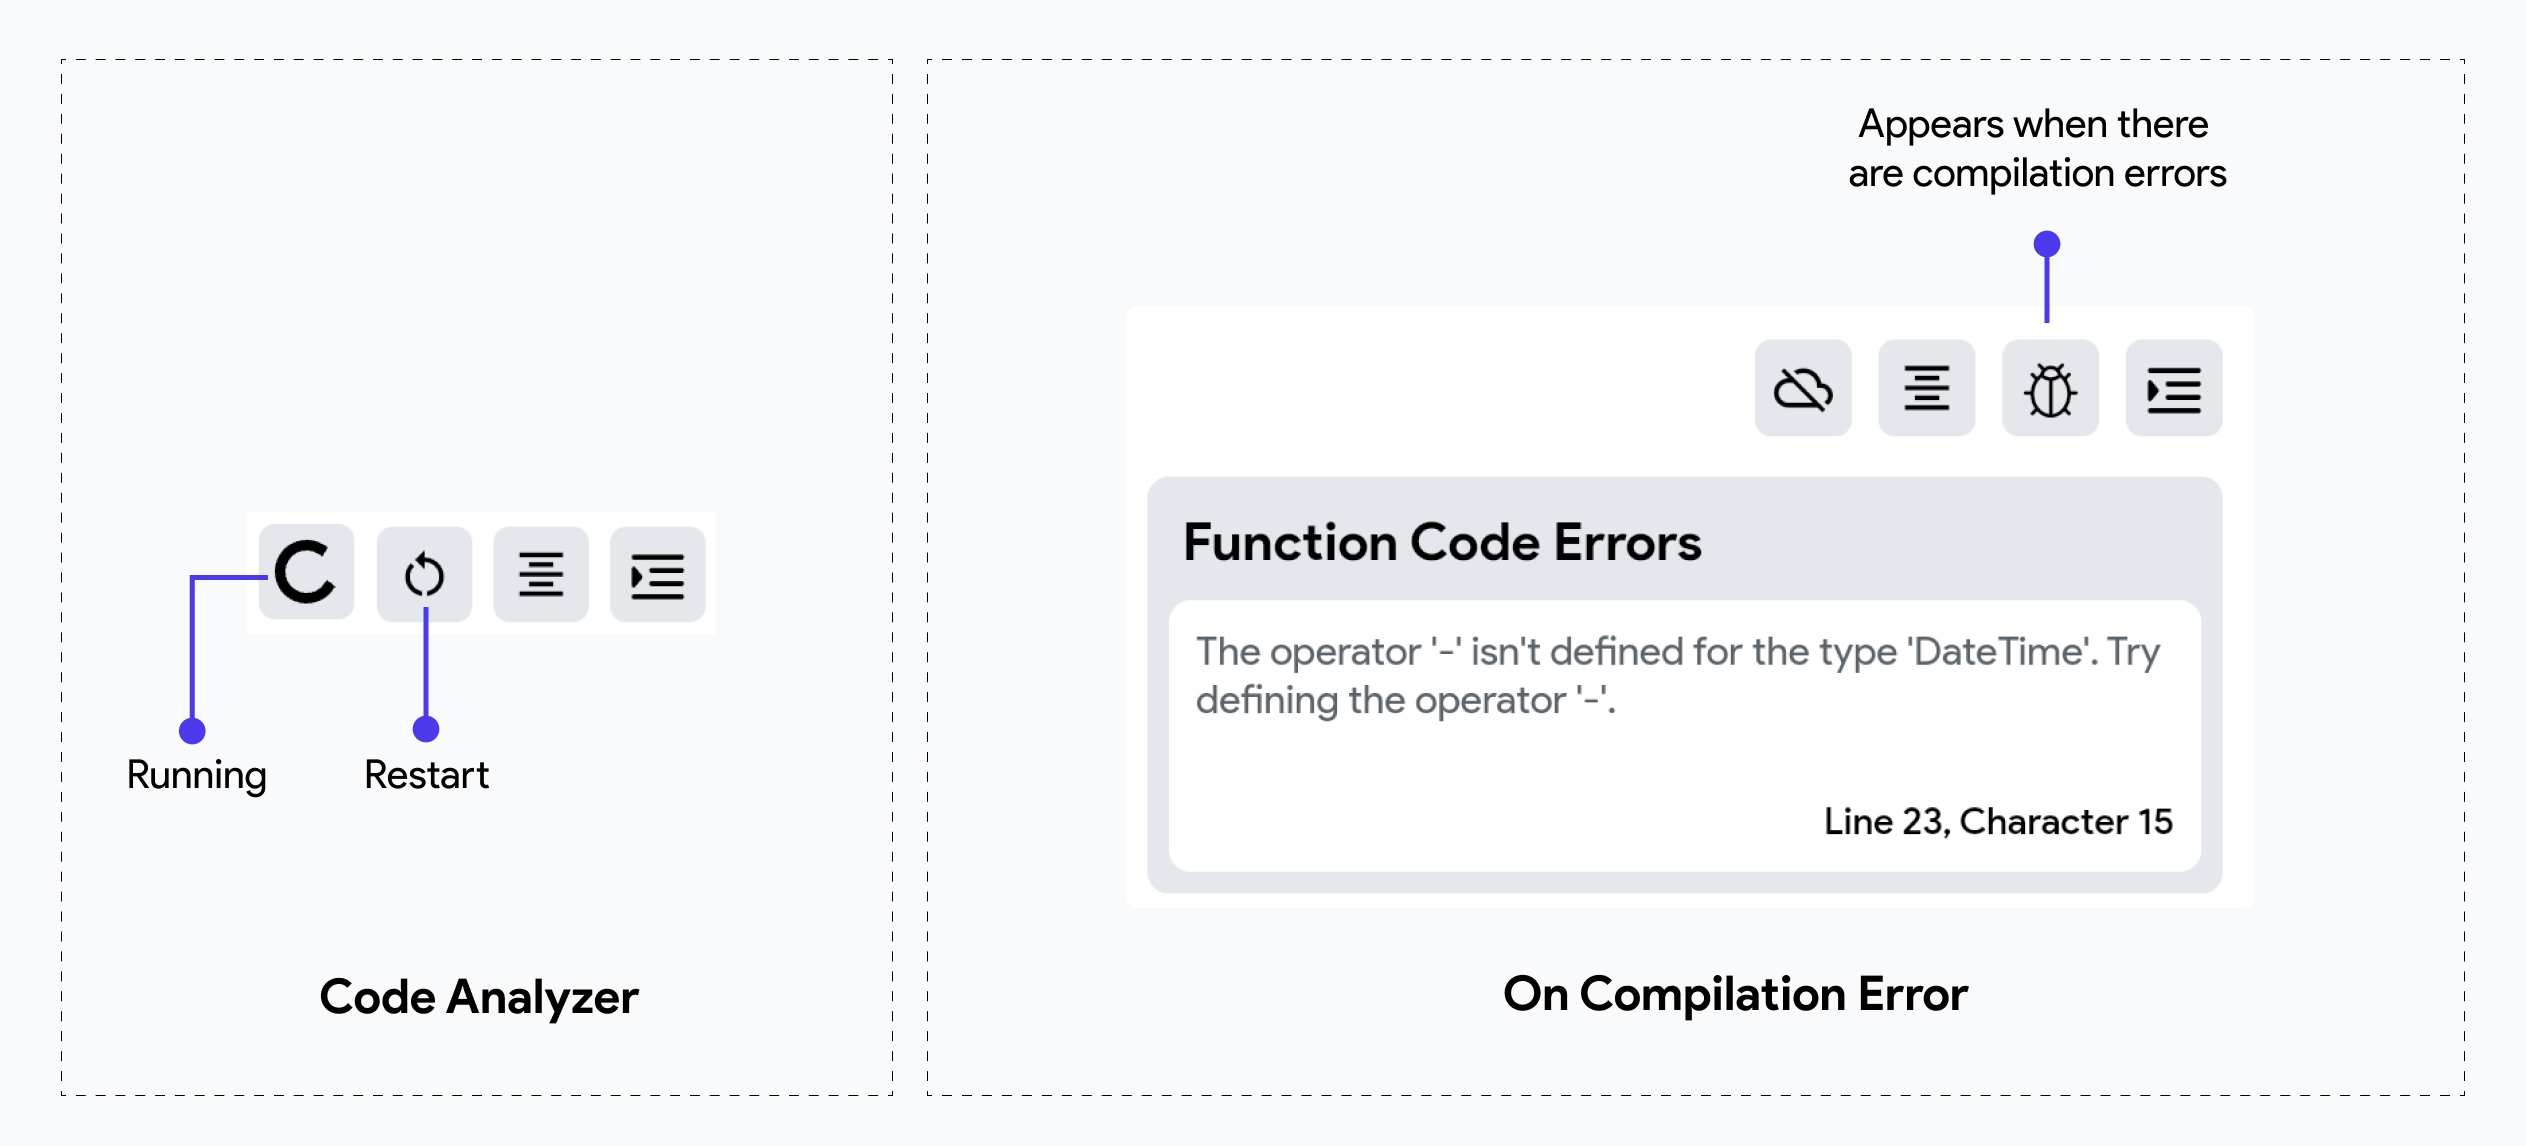
When there is a compilation error, the code analyzer will stop running and display the errors caught by the compiler. Once fixed, save the code and restart the code analyzer to resume real-time analysis and receive feedback on updated code.
Automatic FlutterFlow Imports
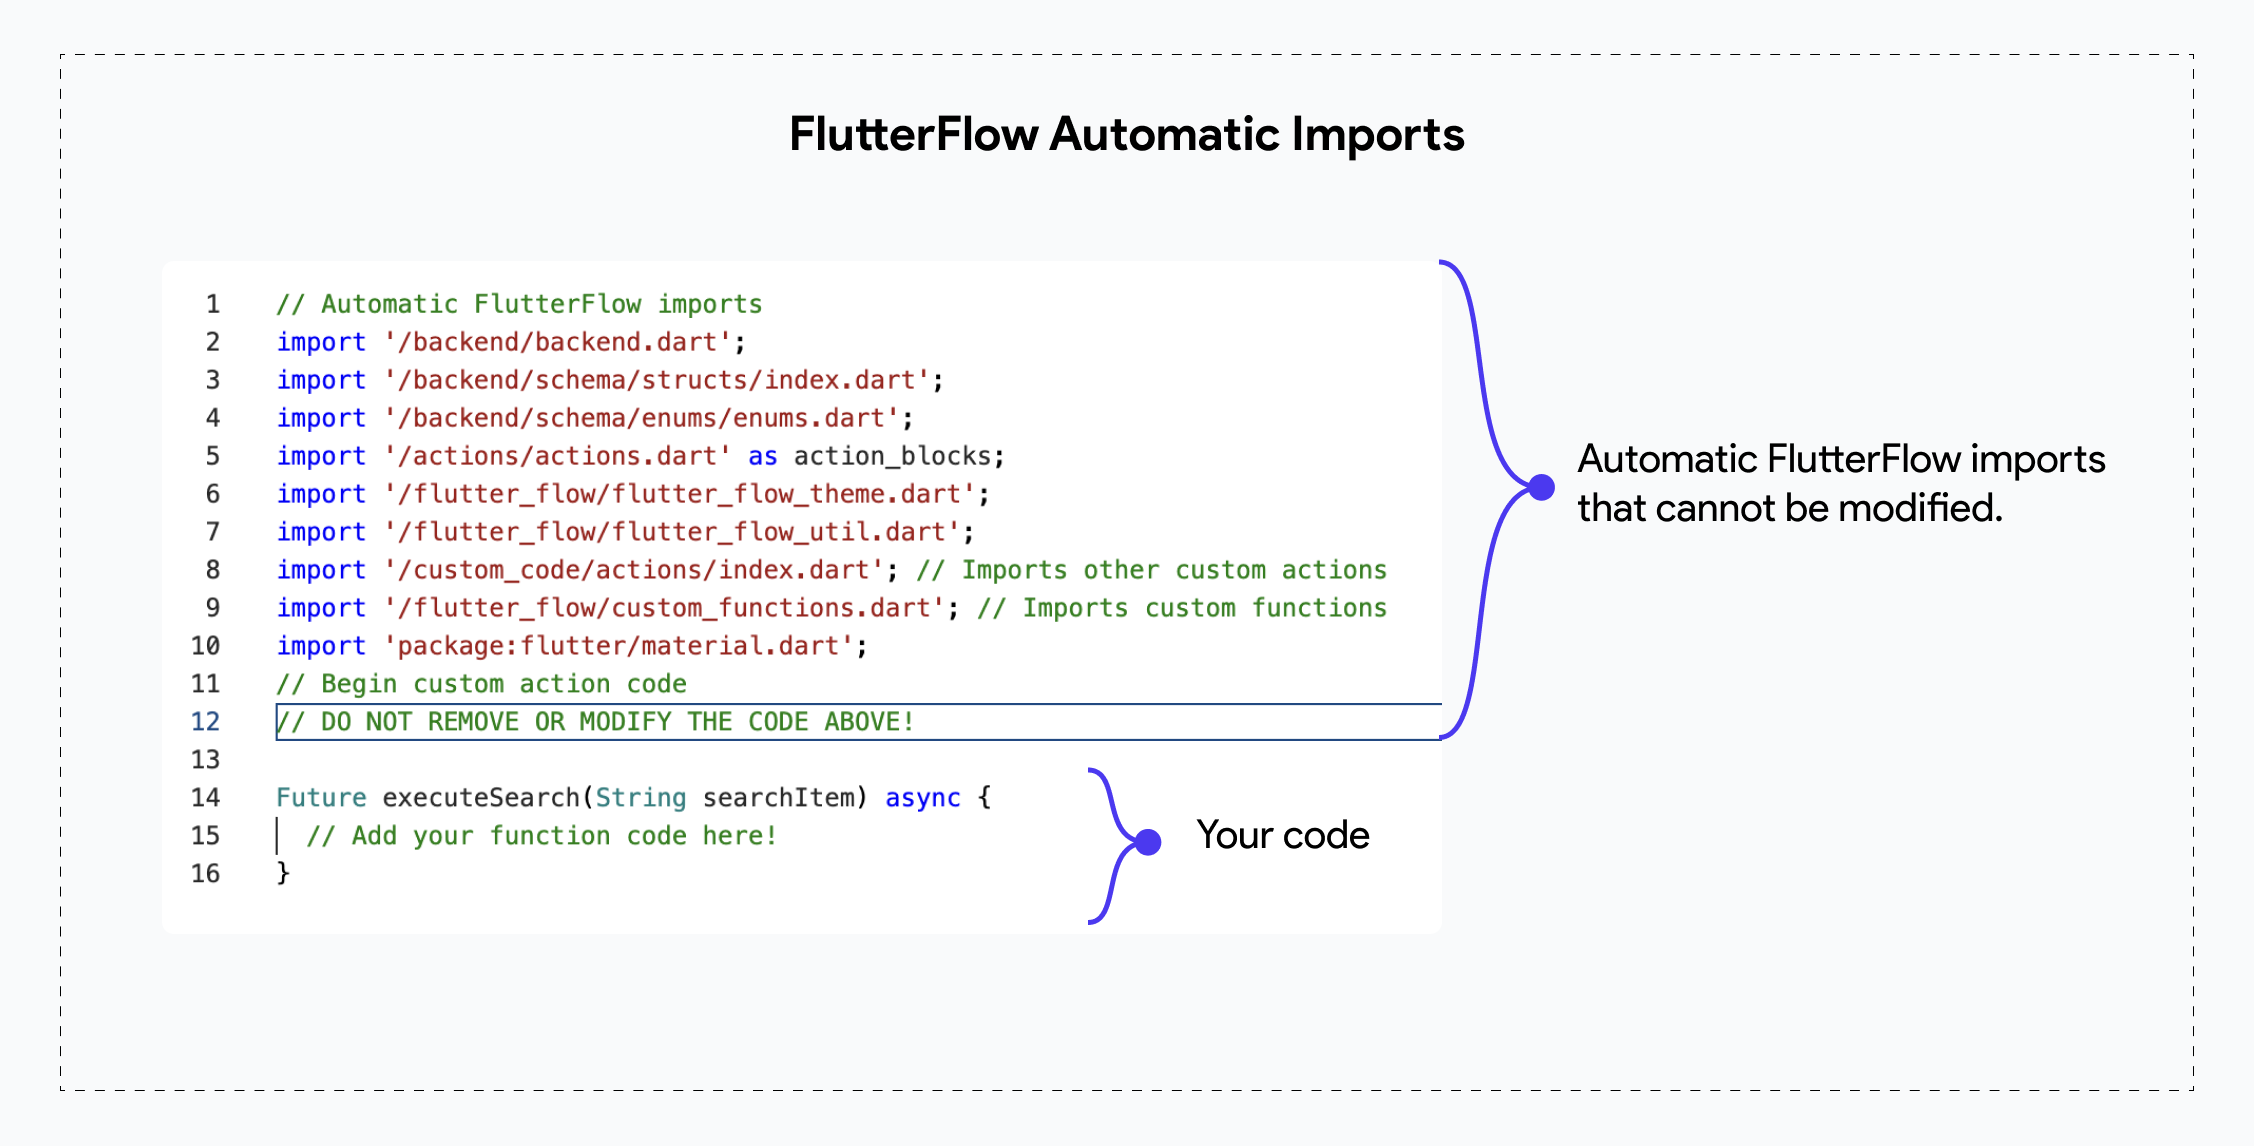
When creating a new custom code snippet (Actions, Widgets, or Functions) in FlutterFlow, some fundamental imports will be automatically added for you. These imports cannot be modified by the developer. Custom Functions do not allow adding any custom imports, but you can add custom imports in Custom Actions and Widgets after the line "Do not remove or modify the code above".
Custom Code Settings
When you edit a custom code snippet in FlutterFlow, the Settings menu opens on the right. This menu may vary slightly depending on the type of custom code (Actions, Functions, or Widgets), but here, we’ll cover the common settings.
Generate Boilerplate Code
This setting allows you to generate boilerplate code, providing a structured starting point with essential code imports and a basic widget or function structure.
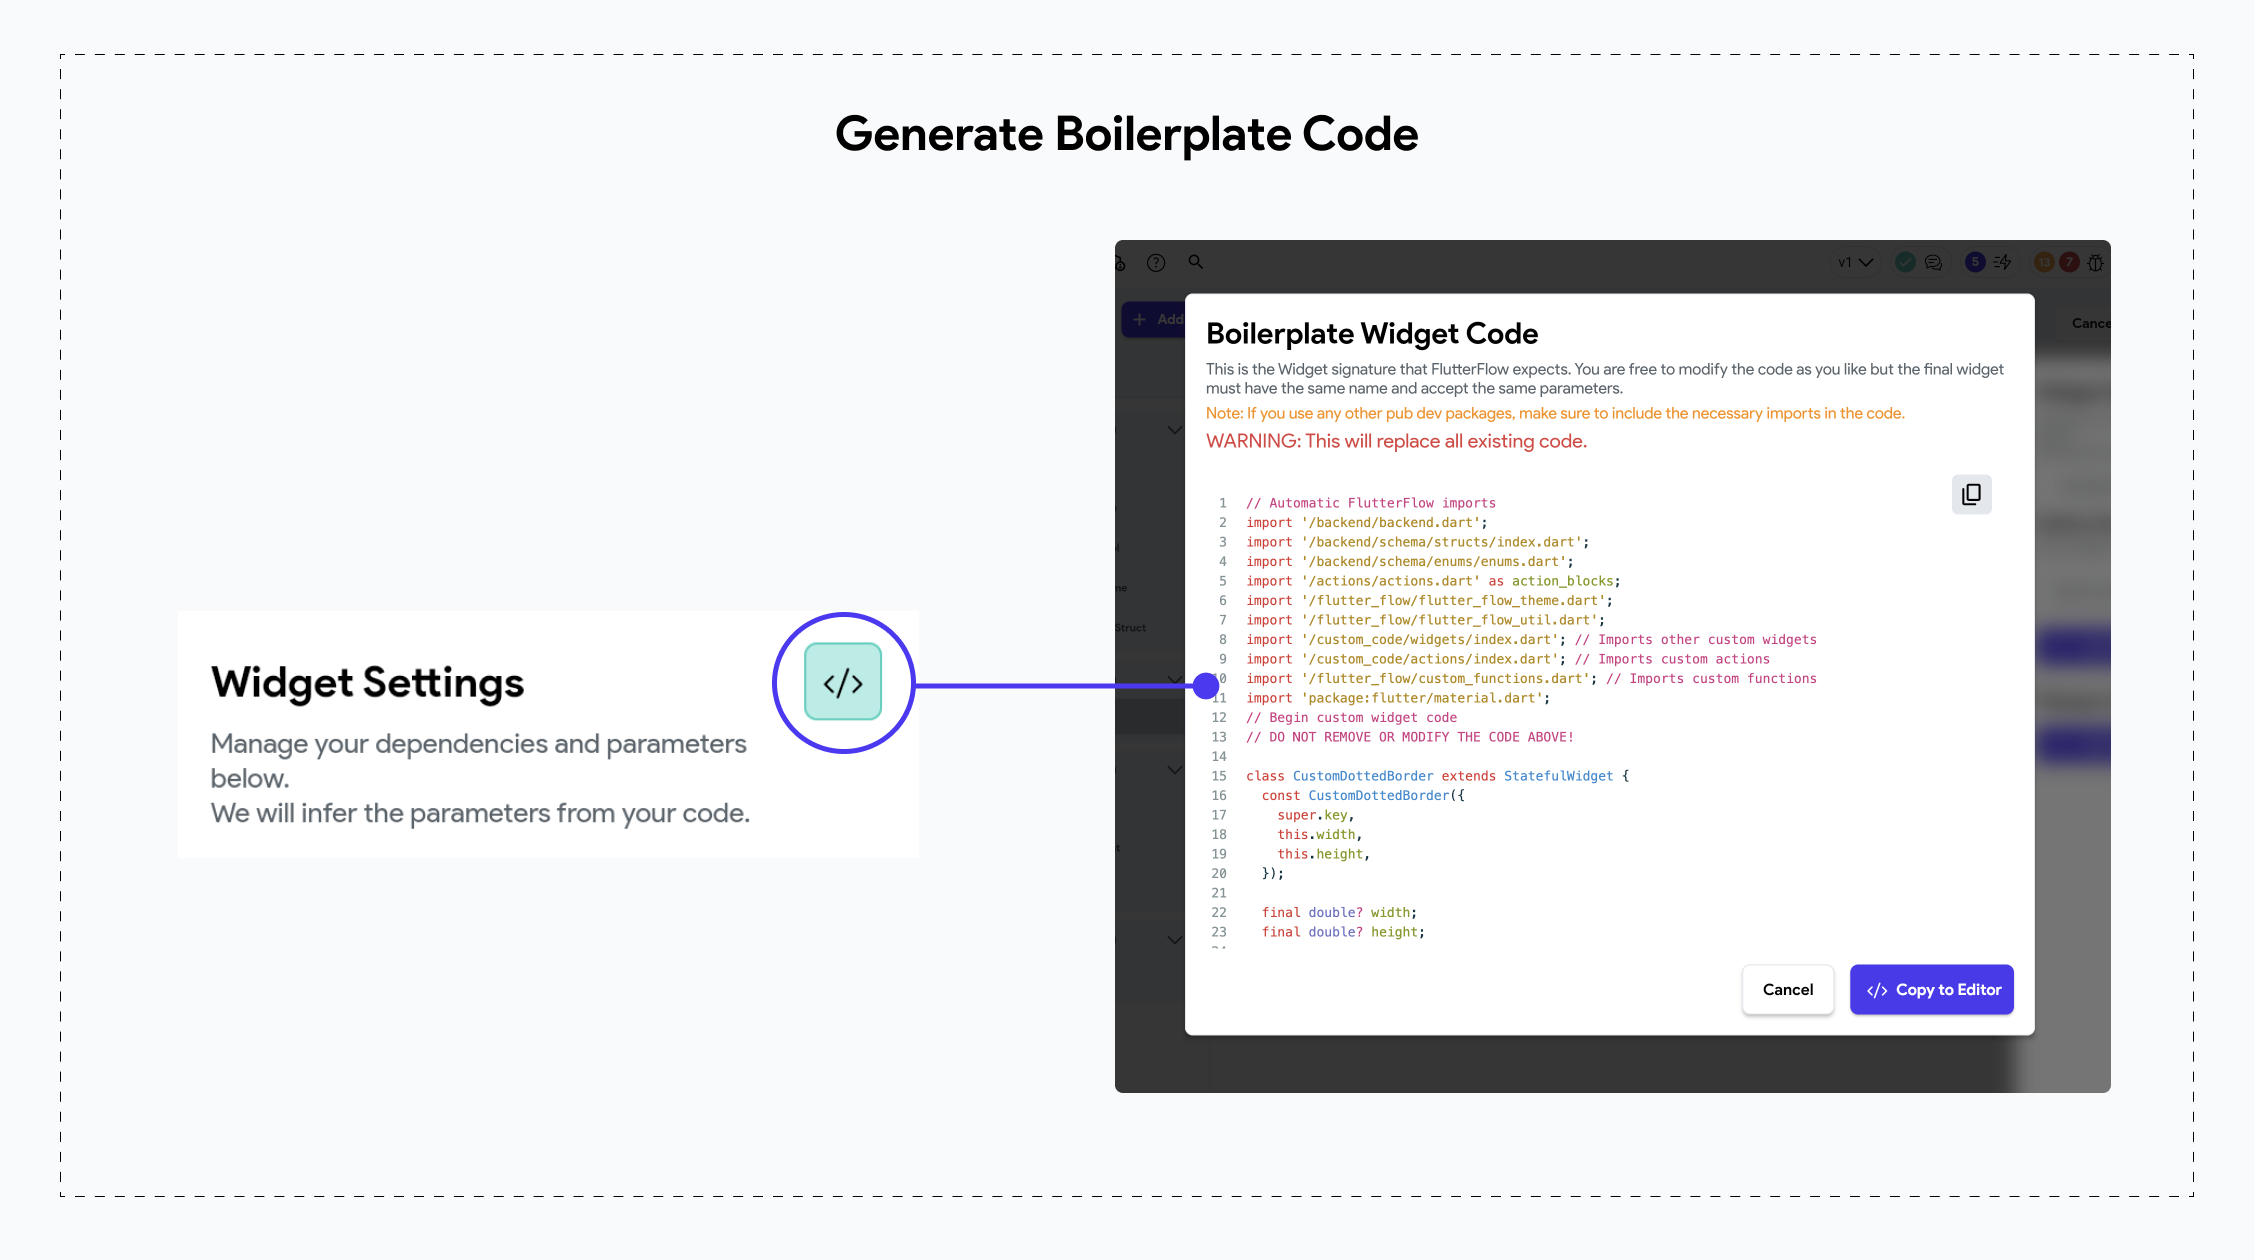
After creating a new resource file, click the code icon on the Widget Settings menu to generate the boilerplate code. Then, click "Copy to Editor" to add the boilerplate to your resource file’s code editor, where you can further customize it.
Exclude From Compilation
If, for some reason, your action or widget fails to compile but you still want to compile the rest of your code, you can enable this toggle. Doing so will exclude the problematic code from the compile process.
This option is only available for Custom Widgets and Custom Actions.
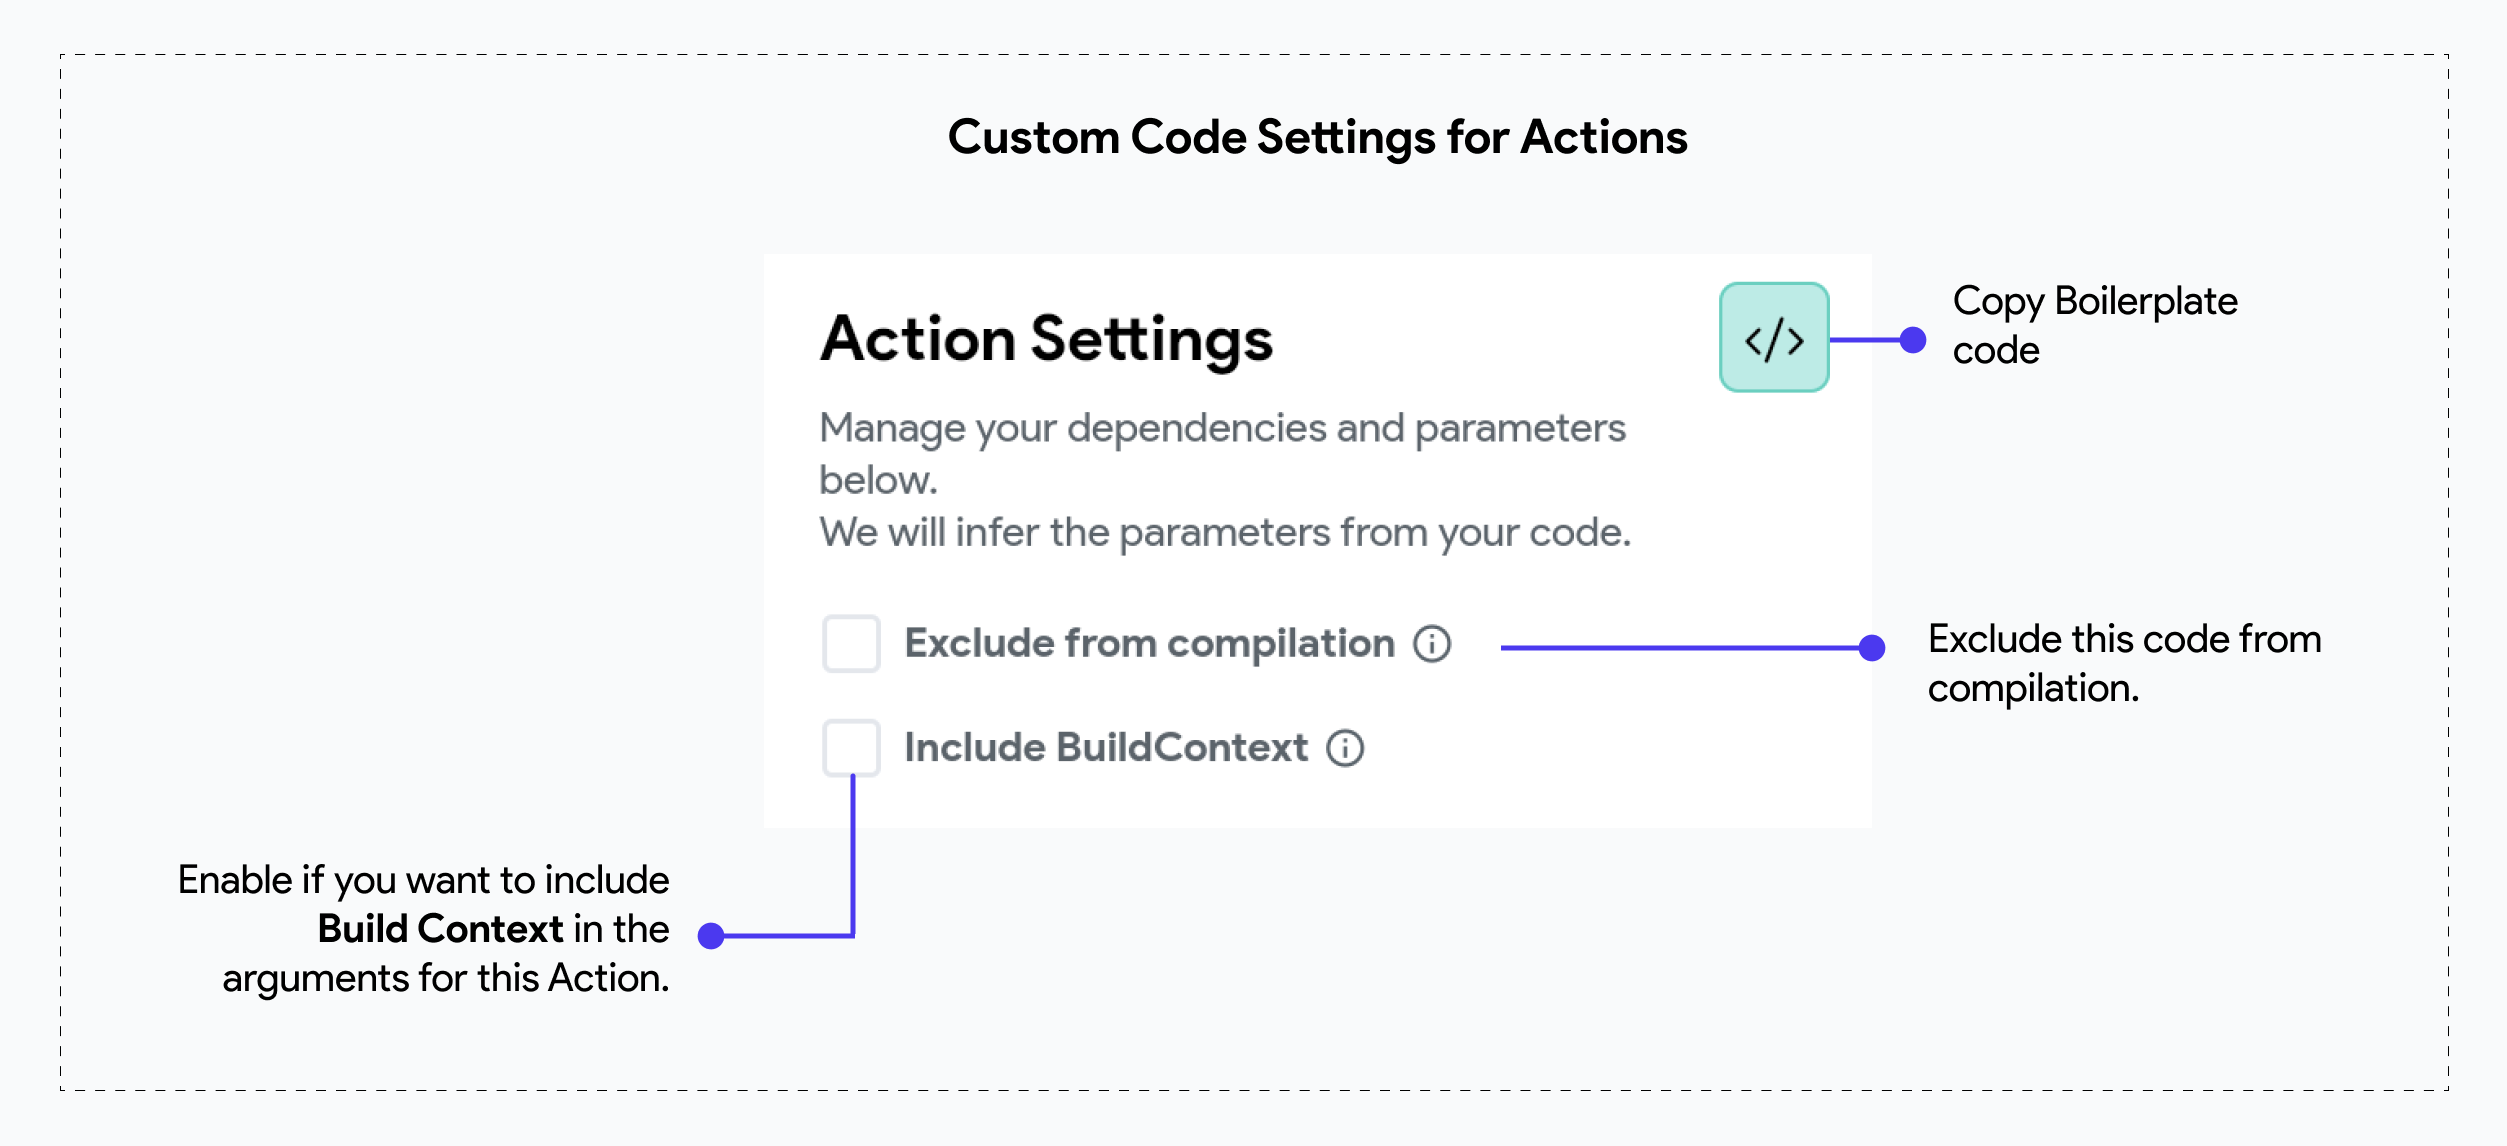
Include BuildContext
This setting determines whether to pass the BuildContext of the widget calling this custom action as an argument. This is useful for actions that need to interact with the widget tree or access context-specific data.
This option is only available for Custom Actions.
Input Arguments
When writing custom code in FlutterFlow, you can define input arguments to make your custom functions, widgets, or actions more dynamic and reusable. Input arguments allow you to pass data into your custom code, enabling it to perform different tasks based on the input provided. By using input arguments, you can create more flexible and powerful custom code that can adapt to various scenarios within your application.
Here's an example of an action that takes 2 arguments: cartItems that is a List of ItemsStruct and productId that is a String.
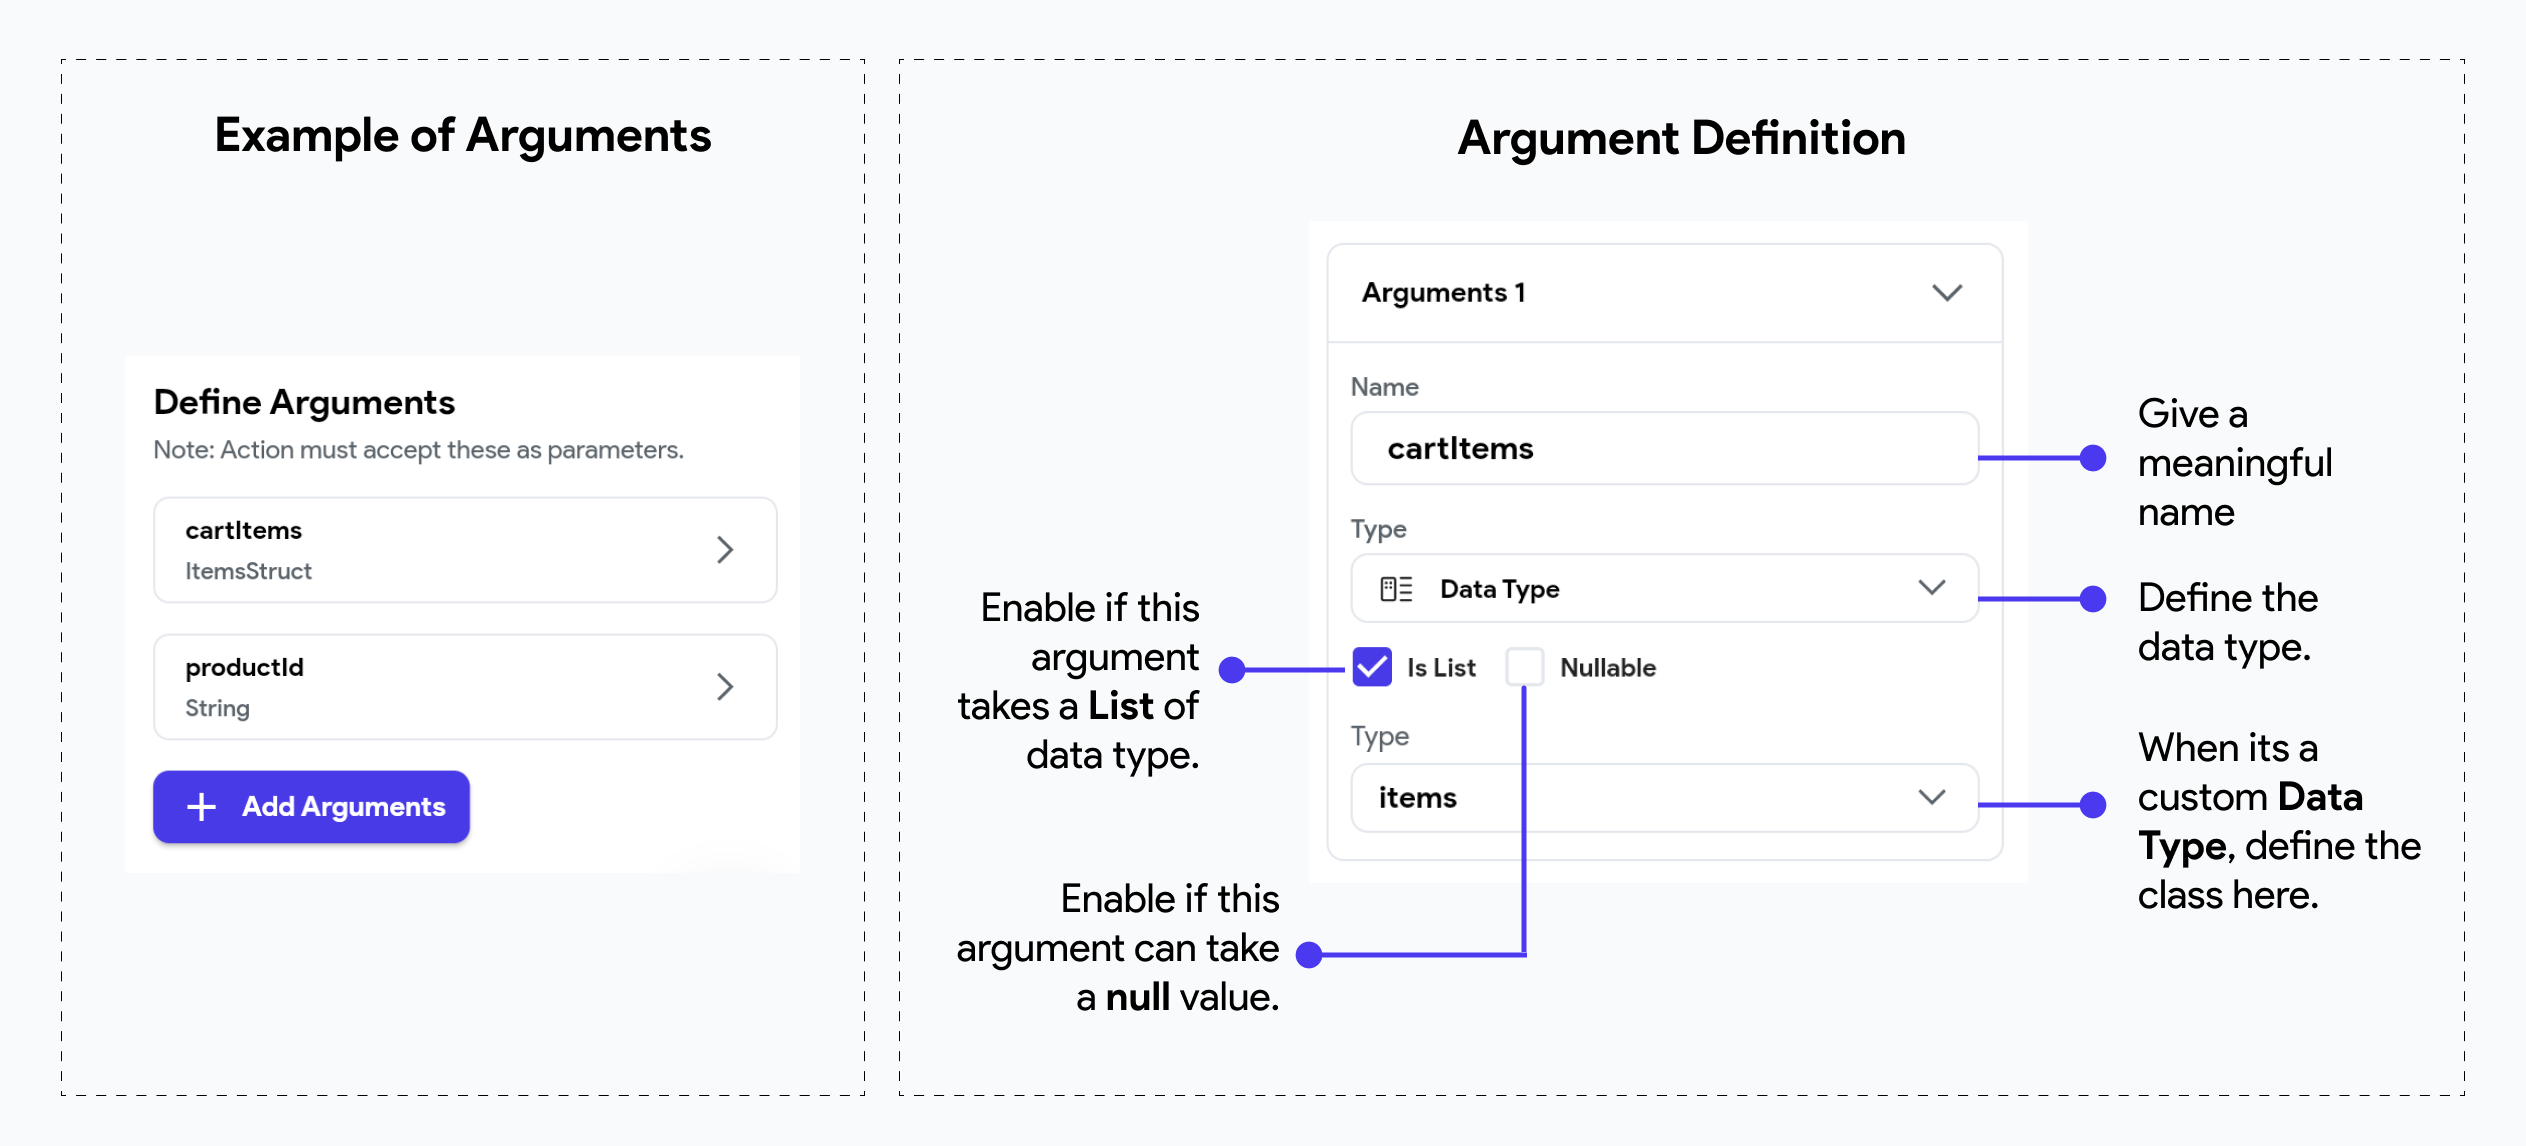
When you define a custom data type in FlutterFlow, the generated code will refer to the type
as <YourTypeName>Struct. For example, if your custom data type is called Items, it will be
referenced in the generated code as ItemsStruct.
Callback Action As Parameter
A callback action is an action passed as a parameter to a custom action or widget and triggered at some point in the future when a specific event occurs.
This is especially helpful when you want to trigger actions from within the custom action or custom widget logic and include them as part of the custom behavior. For example, if an error occurs inside the custom logic, you could trigger an action immediately to inform the user about the error, and then continue execution or end with a default value to return.
In programming, callbacks are functions passed to other functions to be called when a specific event occurs.
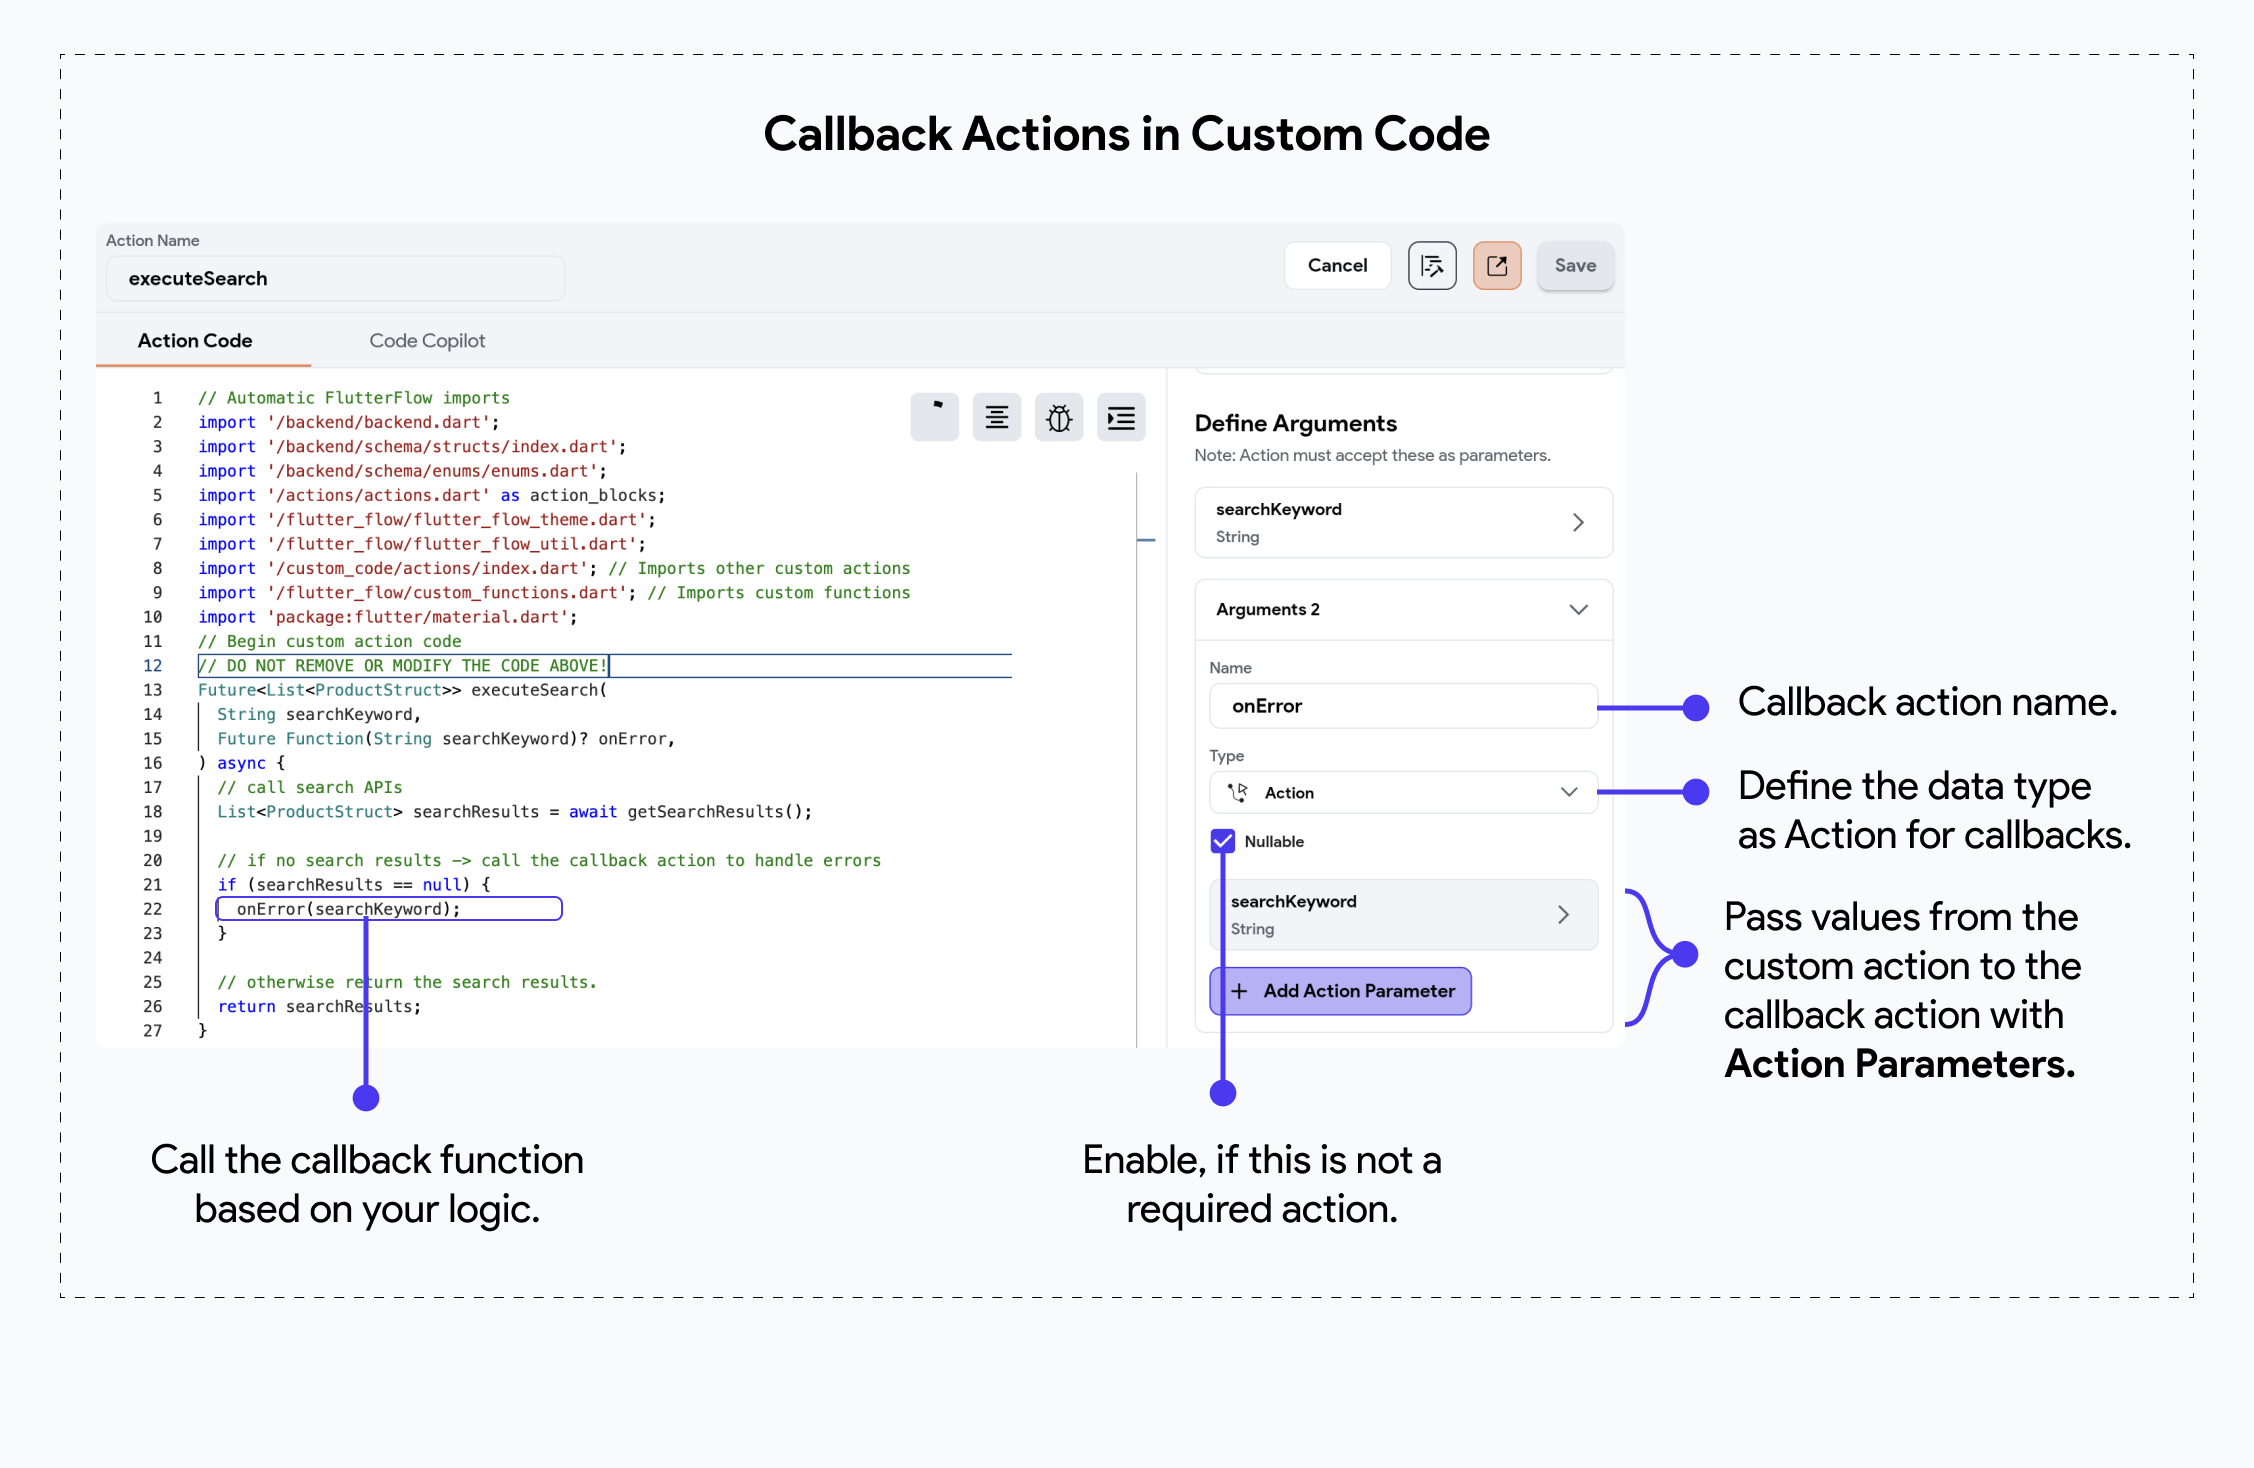
In the following example, we have a Custom Action that takes an onError(searchKeyword) callback
action with an Action Parameter searchKeyword. This means that the custom action will provide this search keyword back to the callback action when it calls it.
Add an Action to Callback Action
To provide a callback action to your main custom action, check out this quick guide where we provide a "Show Snackbar" action to onError, displaying a combined text using the search keyword.
Return Values
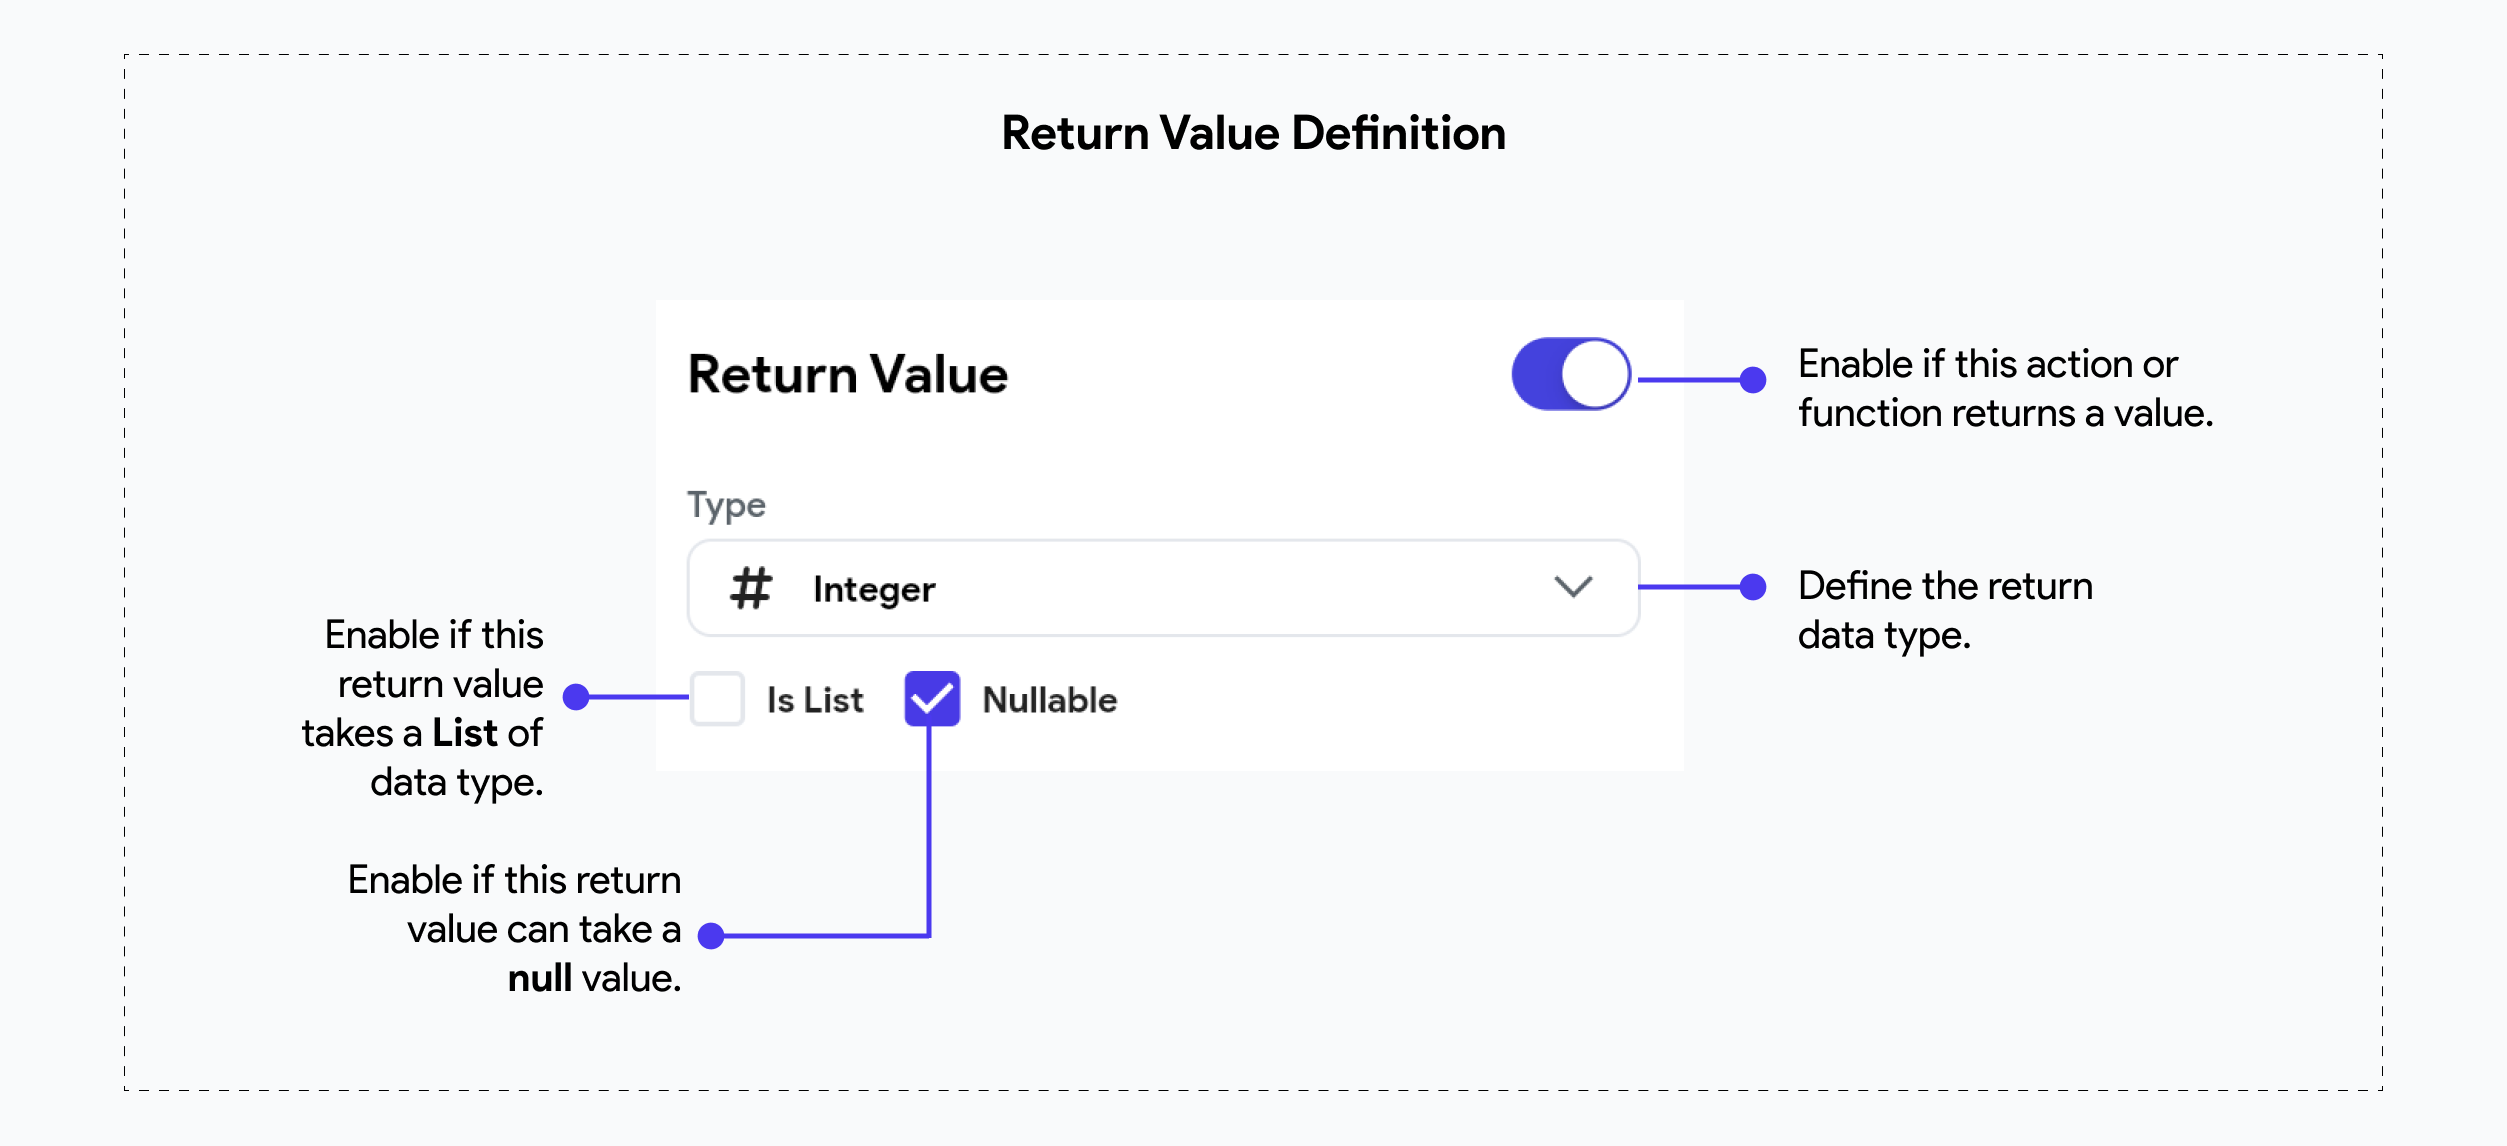
In FlutterFlow, custom code can not only take input arguments but also return values, back to the caller. Return values allow your custom functions, or actions to pass data back to the main application, enabling further processing or UI updates based on the results of the custom code.
Return Values are only enabled for Custom functions & Custom Actions. Custom Widgets cannot return a value at the moment.
Here's an example of an Action that returns a nullable integer.
Description
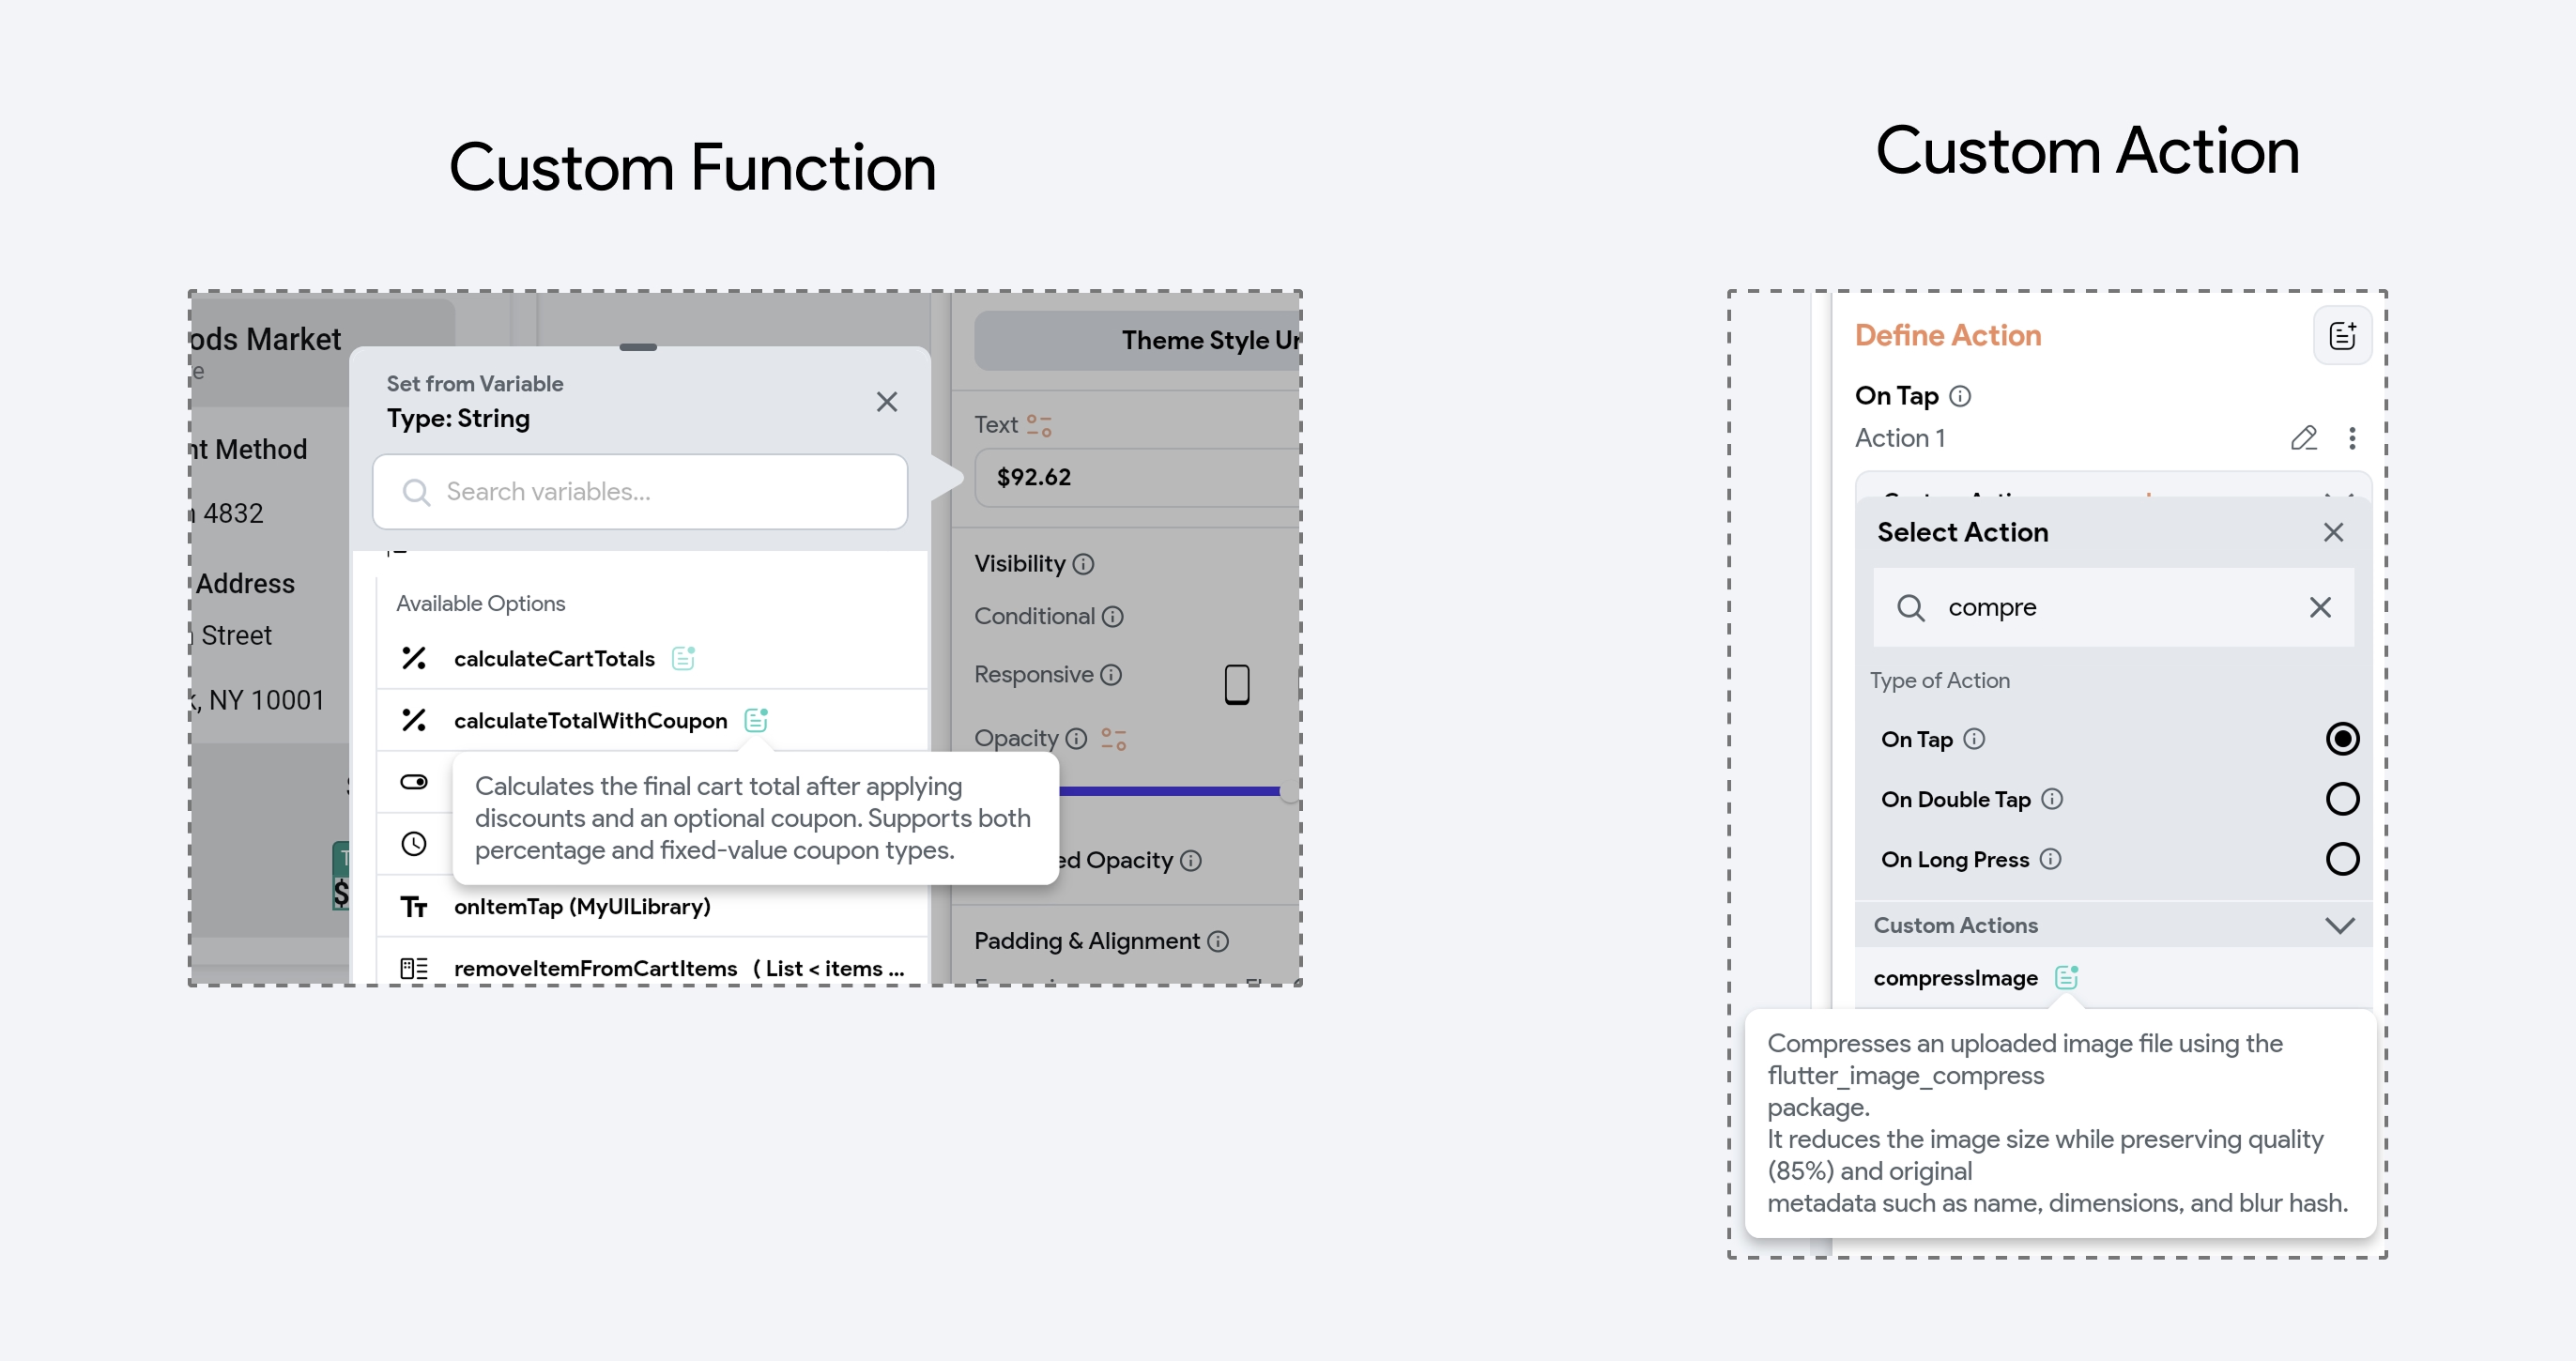
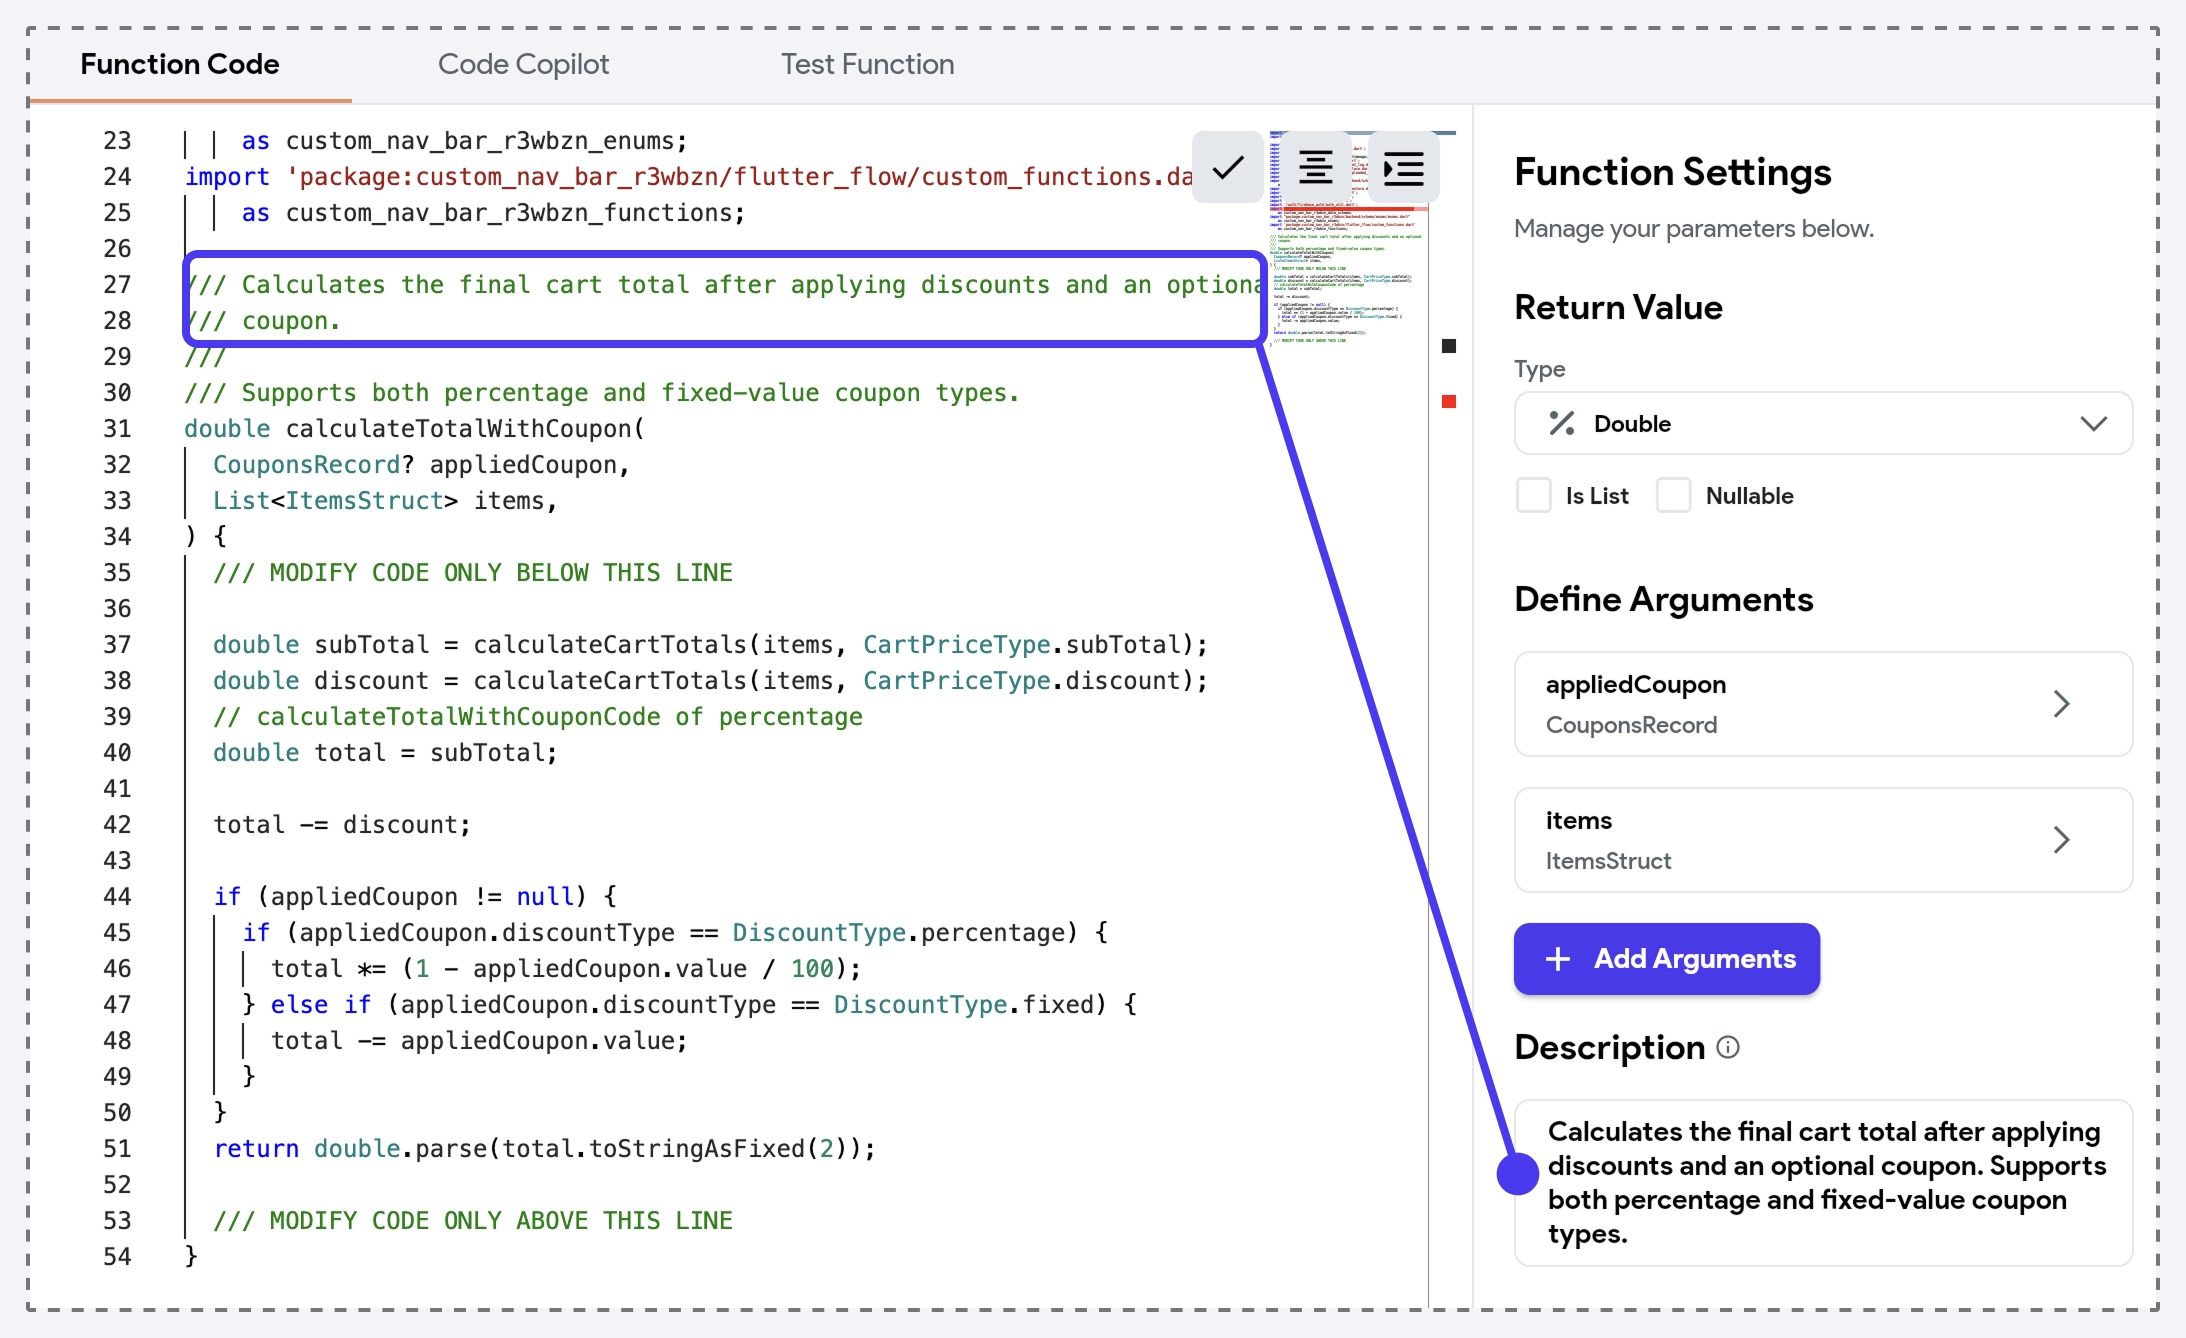
You can add a Description note on Custom Functions and Custom Actions to briefly explain their purpose, usage, or important details. This helps clarify what the function or action is intended for, making your project more understandable and maintainable—especially in libraries and collaborative environments.
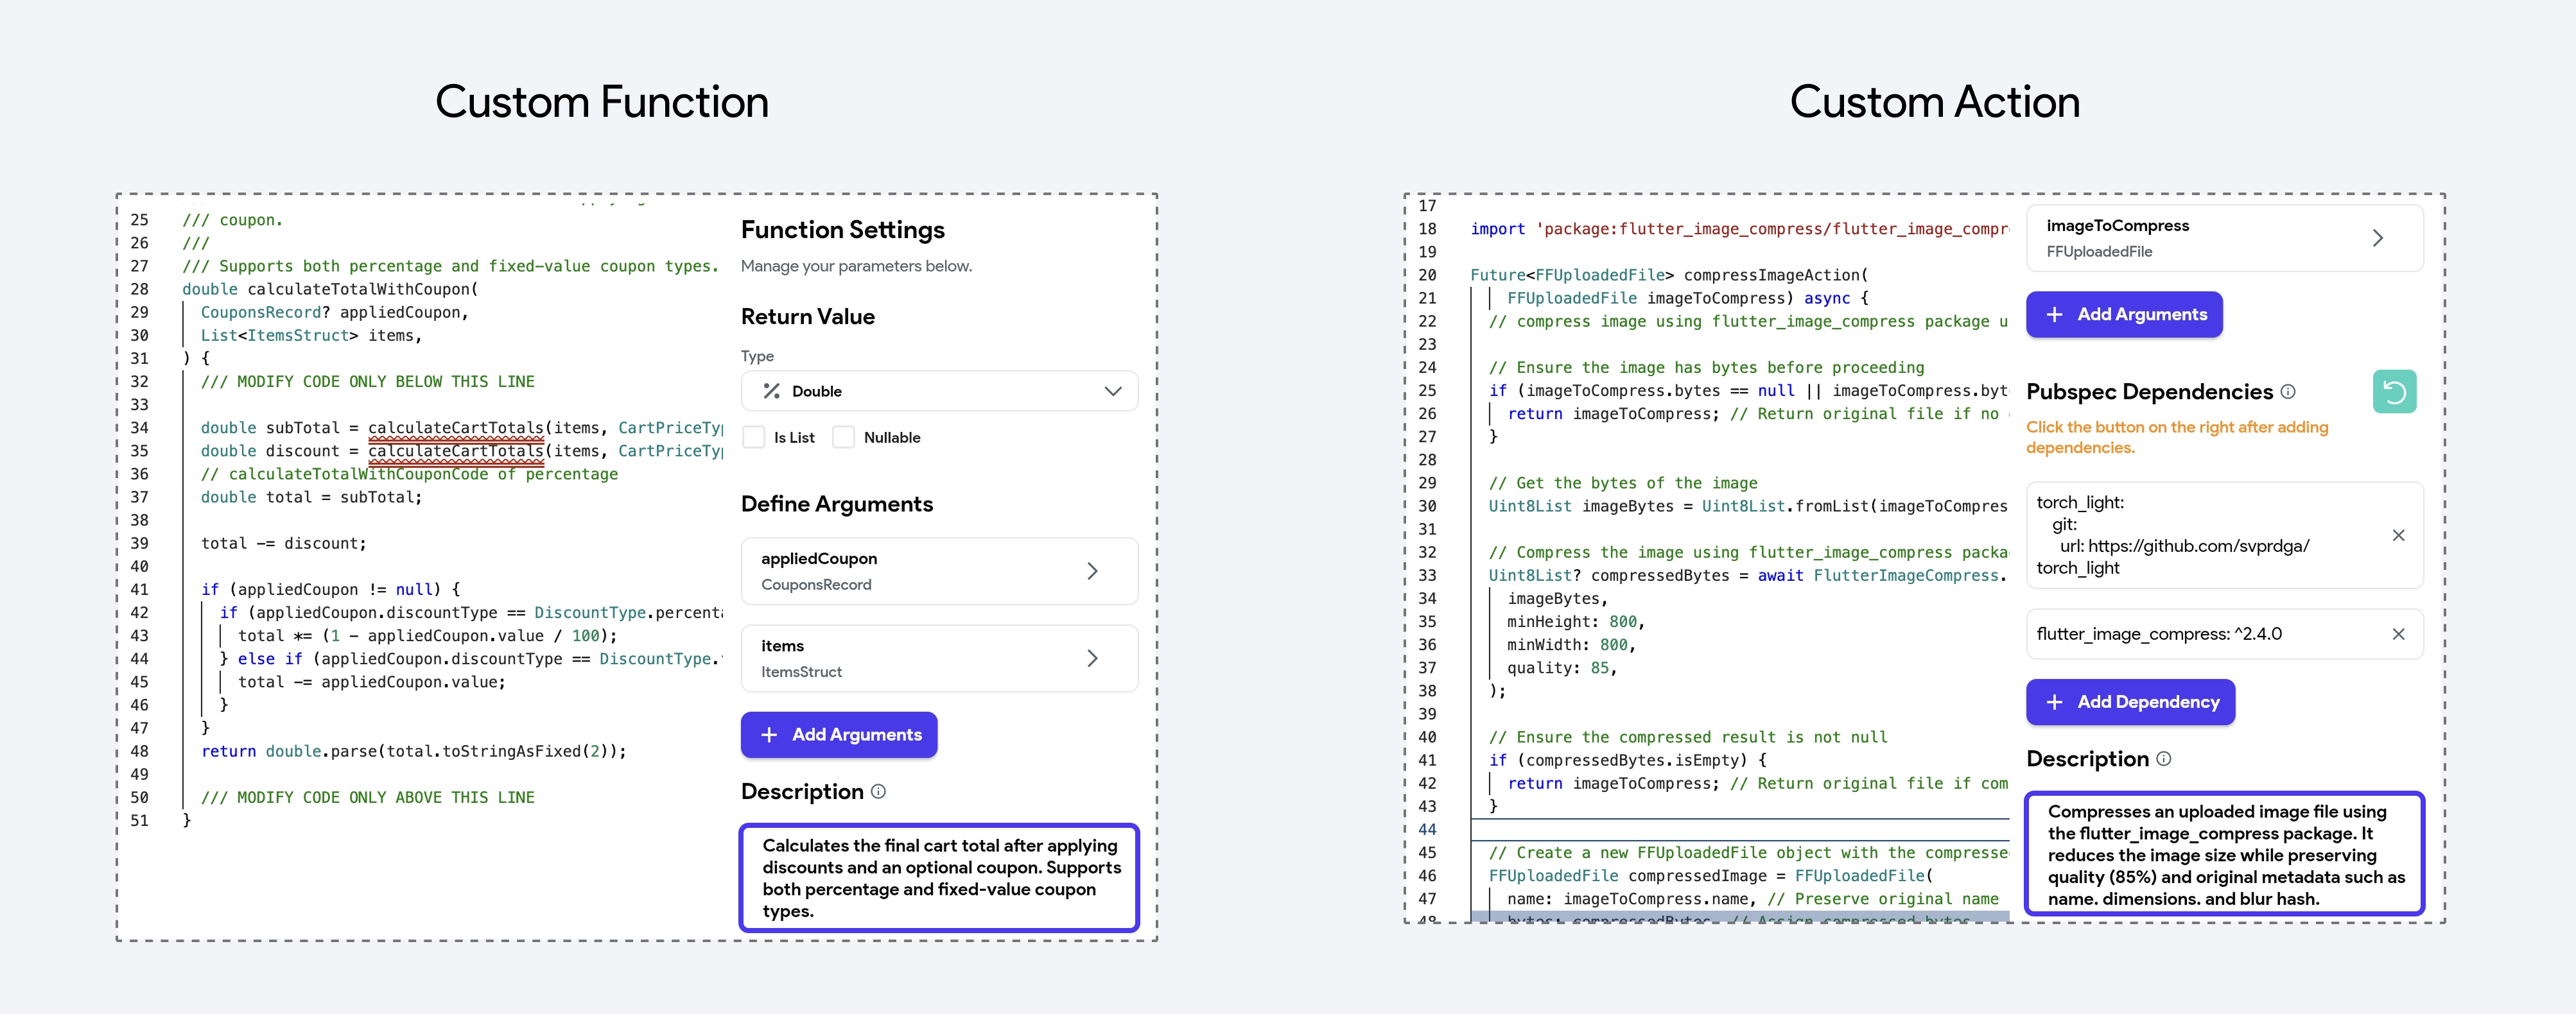
You can view these descriptions as tooltips by hovering over the green note icon when selecting a Custom Function or Custom Action.
In the generated code, descriptions are added as comments before the function definition, and they also appear in the custom code editor.
Adding a Pubspec Dependency
Pub.dev is the official package repository for Dart and Flutter. It hosts a wide range of packages, libraries, and tools that developers can use to extend the functionality of their Dart and Flutter applications.
Flutter Favorite packages are a curated set of packages on pub.dev that have been recognized by the Flutter team and the community for their quality, popularity, and usefulness in Flutter development. These packages are marked with a "Flutter Favorite" badge, indicating that they meet a high standard of quality, reliability, and best practices.
You can explore the Flutter Favorite packages on pub.dev's Flutter Favorites page.
To add a pubspec dependency from pub.dev, go to Settings and Integrations > Project Dependencies, then open the Custom Dependencies tab. Click Add Pub Dependency, enter the package name and version, and click Add to include it in your project.
Choosing the correct package from pub.dev
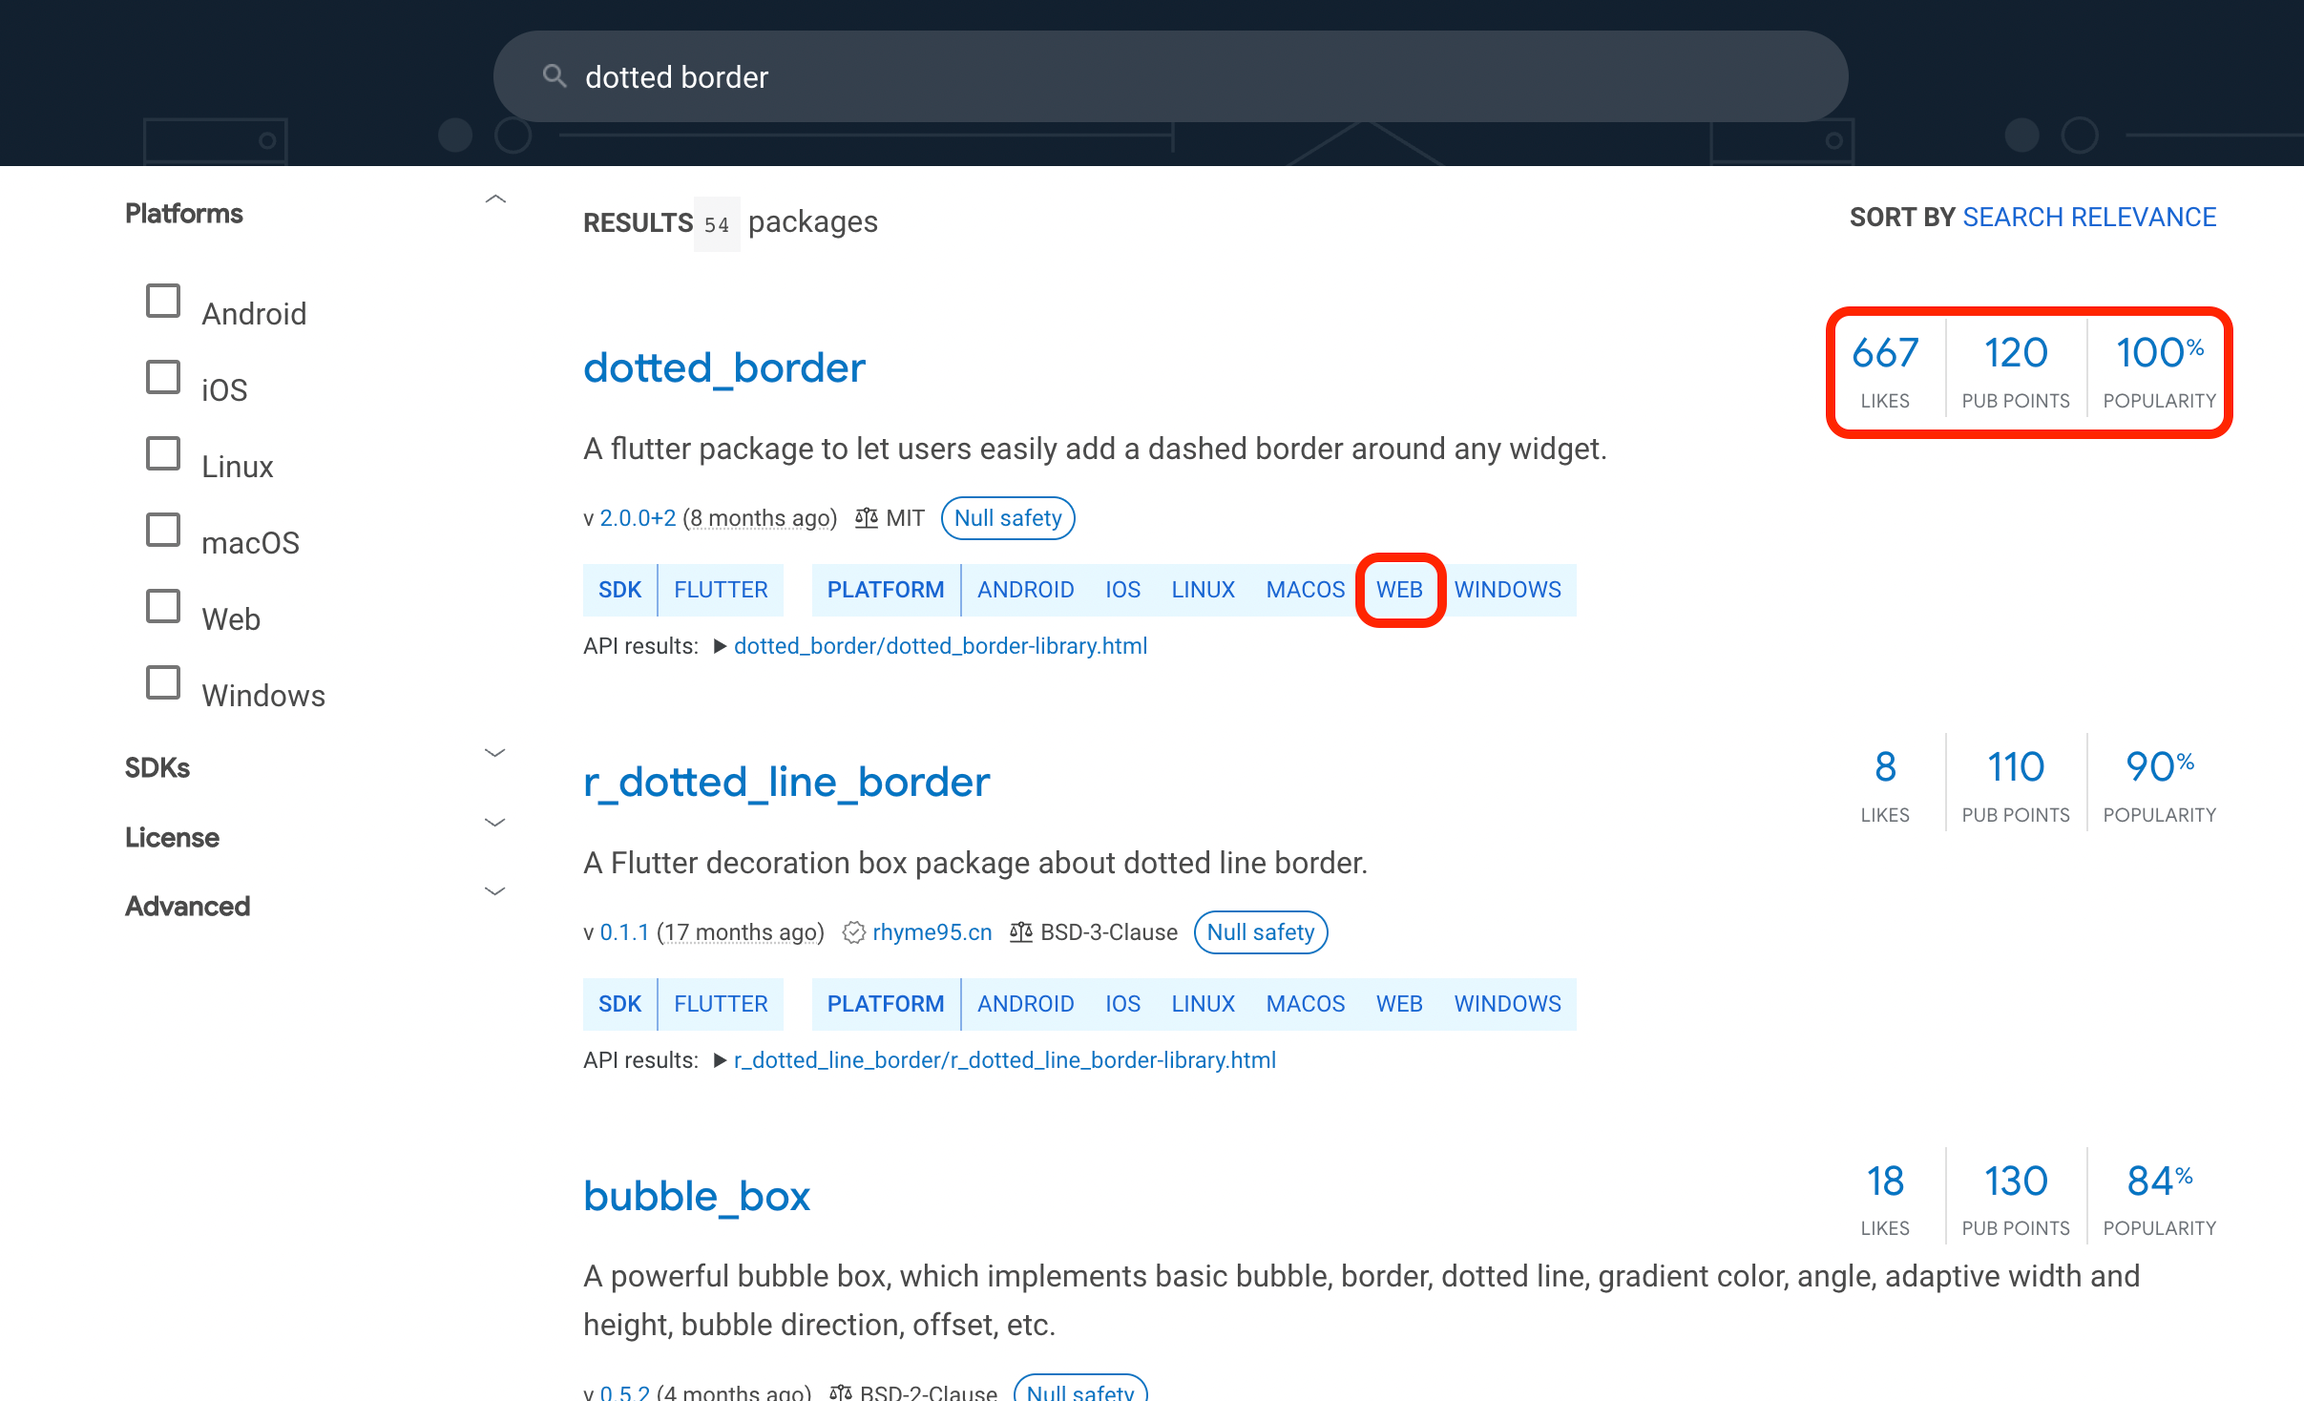
You will find varieties of dependencies for a specific requirement, and choosing the best one can be challenging. This section helps you identify the right dependency by examining its score.
When you search for any dependency in pub.dev, you will get a list of dependencies. You can filter out the result based on which dependency is more inclined toward your needs. You can do so by opening and checking each dependency manually.
Once you have a handful of dependencies, consider the following factors while choosing the final one.
- WEB: It must support Web to run your app in our Run/Test Mode.
- Likes: This shows how many developers have liked a dependency.
- Pub Points: Tells the quality of the dependency (out of 130) based on code style, platform support, and maintainability.
- Popularity: This metric indicates how many apps use the package. A high popularity score (out of 100%) can suggest that the package is stable and trusted by many developers.
- Documentation: A well-documented package will save you time and reduce ambiguity. Check if the package has clear usage examples, a comprehensive README, and ideally API documentation.
- Maintenance & Updates: Check the last update date. A regularly updated package is more likely compatible with the latest Dart/Flutter versions and has fewer bugs.
When adding a pubspec dependency to your custom code in FlutterFlow, you’ll need two pieces of information: the Package name with its Version number and the Import statement.
Using Unpublished or Private Packages
FlutterFlow supports the use of unpublished packages, which allows you to integrate packages that are not yet available on pub.dev. This capability is particularly useful when working with custom, forked, or private packages hosted on public or private repositories. By leveraging this, you can enhance your app’s functionality with customized or proprietary libraries tailored to your specific needs.
- Using a Different Branch of a Package: When you need to test or use features that are only available on a specific branch of a package.
- Forked Version for Customizing Features: When you need to fork a package to customize its functionality or fix issues that the original maintainer hasn’t addressed.
- Private Packages for Internal Use: Companies or enterprises may have internal Flutter libraries that they want to use in their FlutterFlow app but cannot publish publicly due to confidentiality or proprietary restrictions.
Add Packages from Public Repositories
For packages hosted on public repositories (e.g., GitHub), you can add them to your FlutterFlow project by specifying the repository URL in the following format.
  package_name:
    git:
      url: https://github.com/username/repository_name.git
You can also fine-tune the dependency by using additional parameters like ref and path in the given format. Here are some examples:
- To use a specific branch (e.g.,
development):
  package_name:
    git:
      url: https://github.com/username/repository_name.git
      ref: development
- To use from a specific commit:
dependencies:
  package_name:
    git:
      url: https://github.com/username/repository_name.git
      ref: a1b2c3d4
- To use package located in a subdirectory of the repository:
  package_name:
    git:
      url: https://github.com/username/repository_name.git
      path: packages/subpackage_name
Here’s exactly how you do it:
Add Packages from Private Repositories
For packages hosted in private repositories, you’ll need to authenticate access. This can be done using HTTPS with a personal access token.
For GitHub, you can go to your GitHub account’s settings and generate a token with the necessary permissions and use it in the following format. You can also create and use a fine-grained access token that only has certain permissions.
package_name:
    git:
      url: https://<username>:<personal-access-token>@github.com/username/private_repo.git
Replace <username> with your GitHub username and <personal-access-token> with the generated token.
Setup Code
To configure your custom code with the package, copy and paste the following items from the package's pub.dev page:
- Copy Package Name & Version
To use the dependency in your Custom Action or Custom Widget resource file, go to the package's pub.dev page and click the Copy to Clipboard icon next to the package name and version. Then, paste it into the Pubspec Dependency section (bottom right) of the FlutterFlow code editor.
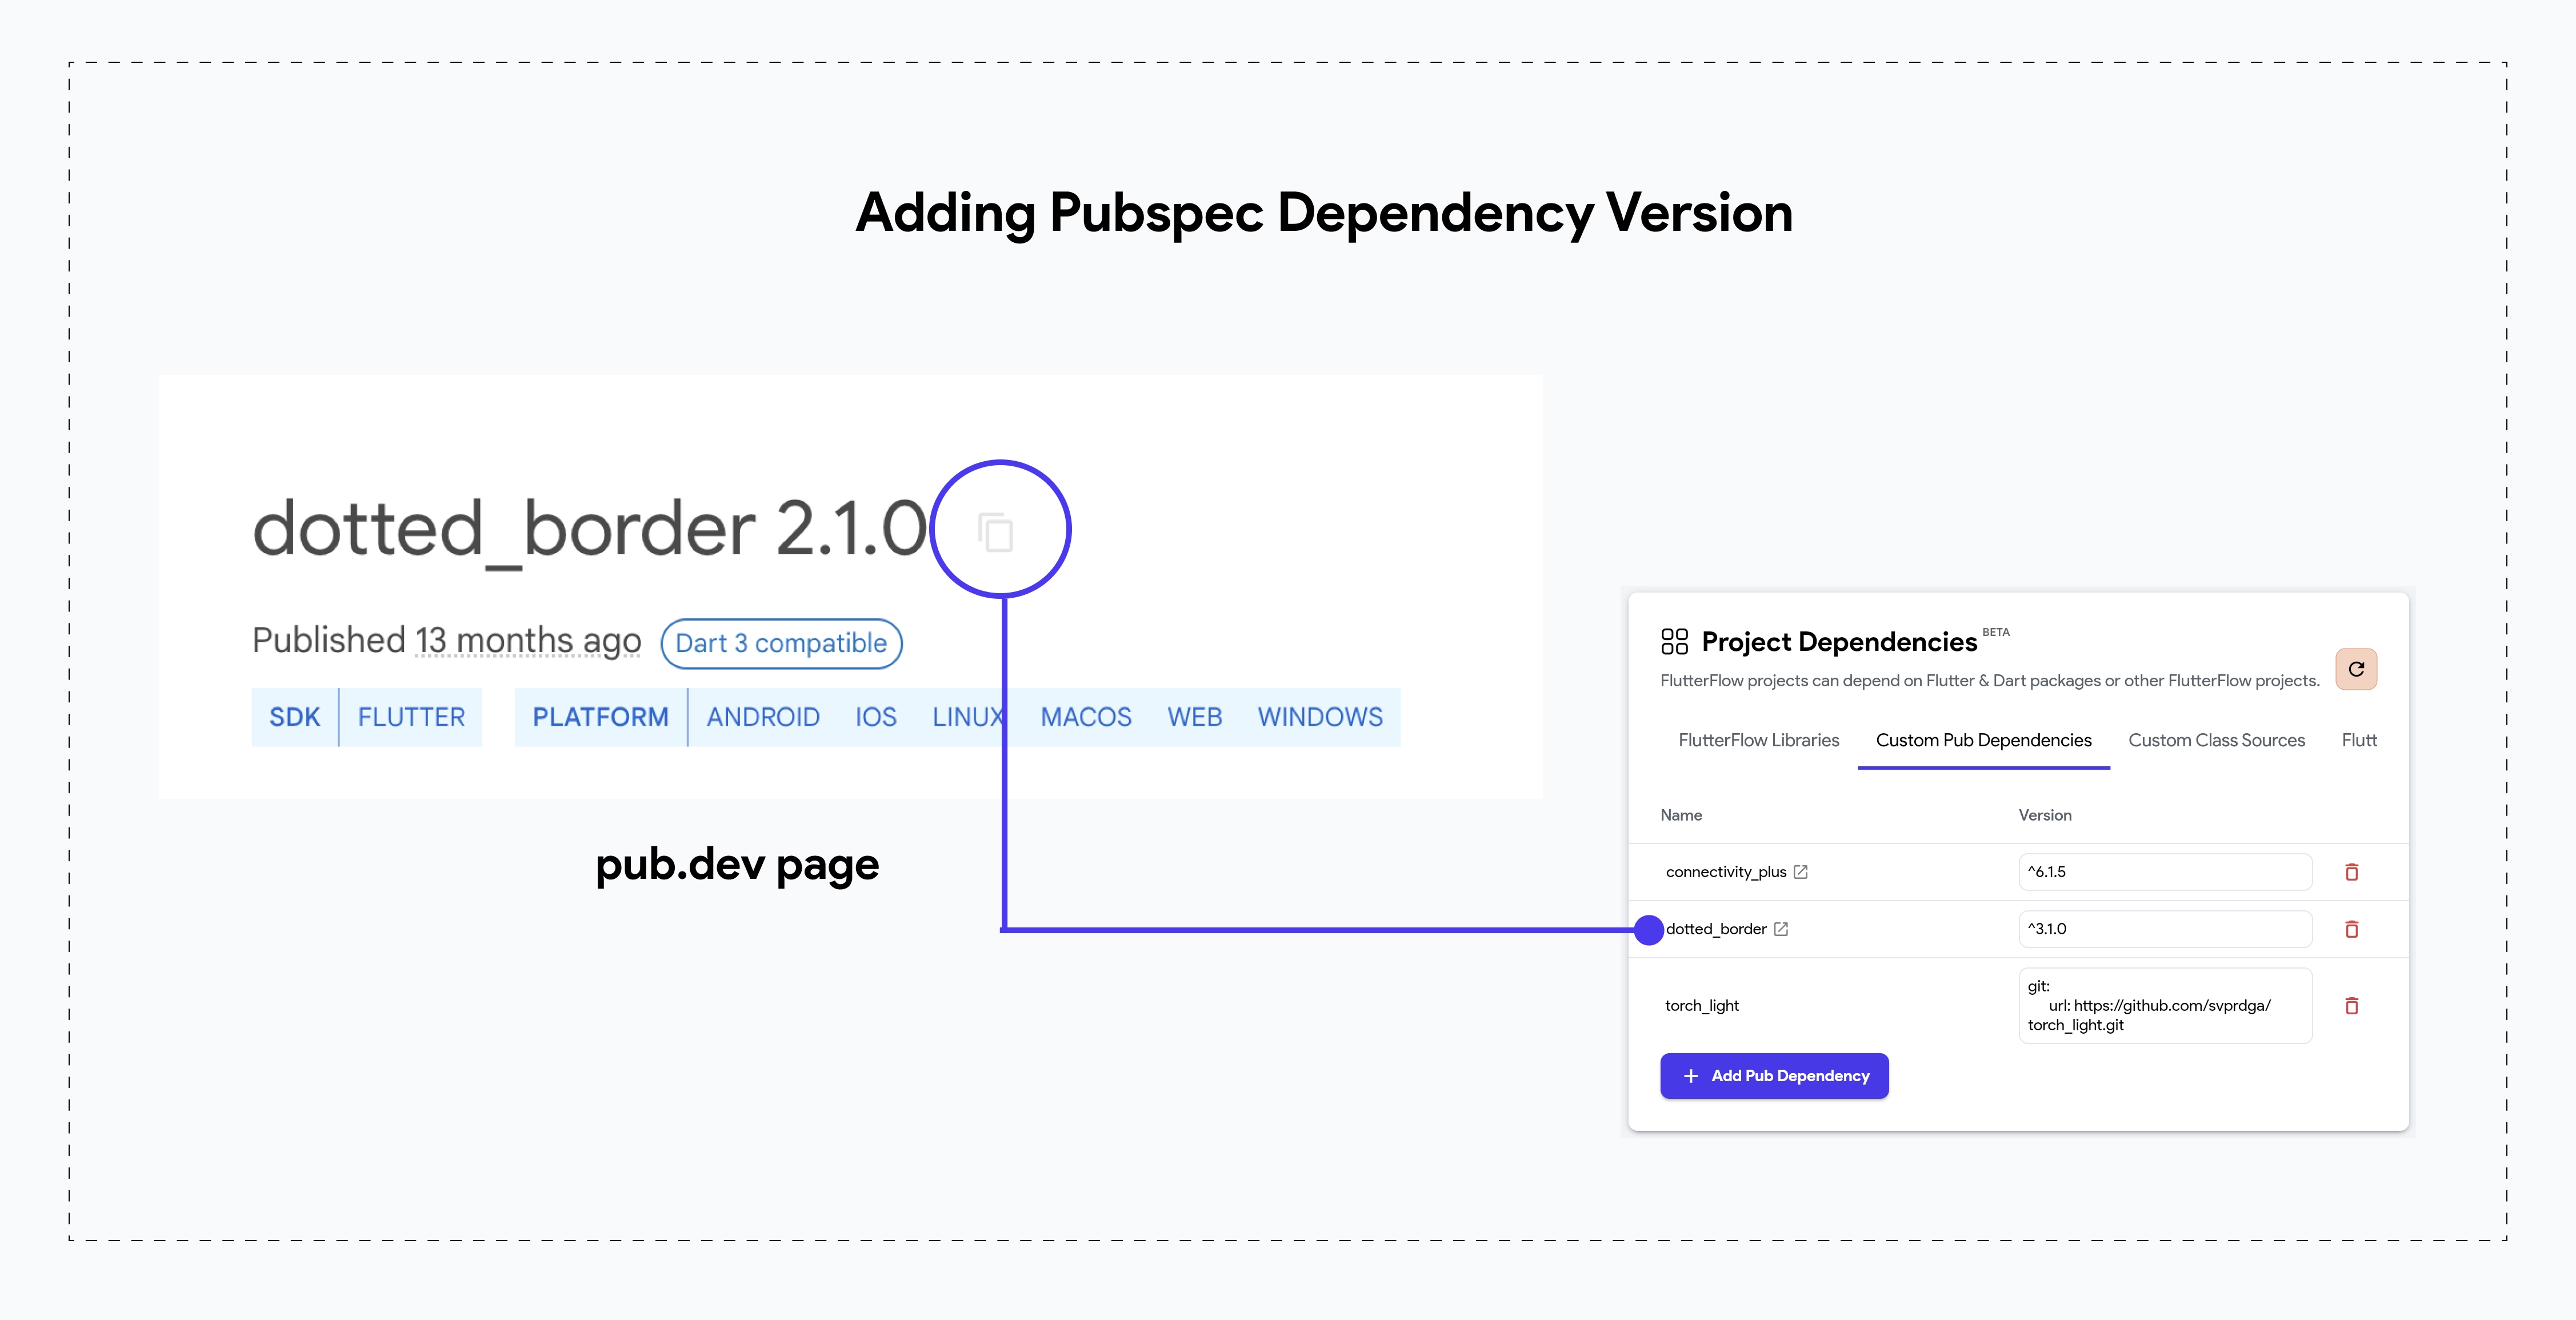
See example for more information.
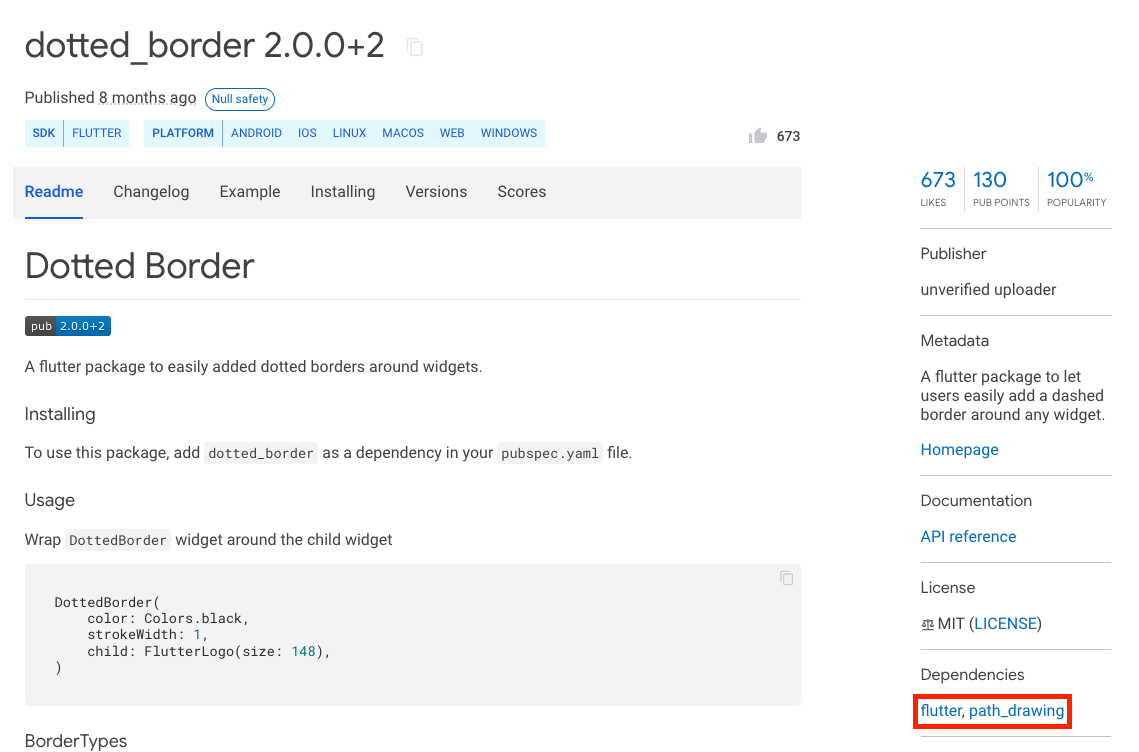
The current dependency might depend on other dependencies to work. So make sure you also copy the name and version of all the additional dependencies to specify in the code
You can check if the current dependency has any additional dependencies inside the 'Dependencies' section at the bottom right side.
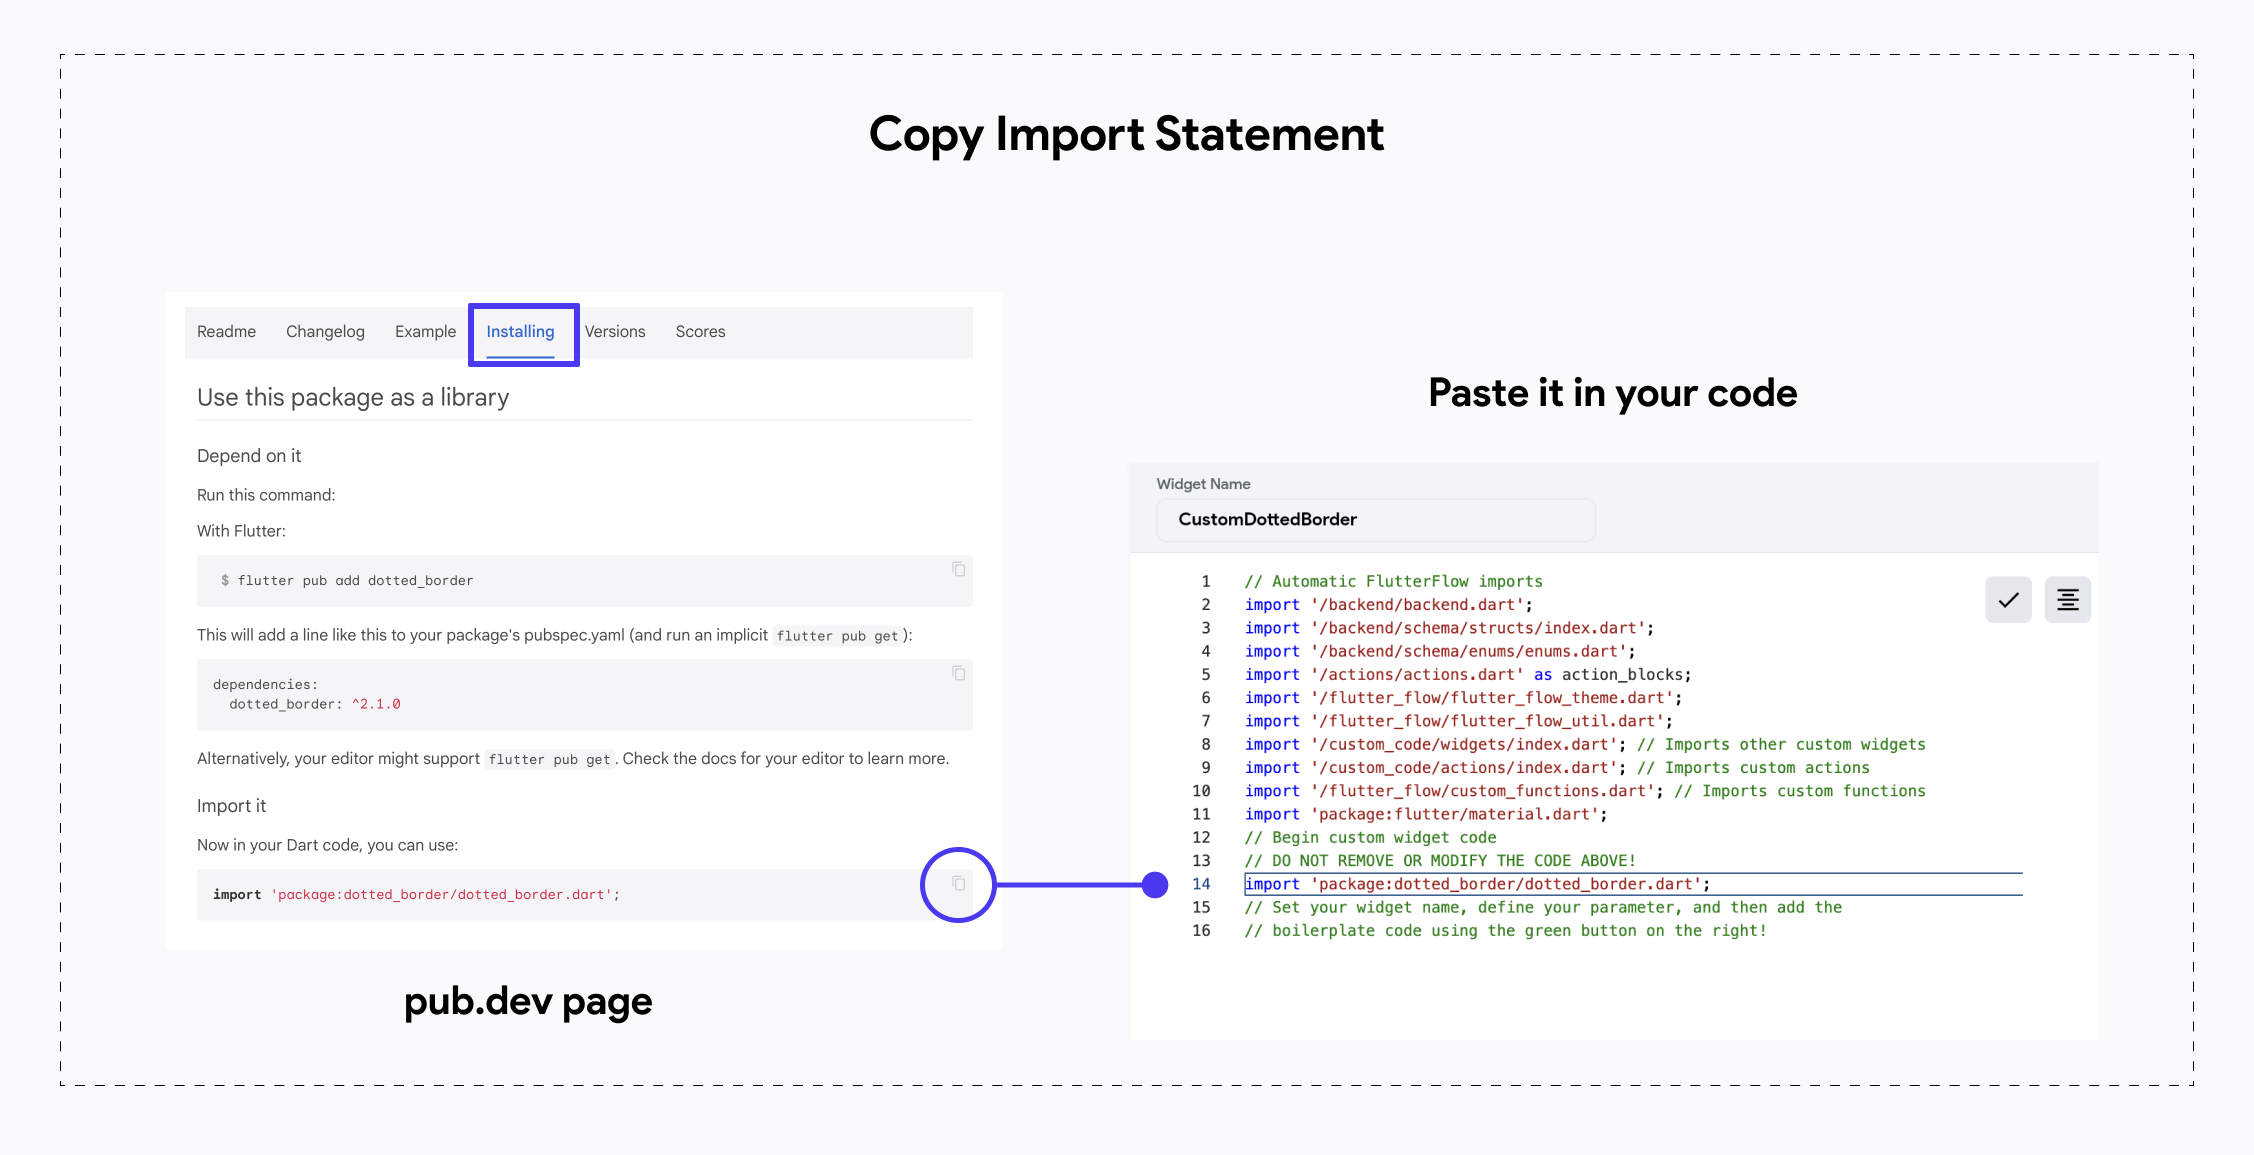
- Copying Import Statement
An import statement specifies the location of the dependency's code. When creating a custom widget or action, add this statement at the end of the default import statements in the code editor.
Open the dependency page and select the Installing tab; under the Import It section, you'll find the import statement. To copy, click the Copy to Clipboard icon.
- Copy Example Code
Example code is always available in the Example tab on the package’s pub.dev page. Copy any relevant snippets that demonstrate usage, and paste them into your custom widget or function file. You can then modify the code as needed to fit your project.
Add Pubspec Dependency to Custom Code: Example Guide
In this example, we are using the
flutter_rating_bar dependency to create a
ProductRatingBar custom widget for our
Product pages. See how we utilize the example code from pub.dev and add the customized widget in
FlutterFlow:
This example demonstrates how to add a pub.dev package to a Custom Widget snippet, but you can follow the same process for adding a package to Custom Actions. For a deep dive, explore the detailed documentation on Custom Widgets and Custom Actions.
Manage Dependencies
You can manage dependencies directly from Settings and Integrations > Project Dependencies > Custom Dependencies tab.
If version conflicts occur, warnings will appear in both the Custom Dependencies tab and the Custom Code editor. You can also bump package versions directly from the list, making it easier to resolve issues and keep dependencies consistent.