Claude Code Plugin
The FlutterFlow plugin for Claude Code packages FlutterFlow's agentic building experience as a Claude Code plugin, and works in both the Claude Code terminal (CLI) and the Claude Code desktop app. Once installed, it:
- Installs the FlutterFlow CLI automatically when a session starts. If the Dart SDK is missing, it points you to the installer instead of failing.
- Stores your API key securely by reading it once from your clipboard, so the key never appears in the chat.
- Adds a guided build skill (
/flutterflow:build) that sets up a workspace, then follows an orient → validate → apply workflow for every change.
The plugin drives the same FlutterFlow CLI described in Build with AI Agents. If you use a different agent (such as Gemini CLI or Codex), or prefer to install the CLI and configure the MCP server yourself, follow that page instead. Both paths produce the same result.
The plugin is open source. Browse the code, releases, and issues on GitHub at FlutterFlow/flutterflow-claude.
Before you start, make sure you have:
- Claude Code installed and signed in (the terminal CLI, the desktop app, or both). Get them from claude.com.
- Git, which Claude Code uses to install the plugin.
- Dart, bundled with Flutter, which the FlutterFlow CLI requires. If it's missing, the plugin detects it and links you to the installer.
macOS and Linux work out of the box. On Windows, the plugin's automatic setup requires a bash on your PATH (from Git Bash or WSL). Without one, install the CLI manually (see Installation) and let flutterflow ai prompt for your API key. The CLI itself supports Windows end-to-end.
Choose Your Claude Code Surface
The plugin behaves the same in the Claude Code terminal and the Claude Code desktop app. Only plugin installation and session startup differ. Both surfaces read the same Claude Code configuration, so installing the plugin once makes it available in both.
Claude Code Terminal (CLI)
Use this path when you run claude from a terminal.
-
Install the plugin with two slash commands inside a Claude Code session:
/plugin marketplace add FlutterFlow/flutterflow-claude
/plugin install flutterflow@flutterflow
Or run the equivalent commands from your shell:
claude plugin marketplace add FlutterFlow/flutterflow-claude
claude plugin install flutterflow@flutterflow -
Start a new session from the folder where you want to work. This can be an existing FlutterFlow AI workspace or the parent folder where a new one should be created:
cd /path/to/your/projects
claude -
Describe the FlutterFlow outcome you want at the prompt.
If Claude Code was already running when you installed the plugin, start a new session so the build skill and automatic setup load.
FlutterFlow/flutterflow-claude is the GitHub repository the plugin installs from; flutterflow after the @ is the marketplace name.
📸 Image placeholder: terminal install. Screenshot of a Claude Code terminal session after running the two /plugin commands, showing the marketplace added and the confirmation that the flutterflow plugin is installed and enabled.
Claude Code Desktop App
Use this path when you work in the Claude Code desktop app on macOS or Windows. Installation happens entirely in the app, with no terminal commands required.
-
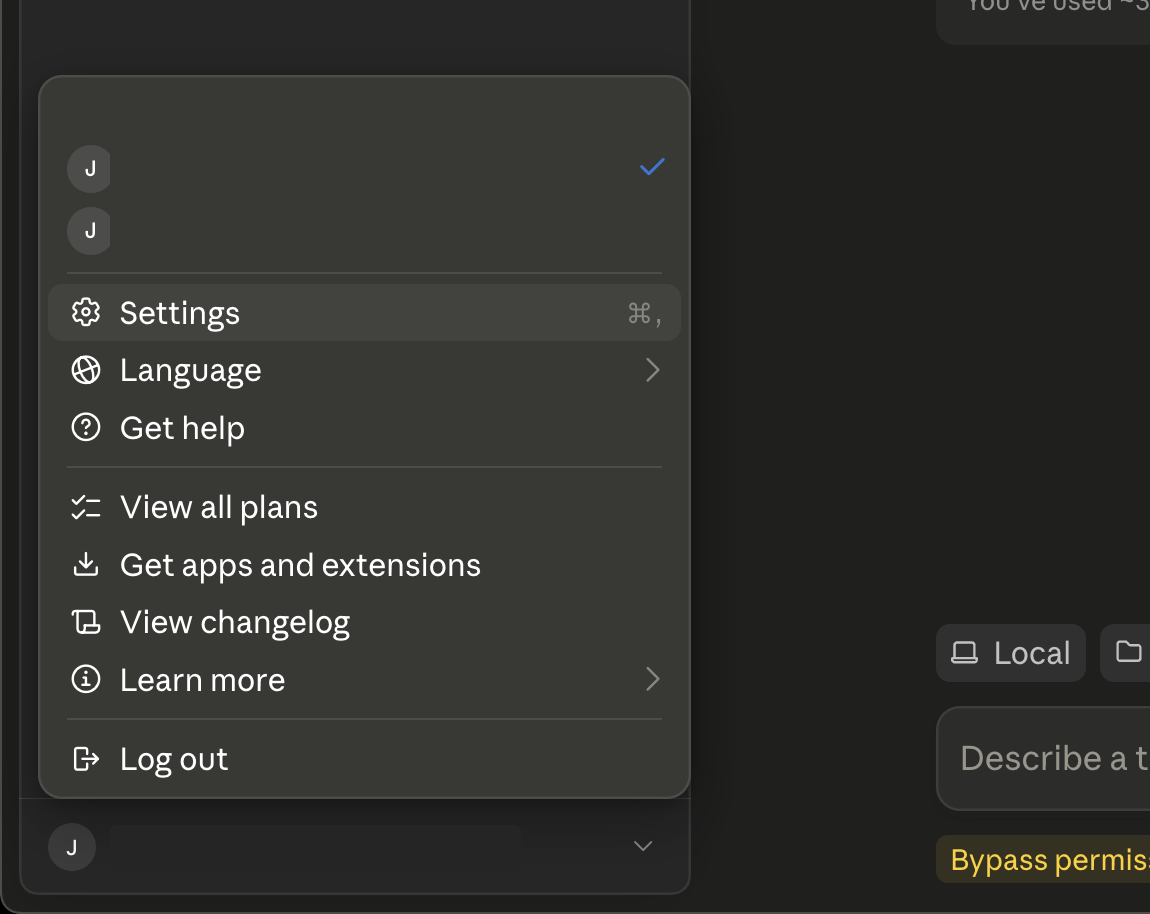
Open the account menu in the lower-left corner of the app and select Settings.
-
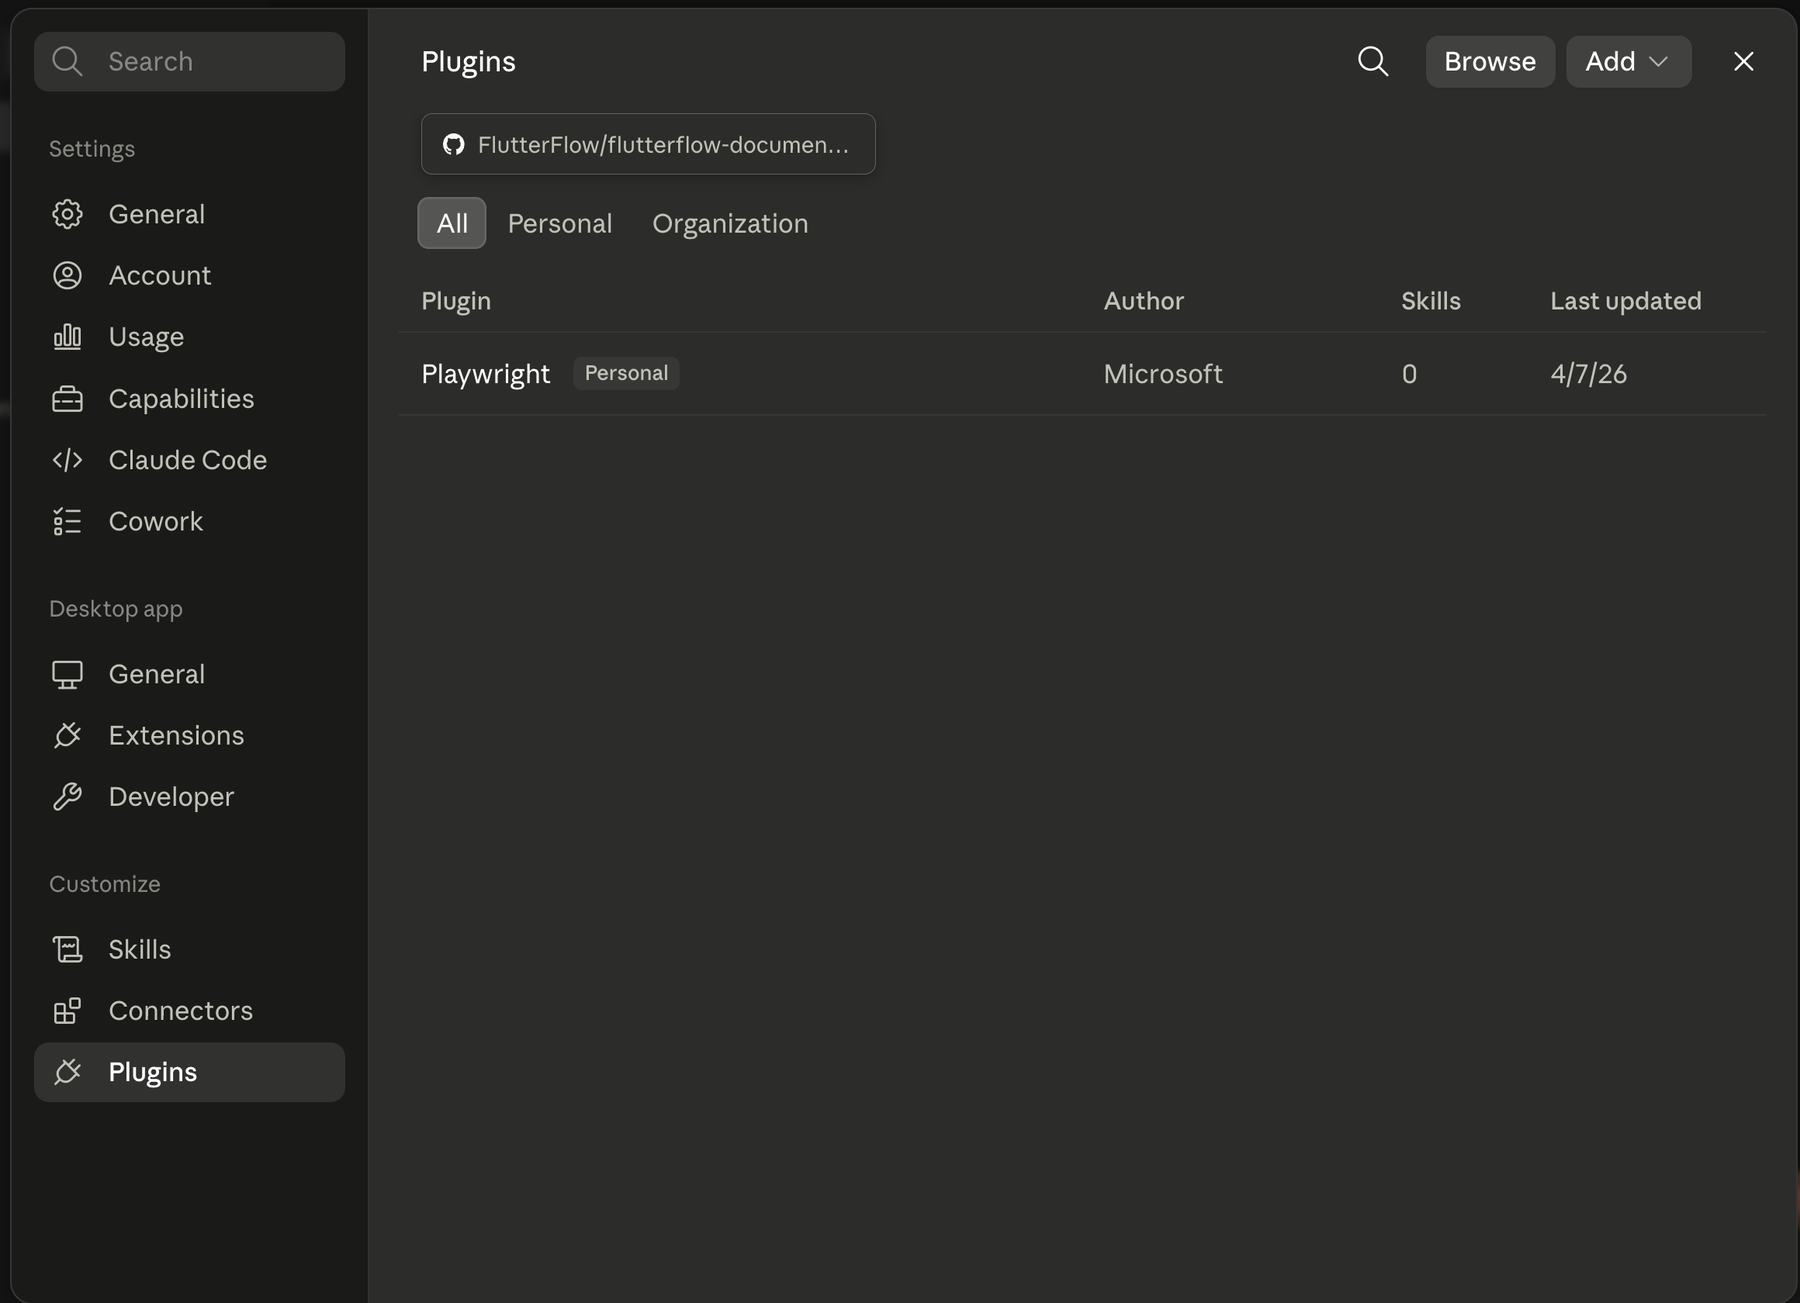
Under Customize, select Plugins.
-
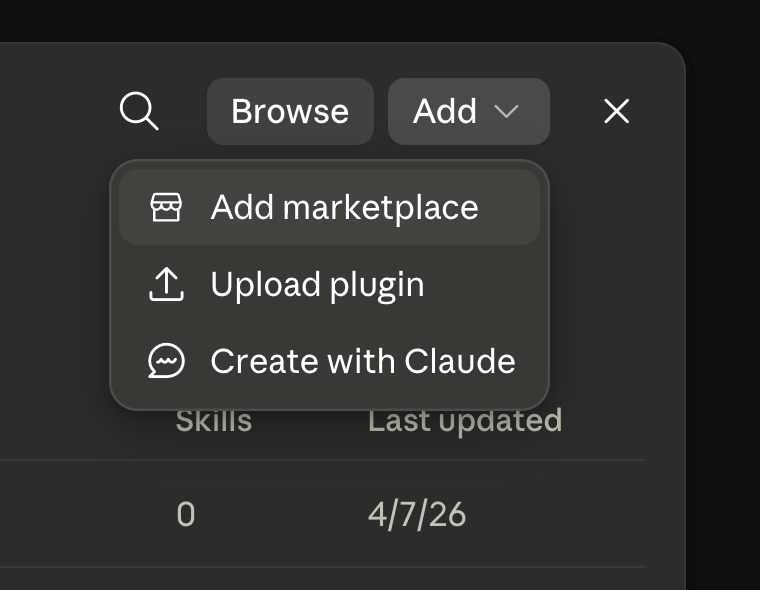
Select Add, then Add marketplace.
-
In URL, enter
https://github.com/FlutterFlow/flutterflow-claude, then select Use "https://github.com/FlutterFlow/flutterflow-claude".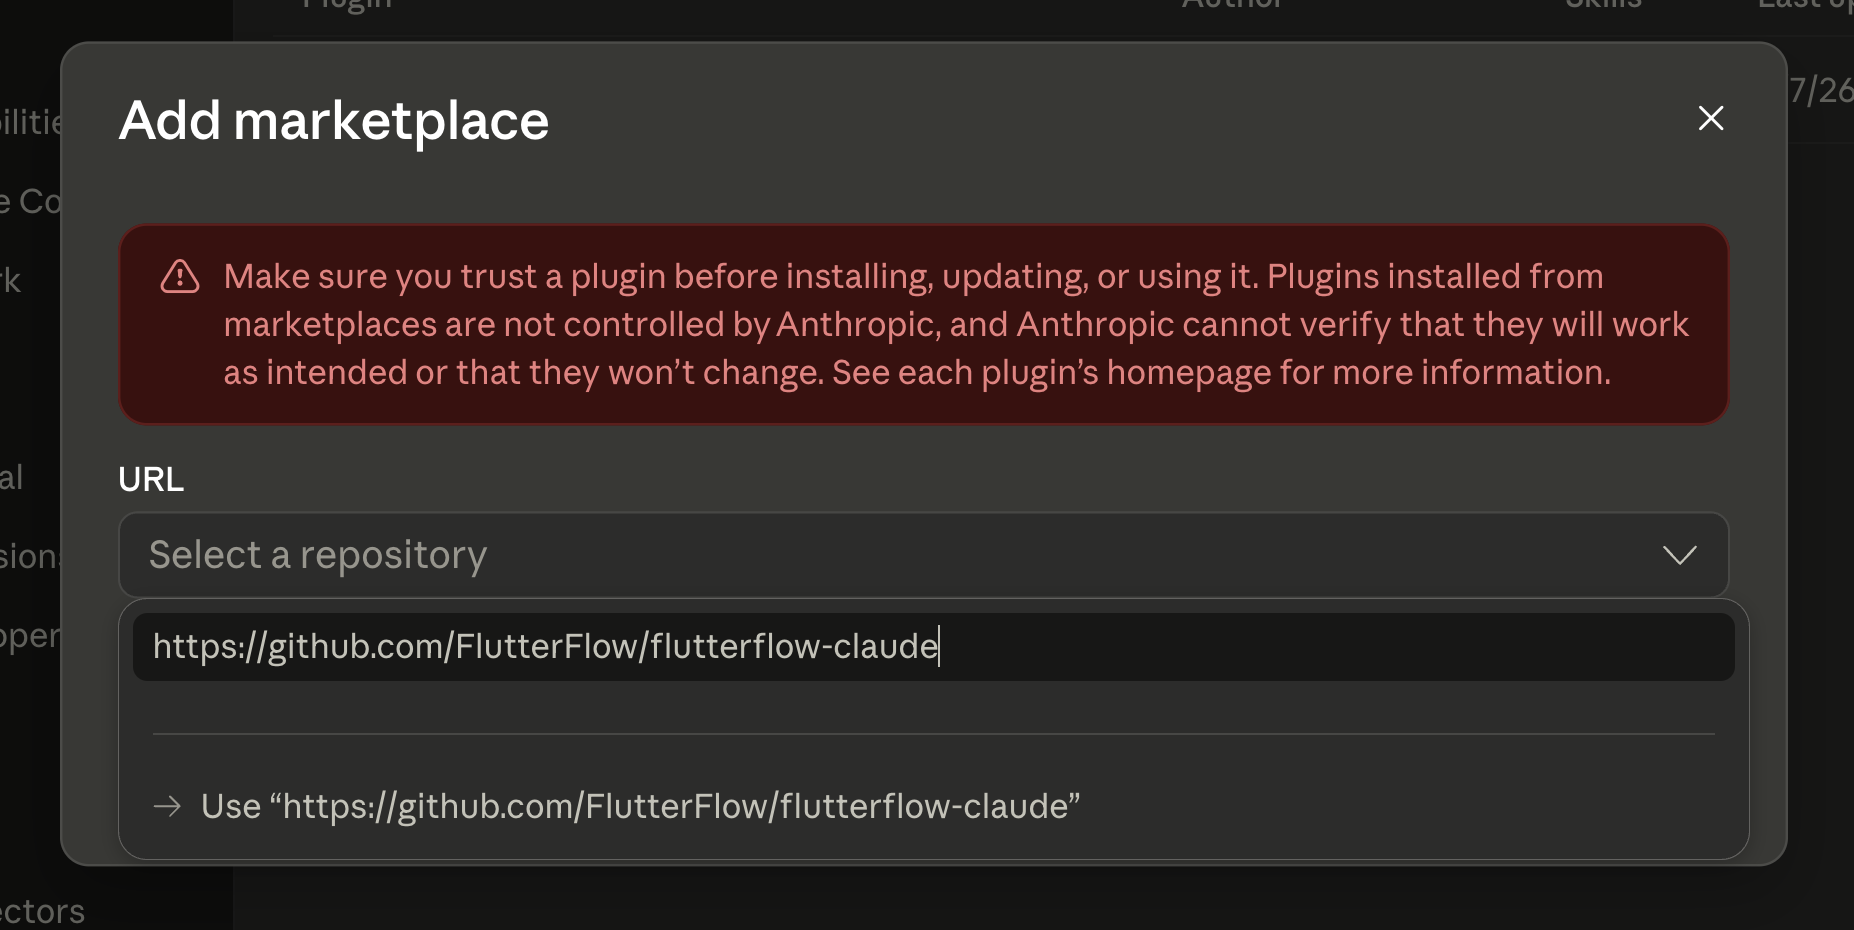
-
In the plugin directory, select Code. Under the
flutterflowmarketplace, find the FlutterFlow plugin and select the + button on its card.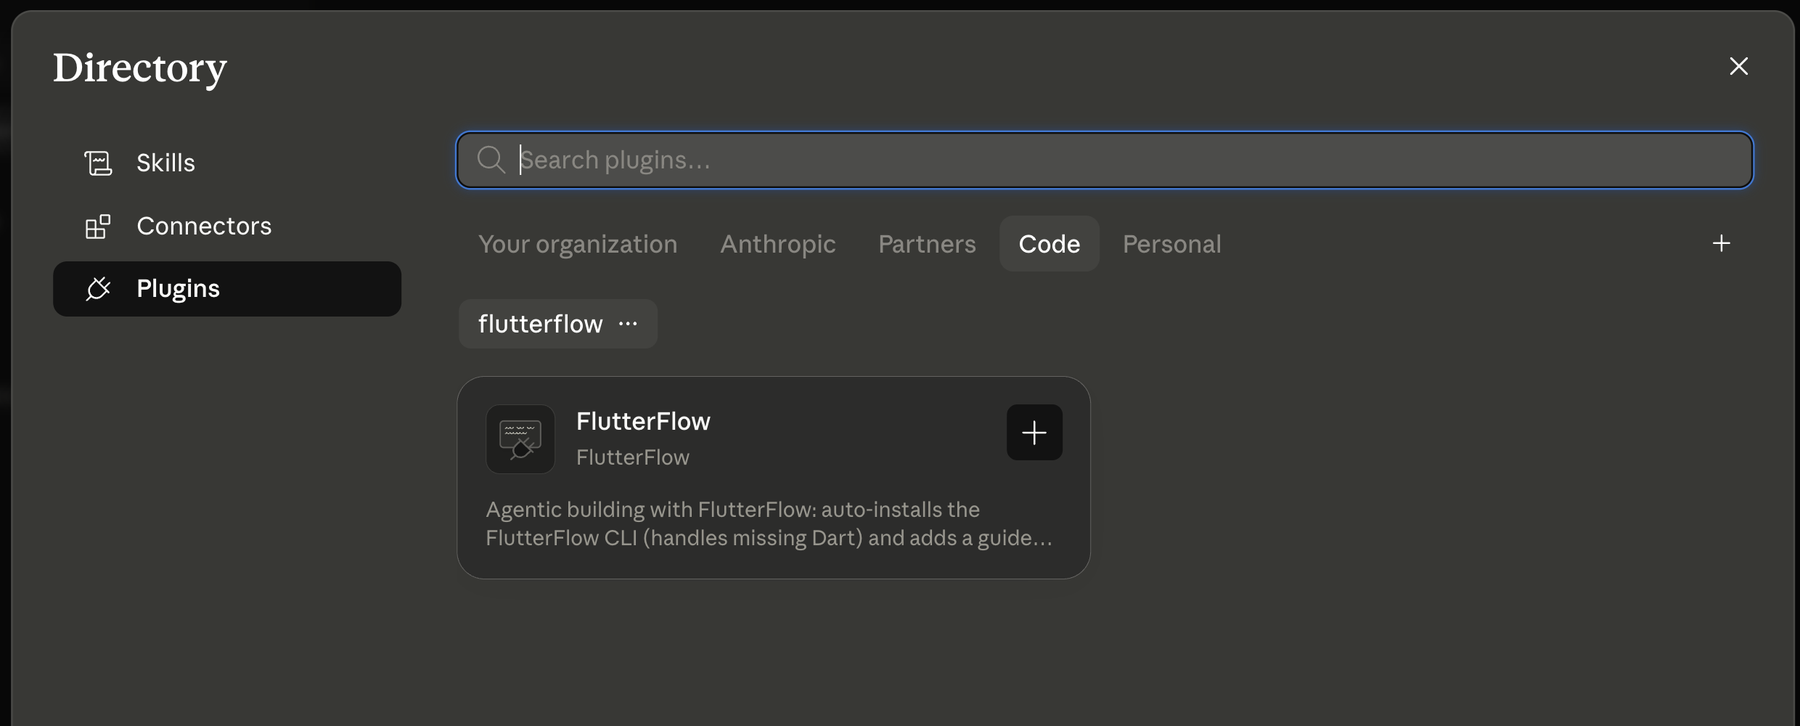
-
Wait for the FlutterFlow is installed and ready to use. confirmation.

-
Close Settings, open the Code tab, and start a new session. Choose Local as the environment, select the folder where you want to work, and describe the FlutterFlow outcome you want in the prompt box. The folder can be an existing FlutterFlow AI workspace or the parent folder where a new one should be created.
- Plugins are available in the desktop app's Local and SSH sessions, not in cloud or WSL sessions.
- The desktop app reads your
PATHwhen it launches. If Dart or the FlutterFlow CLI was installed while the app was open and a session can't find them, quit and reopen the app.
Set Up Your API Key
The plugin authenticates with your FlutterFlow API key, and key setup works the same on both surfaces. Until a key is configured, the plugin prints a reminder when a session starts:
[flutterflow] No FlutterFlow API key configured.
[flutterflow]   1) Copy an API key from https://app.flutterflow.io/account
[flutterflow]   2) Come back and tell Claude: "I copied my FlutterFlow API key"
Never paste the API key into the chat, because conversations are logged and retained. Instead, hand the key over through your clipboard:
- Open your FlutterFlow account page and copy your API key. If you don't have one yet, see generating an API token.
- Come back to Claude Code and say: "I copied my FlutterFlow API key".
Claude runs a script bundled with the plugin that reads the clipboard once, validates the key, stores it in ~/.config/flutterflow/claude-env.sh with owner-only permissions, and clears the clipboard. The key itself never enters the conversation. If validation fails (for example, you copied something else in the meantime), Claude asks you to copy the key again and retry.
Tools like Raycast, Alfred, Windows clipboard history (Win + V), and Apple's Universal Clipboard keep their own copy of everything you copy, even after the system clipboard is cleared. If you use one, purge the key from its history after setup.
Working over SSH or in a headless environment? The clipboard hand-off isn't available there, so Claude offers a one-line terminal command that prompts for the key with hidden input. Alternatively, run flutterflow ai in your own terminal and let its setup wizard prompt for the key.
Build with FlutterFlow
Start a new Claude Code session in your working folder: claude in the terminal, or a Local session in the desktop app. On the first session after setup, the plugin installs the FlutterFlow CLI automatically and prints a notice while it works:
[flutterflow] Installing the FlutterFlow CLI…
After that, describe what you want to build. The build skill triggers on FlutterFlow tasks, or you can invoke it explicitly with /flutterflow:build:
> Create a FlutterFlow app for tracking daily habits
> Add a profile page with an avatar, display name, and a settings list
> Change the primary color to teal and update the home page title
Under the hood, the skill follows a disciplined workflow:
- Workspace. Ensures you have a FlutterFlow AI workspace (
flutterflow ai init), bound either to a new app or to an existing project. If you're editing an existing project but don't have its ID handy, Claude lists your account's projects and asks which one to use. - Orient. Reads the project before changing it, using commands like
status,inspect,resources, andsearch. - Author → validate → apply. Writes changes as declarative Dart files, checks them with
flutterflow ai validatefirst, and only then applies them withflutterflow ai run.
Each applied change lands as a commit in your FlutterFlow project. Open the project in the visual builder to verify the result, then keep refining, either visually or with follow-up prompts.
Workspaces created by flutterflow ai init also register the FlutterFlow AI MCP server with Claude Code via a project-scoped .mcp.json. If Claude Code asks to approve a new MCP server named flutterflow_ai when you open a session in the workspace, approve it; the build skill and the MCP server drive the same project state. See Build with AI Agents for details.
The plugin drives the standard flutterflow ai CLI, so the same commands work in any terminal, for example flutterflow ai init my-app, flutterflow ai status, flutterflow ai validate, and flutterflow ai run. See the MCP tools reference for the full command list.
Managing Your API Key
Rotate the key. Create a new API key on your account page, copy it, and tell Claude "I copied my FlutterFlow API key" again. The stored key is replaced and used for subsequent commands.
Remove the key entirely. Delete the stored key file and clear the CLI's cached credentials:
rm -f ~/.config/flutterflow/claude-env.sh
flutterflow ai logout --all
If a key ever appears in the chat, treat it as compromised: delete it on your account page and create a new one.
Update the Plugin
Plugin installs track the latest version of the FlutterFlow marketplace. To update, run this from a terminal (or /plugin marketplace update flutterflow inside a terminal session), then start a new session. The update applies to the terminal and the desktop app alike:
claude plugin marketplace update flutterflow
Troubleshooting
The CLI installed, but the flutterflow command isn't found
The CLI installs to Dart's pub-cache, which may not be on your PATH. Add it to your shell profile and restart the session:
echo 'export PATH="$HOME/.pub-cache/bin:$PATH"' >> ~/.zshrc
The CLI didn't install because Dart is missing
The FlutterFlow CLI requires the Dart SDK, which ships with Flutter. Install Flutter (recommended) or Dart on its own, then start a new Claude Code session. The plugin retries the install automatically.
The desktop app can't find the dart or flutterflow command
The desktop app reads your PATH once, when it launches. If Dart or the FlutterFlow CLI was installed while the app was open, quit and reopen the desktop app. On macOS, make sure your shell profile (for example ~/.zshrc) exports the path; on Windows, add it to your user PATH.
Nothing happens on session start (Windows)
The plugin's automatic setup runs as a bash script, so it needs a bash on your PATH. Install Git Bash or WSL. Alternatively, install the CLI manually with dart pub global activate flutterflow_cli and let flutterflow ai prompt for your API key the first time you run it.
FlutterFlow rejected my API key (401 error)
The key is invalid or was revoked. Copy a fresh key from your account page and tell Claude "I copied my FlutterFlow API key". Don't paste the key into the chat.