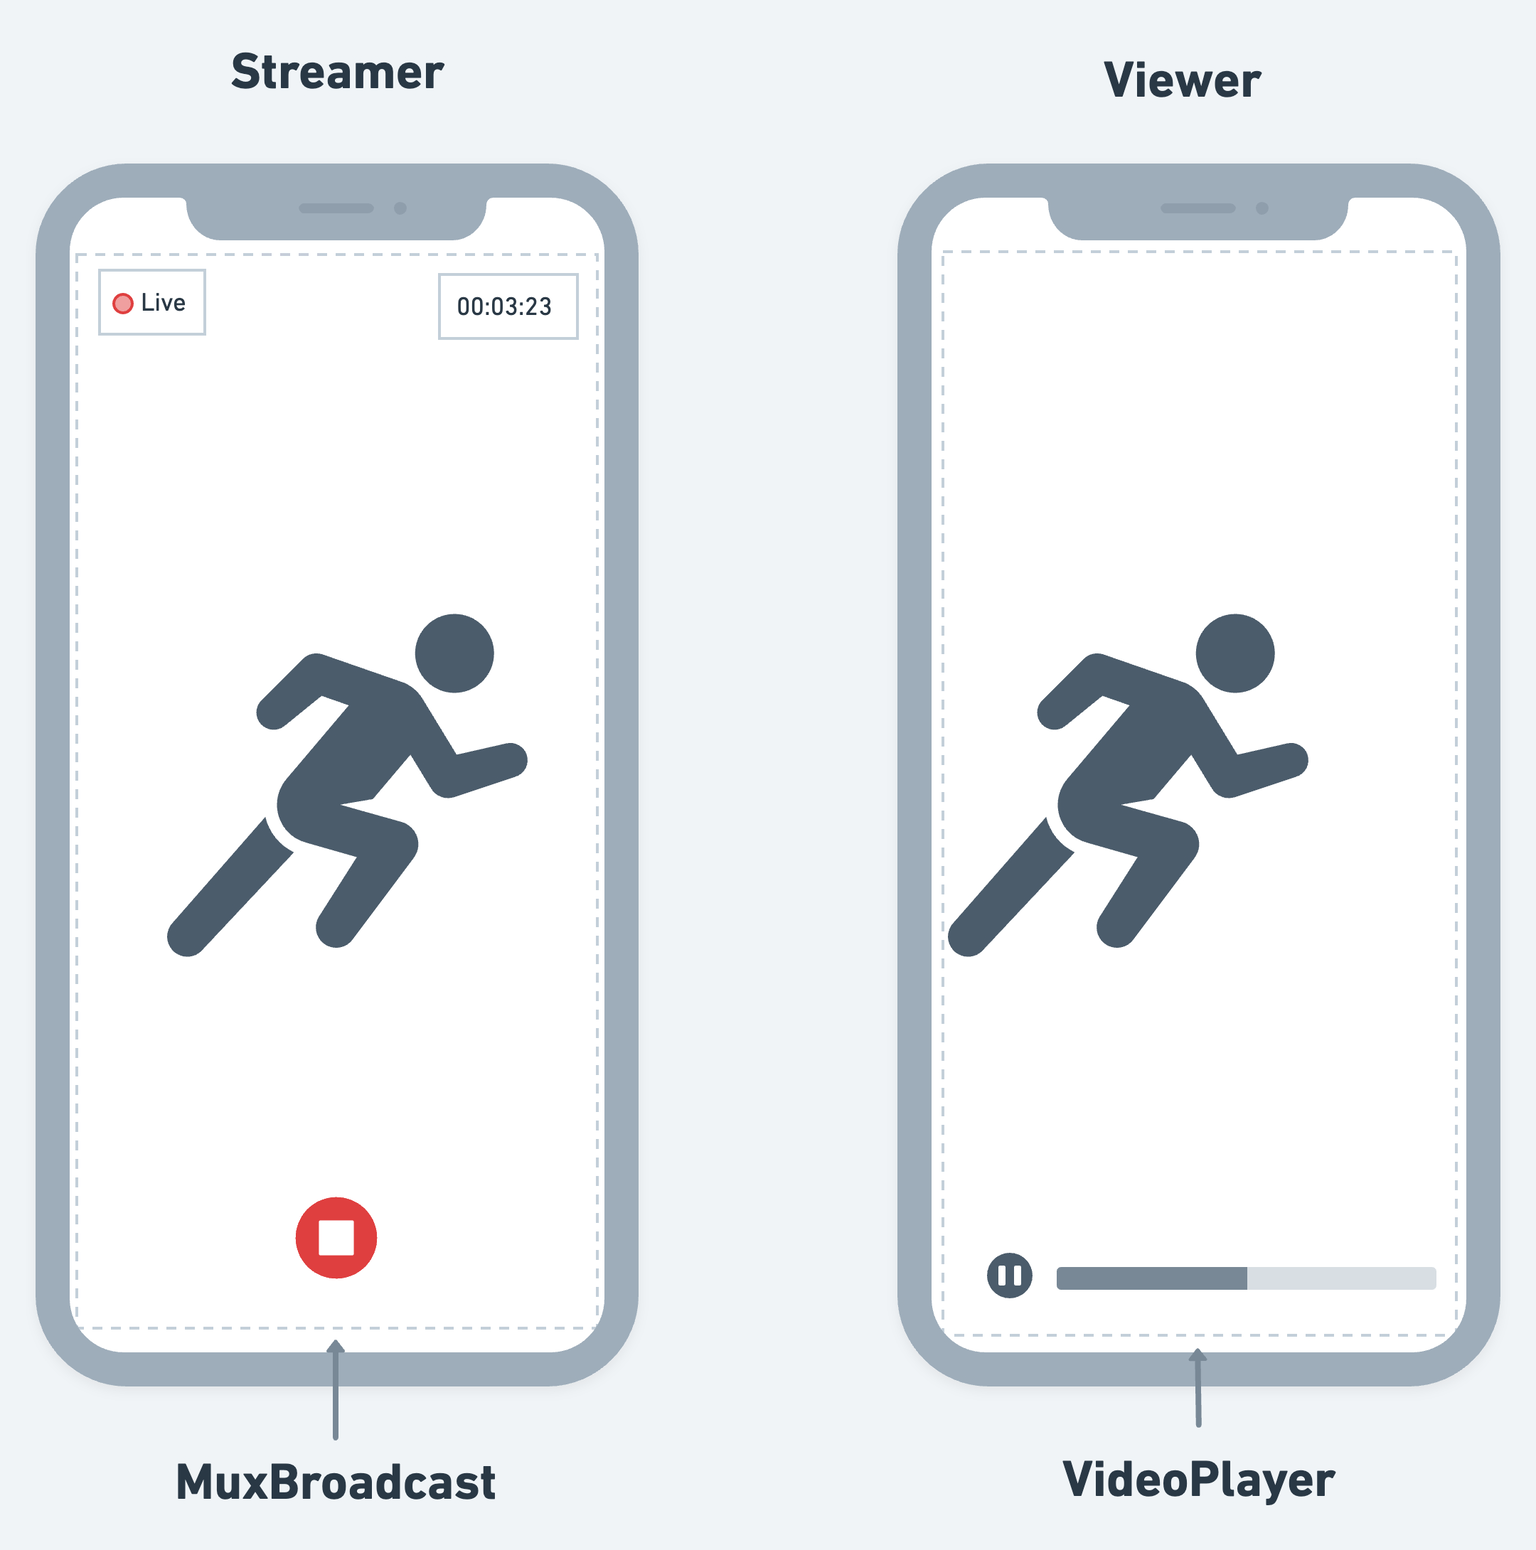
MuxBroadcast
Adding a live-streaming or broadcast feature allows users to watch the event in real-time. Instead of building the live-streaming from scratch, you can use the built-in widget called MuxBroadcast, which is provided by FlutterFlow. The MuxBroadcast widget allows you to build a broadcast feature in minutes, and you can focus more on your app's core features.
The MuxBroadcast uses Mux, an API-based video streaming service. Learn more about how video stream works.
On this page, you'll learn how to use the MuxBroadcast widget ( by building an example app) and customize the MuxBroadcast widget.
Building broadcast (live stream) app
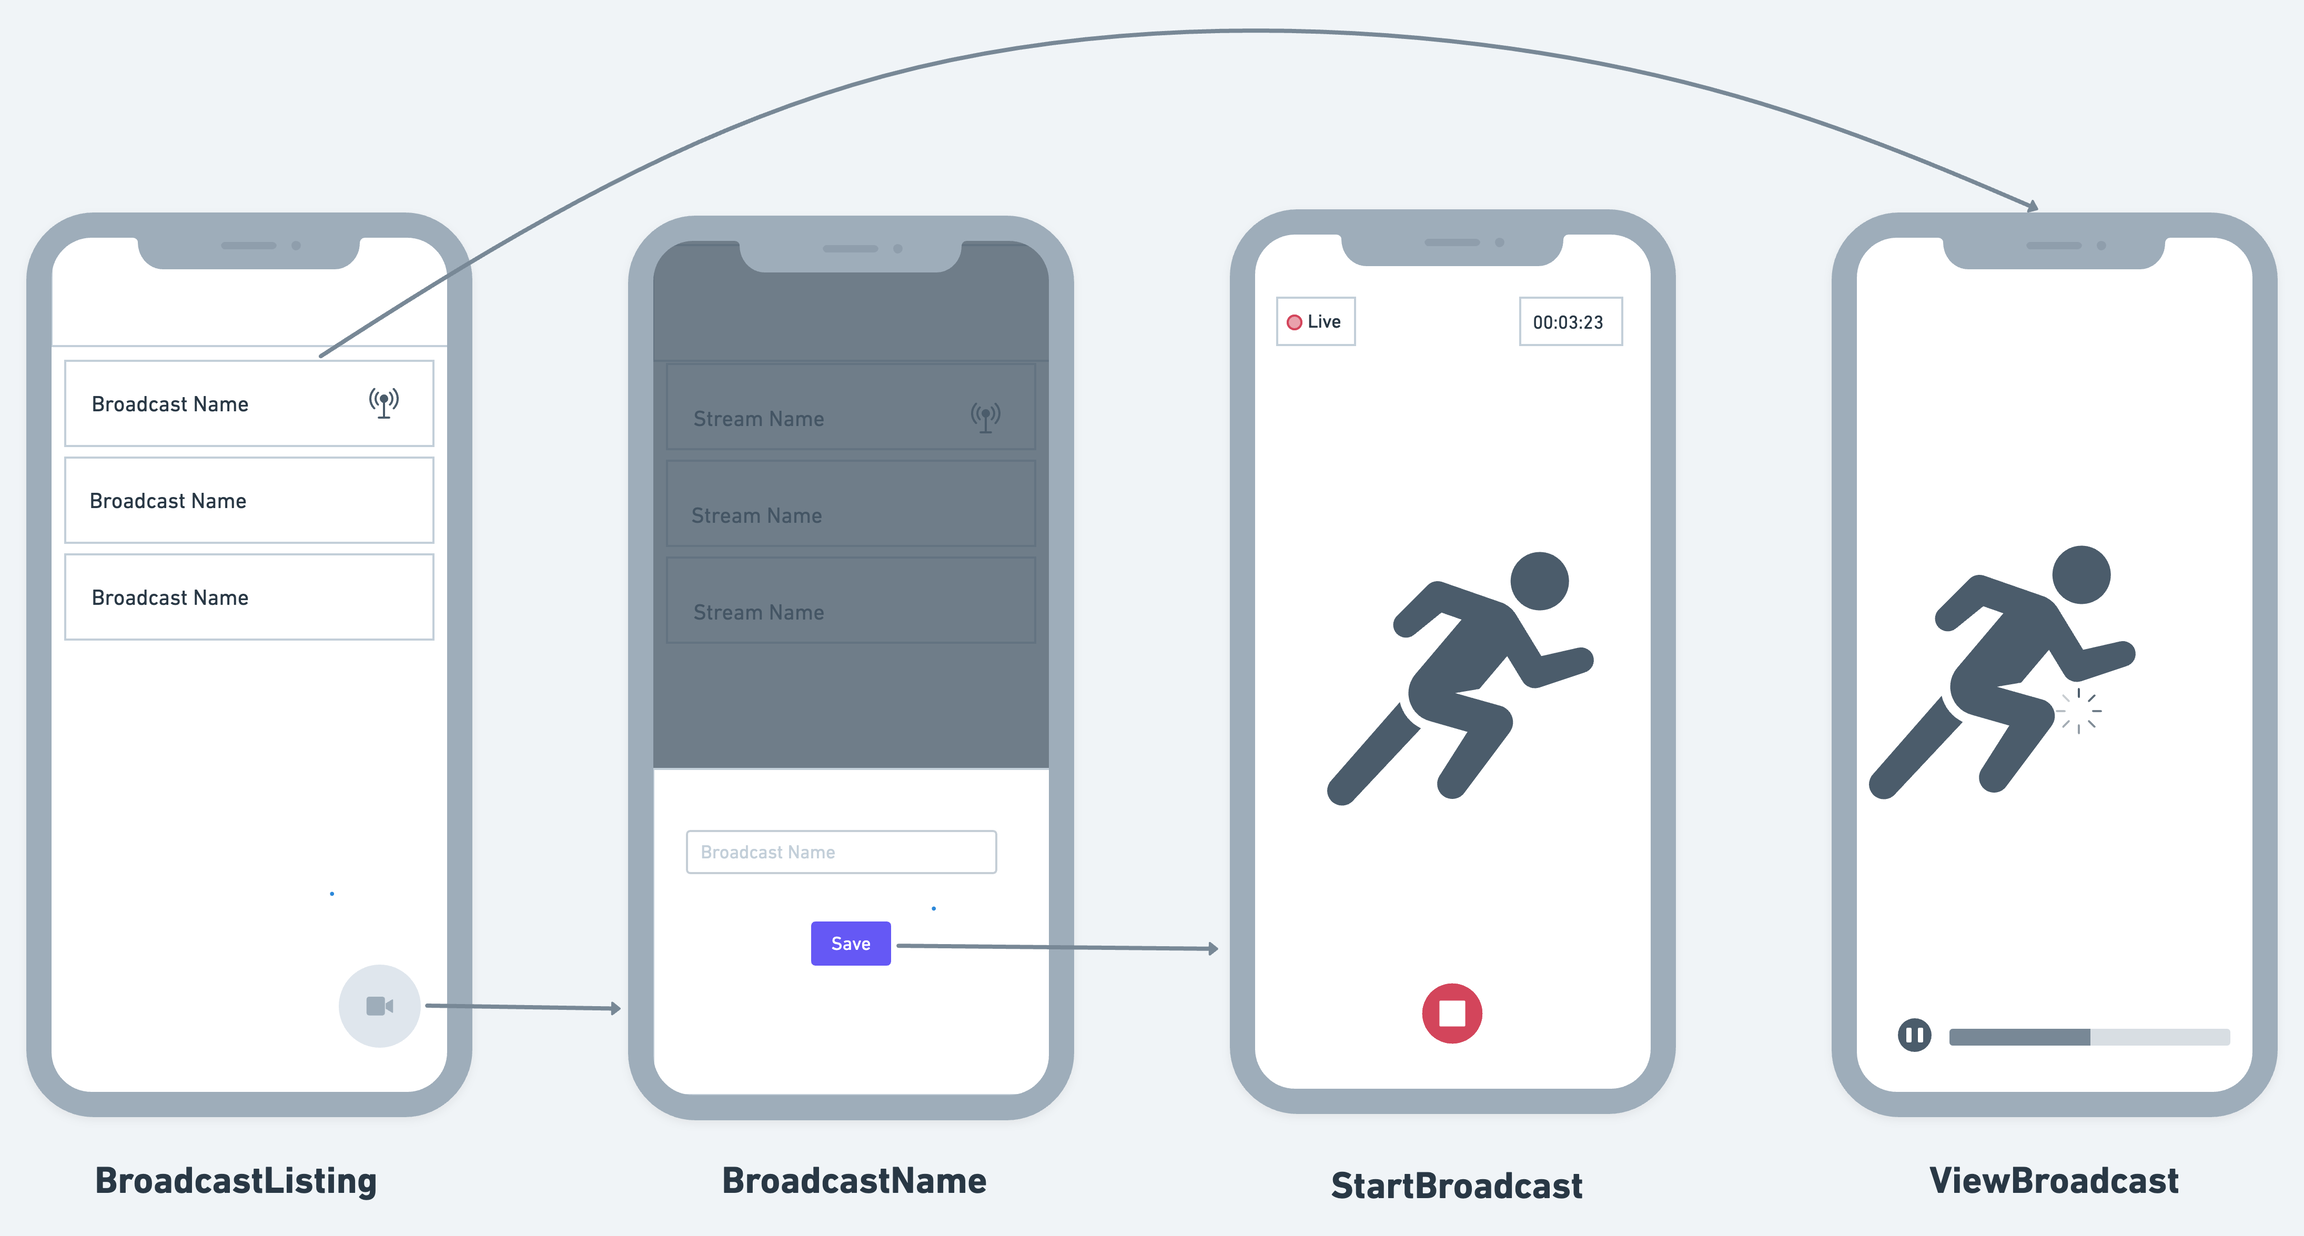
This section walks you through building an example app that allows users to create and watch the live stream. The home page shows the list of all streams. If any stream is live, users will see a broadcast icon. Tapping on a stream name will open a new page that shows a live or past stream, whereas tapping on a floating action button navigates to a new page, and users can start broadcasting the event.
The final app looks like this:
 >
>
To build such an app, you need the following pages and a bottom sheet.
- BroadcastListing: This shows a list of all broadcasts.
- BroadcastName: A bottom sheet that allows you to set a broadcast name.
- StartBroadcast: This allows you to start a broadcast.
- ViewBroadcast: This allows you to watch a live or past broadcast.
The following flow illustrates how these pages will work together:
-
Set up Firebase for your project and Enable Billing. This is required to deploy the cloud functions (to your Firebase project) that will create the live stream on the Mux server.
-
Get API keys and follow the initial setup
Adding MuxBroadcast Widget
1. Creating Firestore collection
To display the broadcast list, you must store the records of created streams on your backend server. For simplification, we will use the Firestore collection. The collection called broadcasts will store the stream information, and it looks like this:
The steps to create a collection are as follows:
- Be familiar with Structuring the Firebase Database.
- Create a Collection and provision at least four fields that store broadcast information
such as
is_live,name,url, andtime(this will be used to filter the list by latest stream first).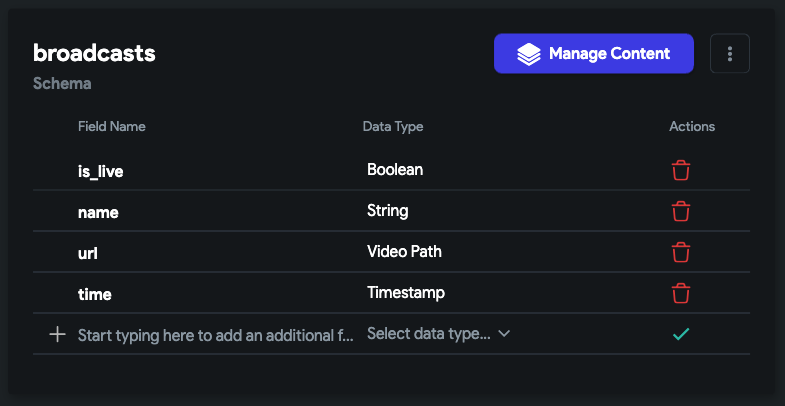
2. Building UI
Now, it's time to start building the UI. Here, we will build the UI for all the pages and the bottom sheet. Let's see how to do that:
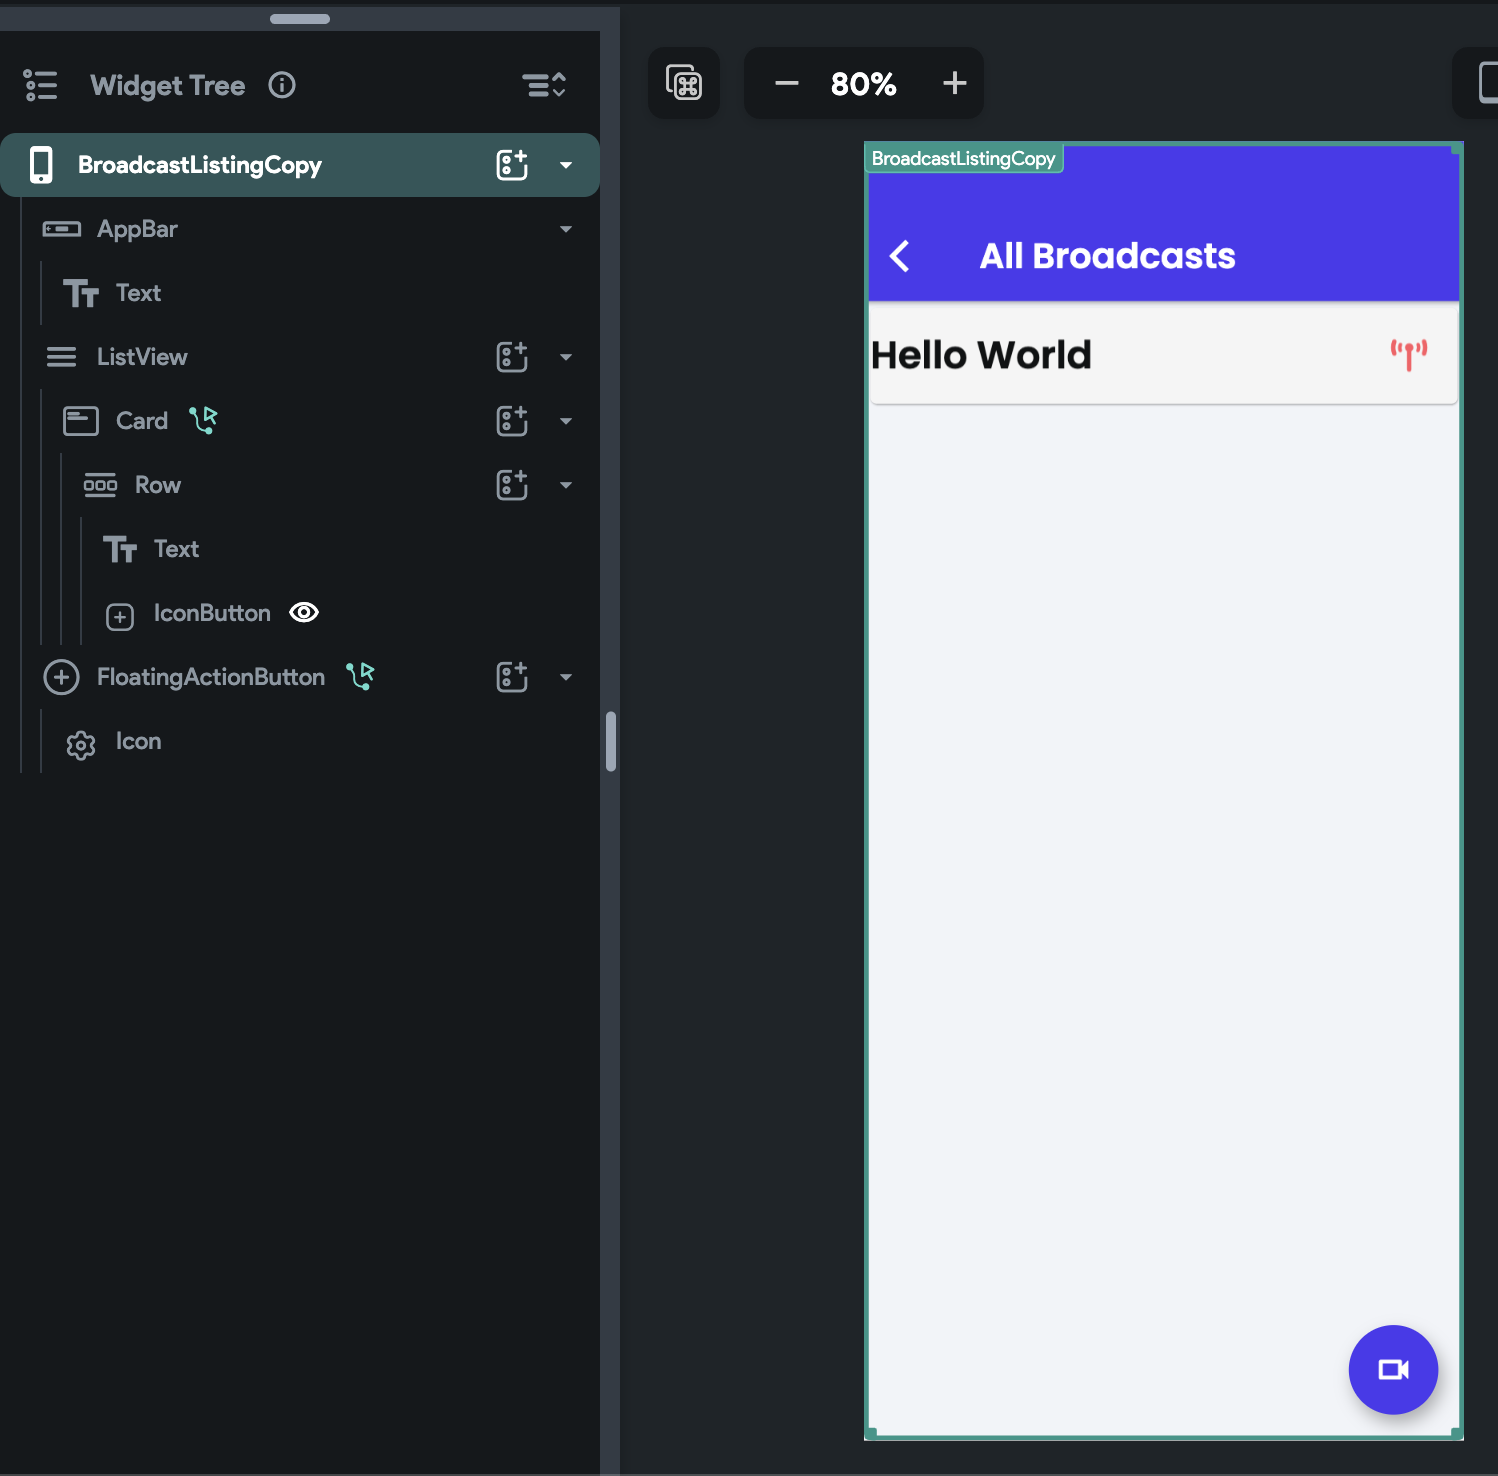
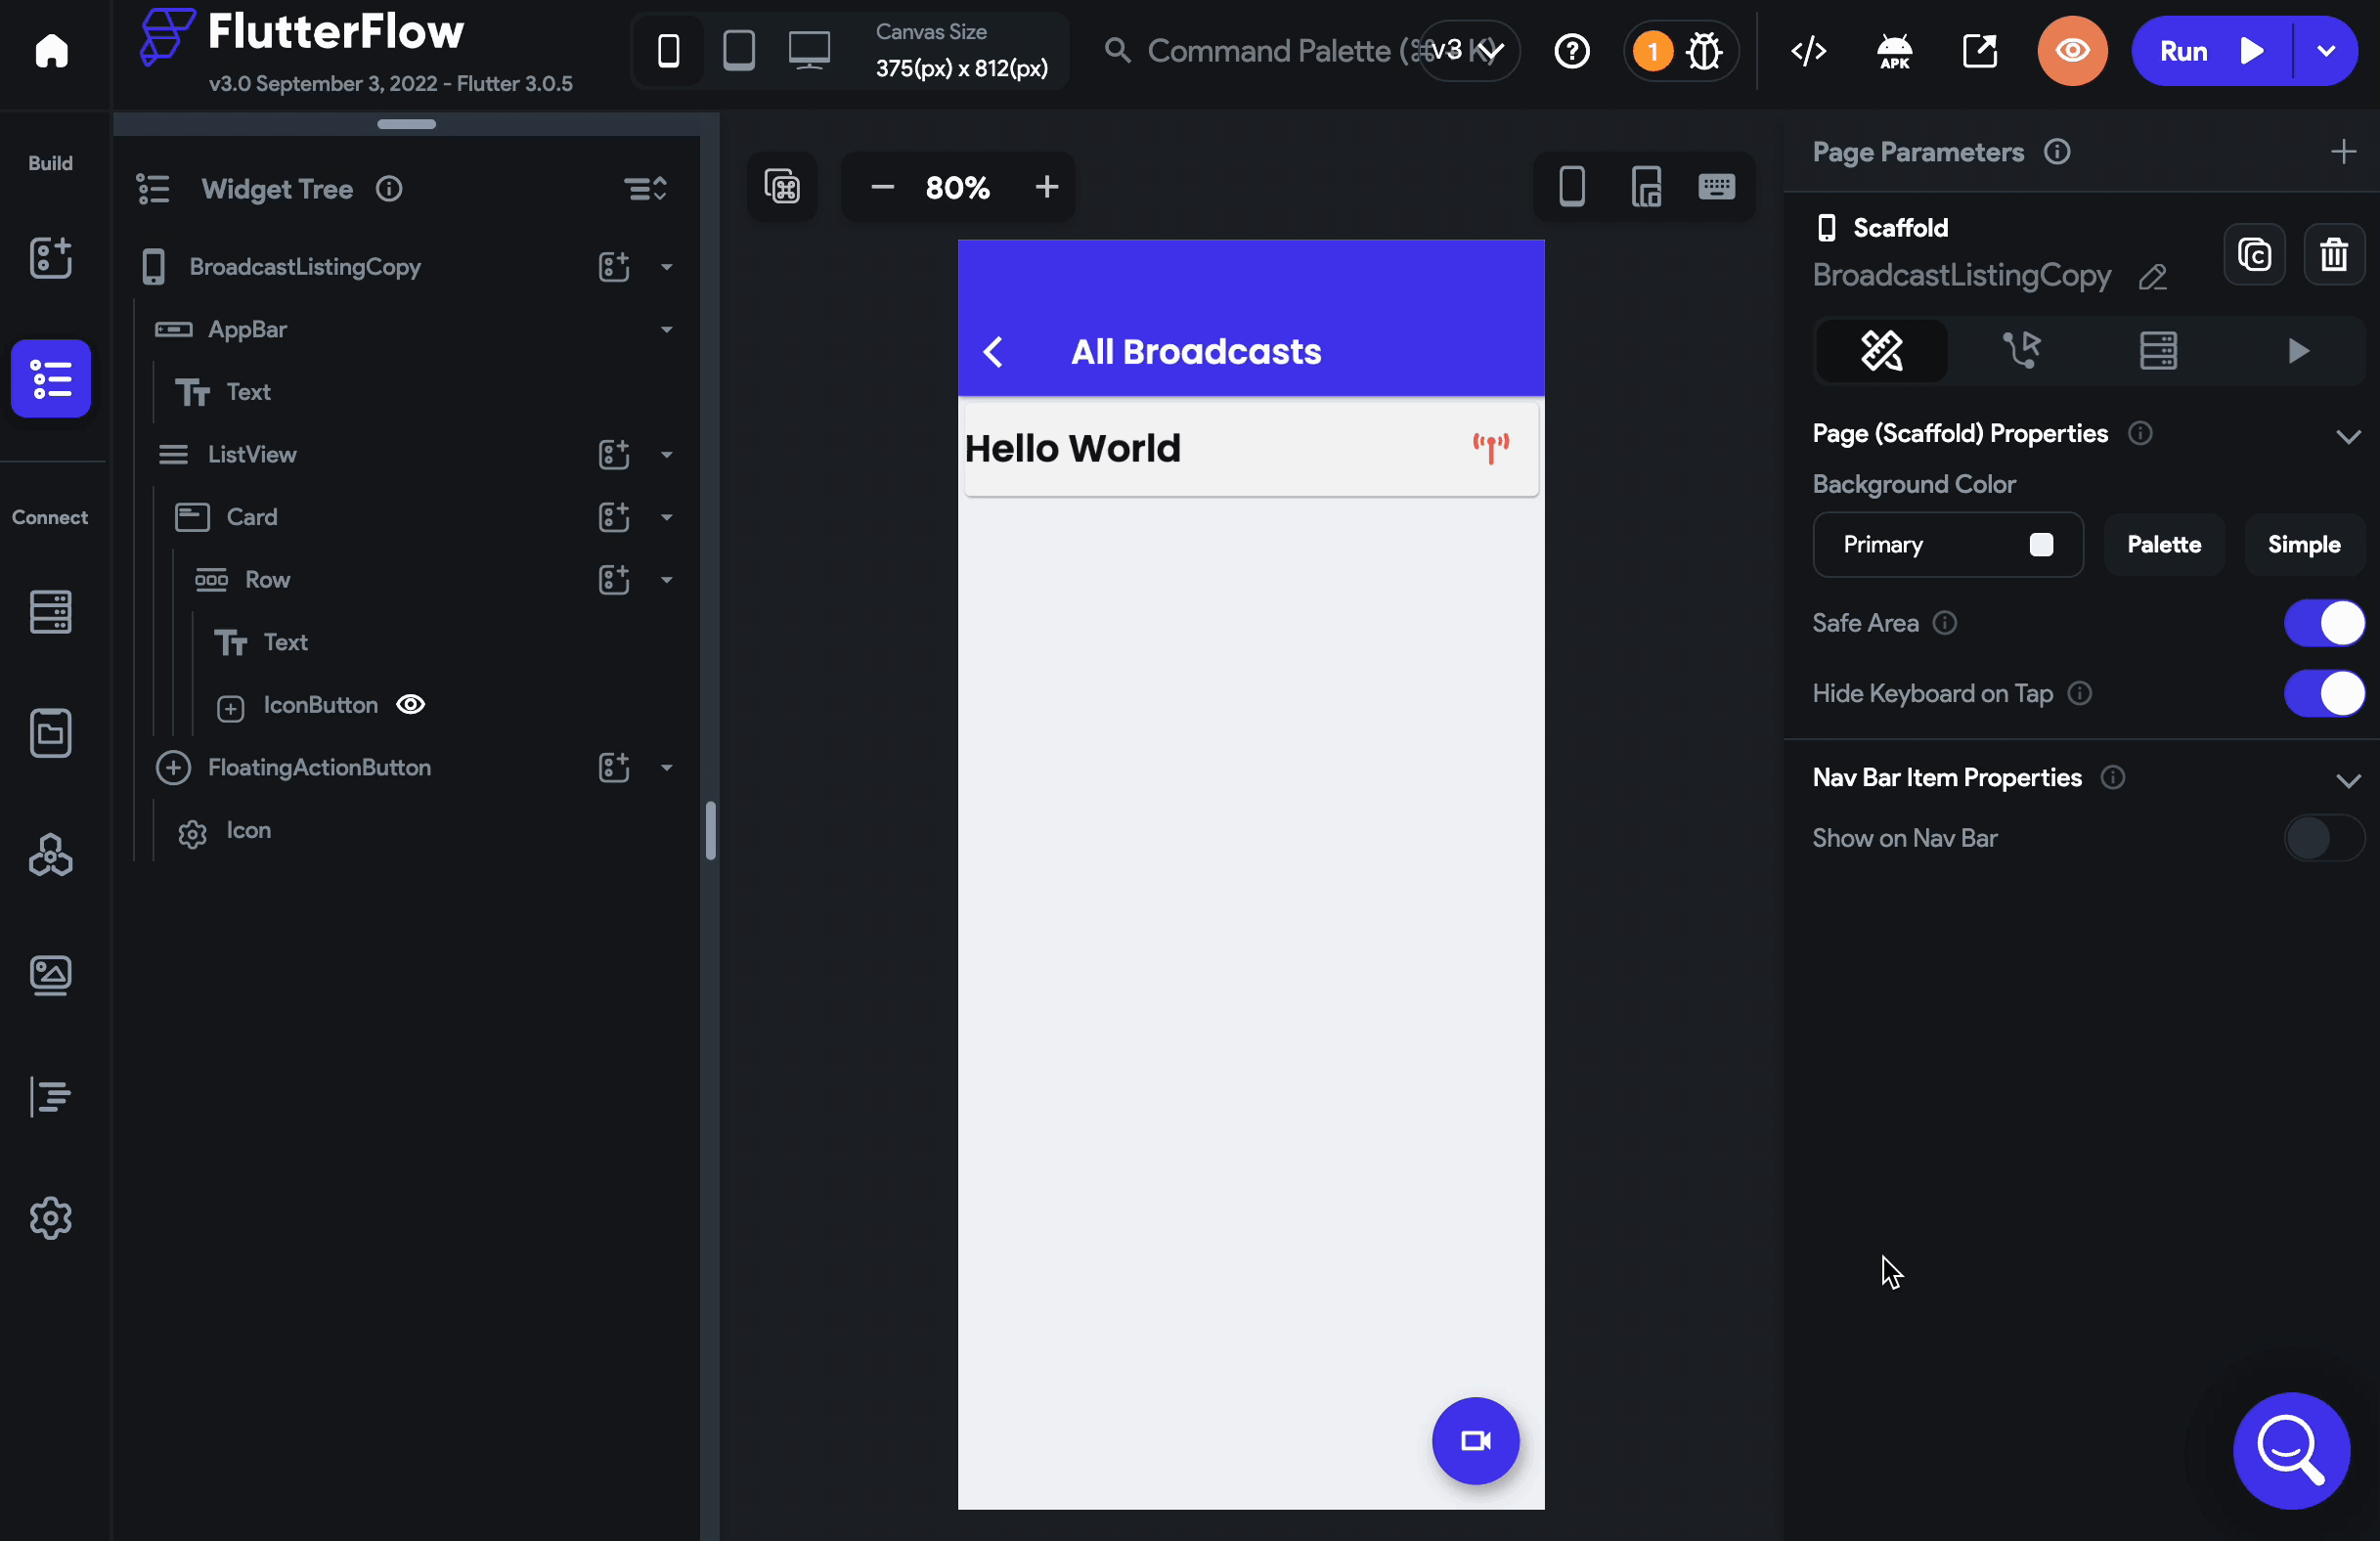
2.1 BroadcastListing Page
On this page:
-
Add the ListView to show all broadcasts.
- Inside the ListView, add the Card > Row > Text (to show stream name) and Icon (to indicate if the stream is live).
-
Add the FloatingActionButton to open a bottom sheet.
After adding, it should look similar to this:
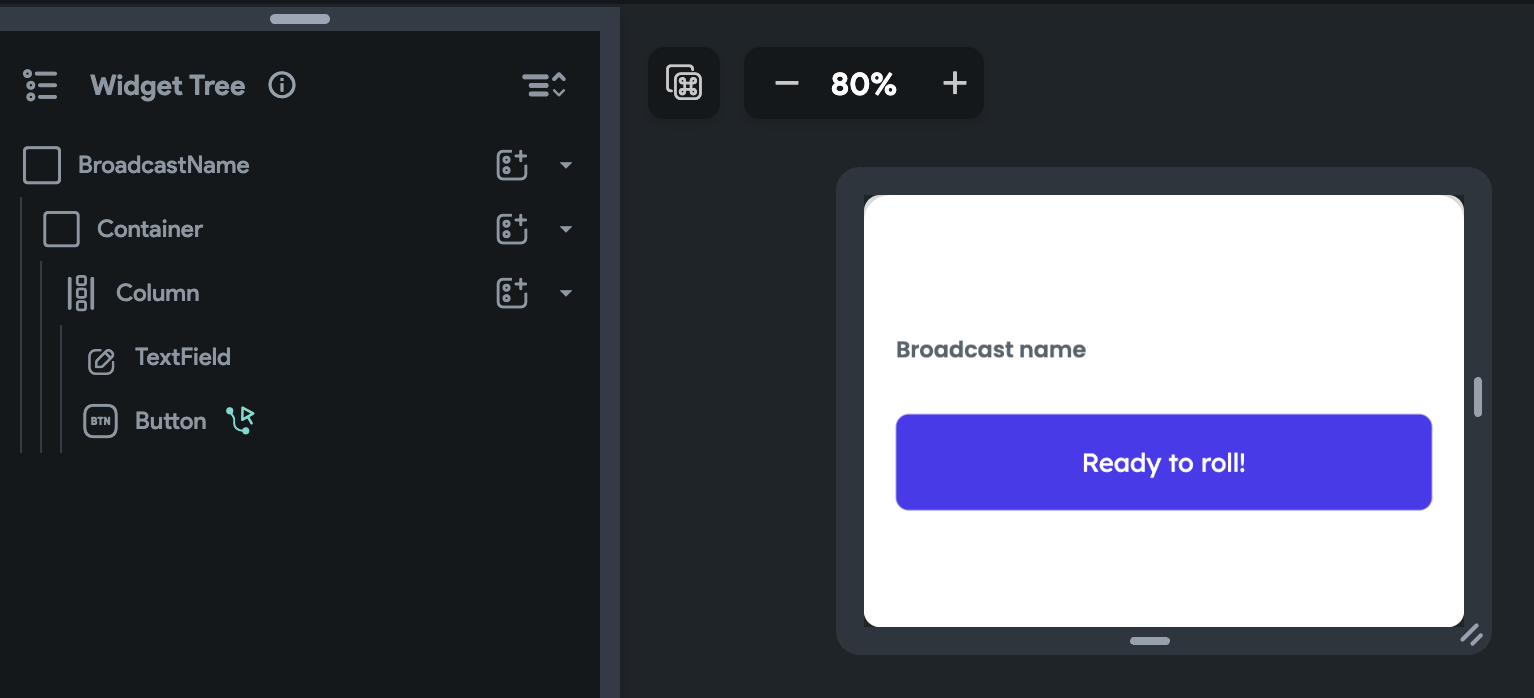
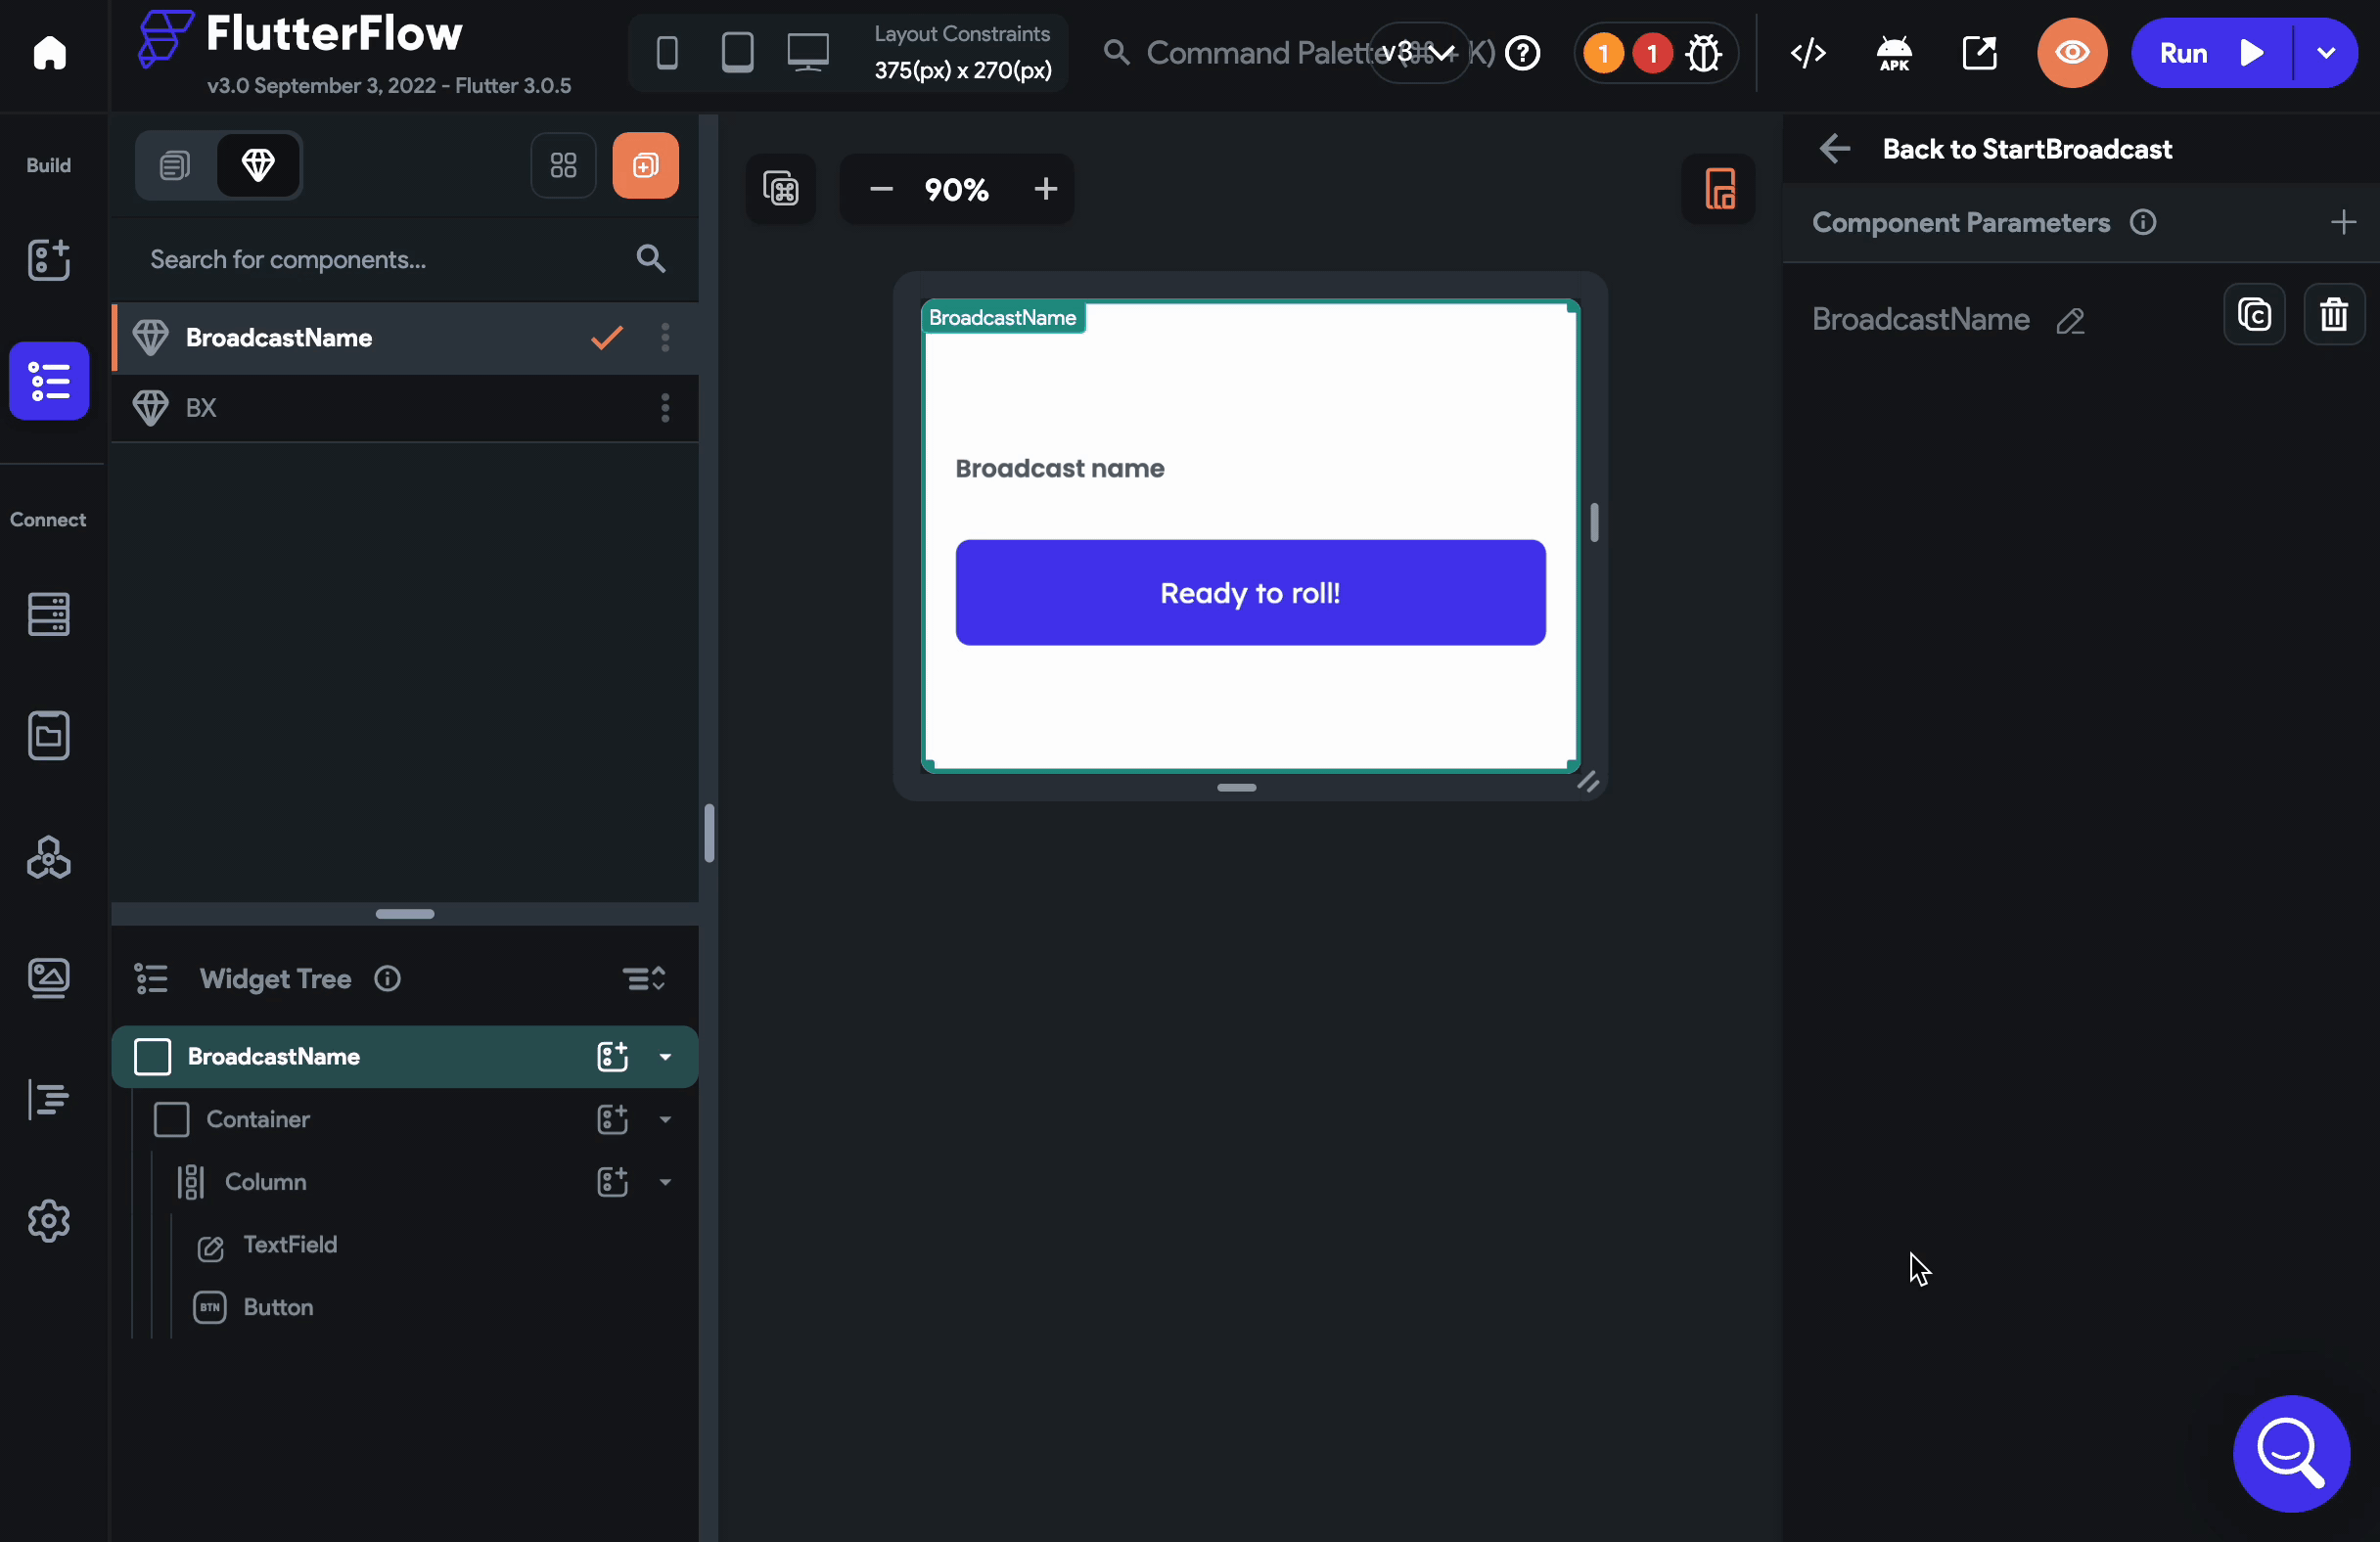
2.2 BroadcastName (BottomSheet Component)
This will be used to get the stream name from users.
Create a new component called BroadcastNamewhich will be used as a Bottom sheet. Inside the component, add a TextField and a Button.
It should look like this:
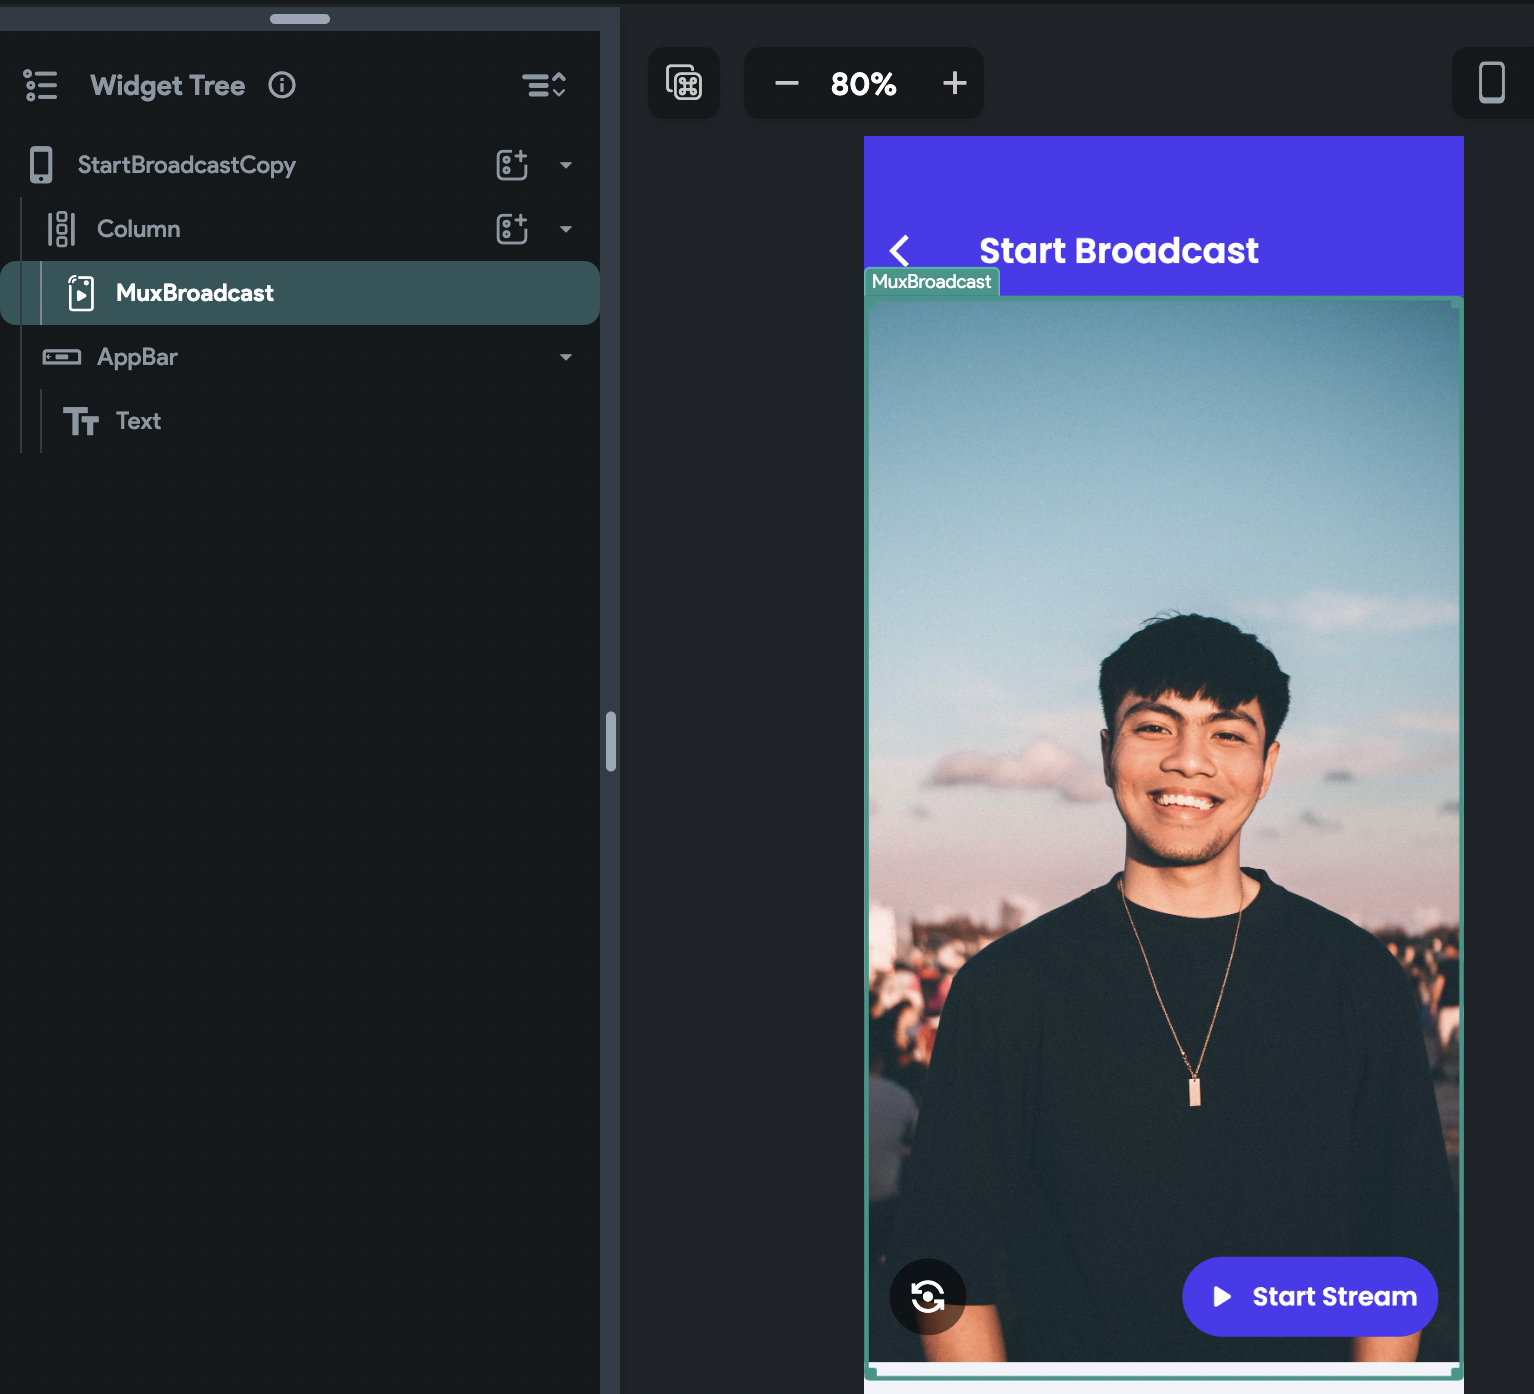
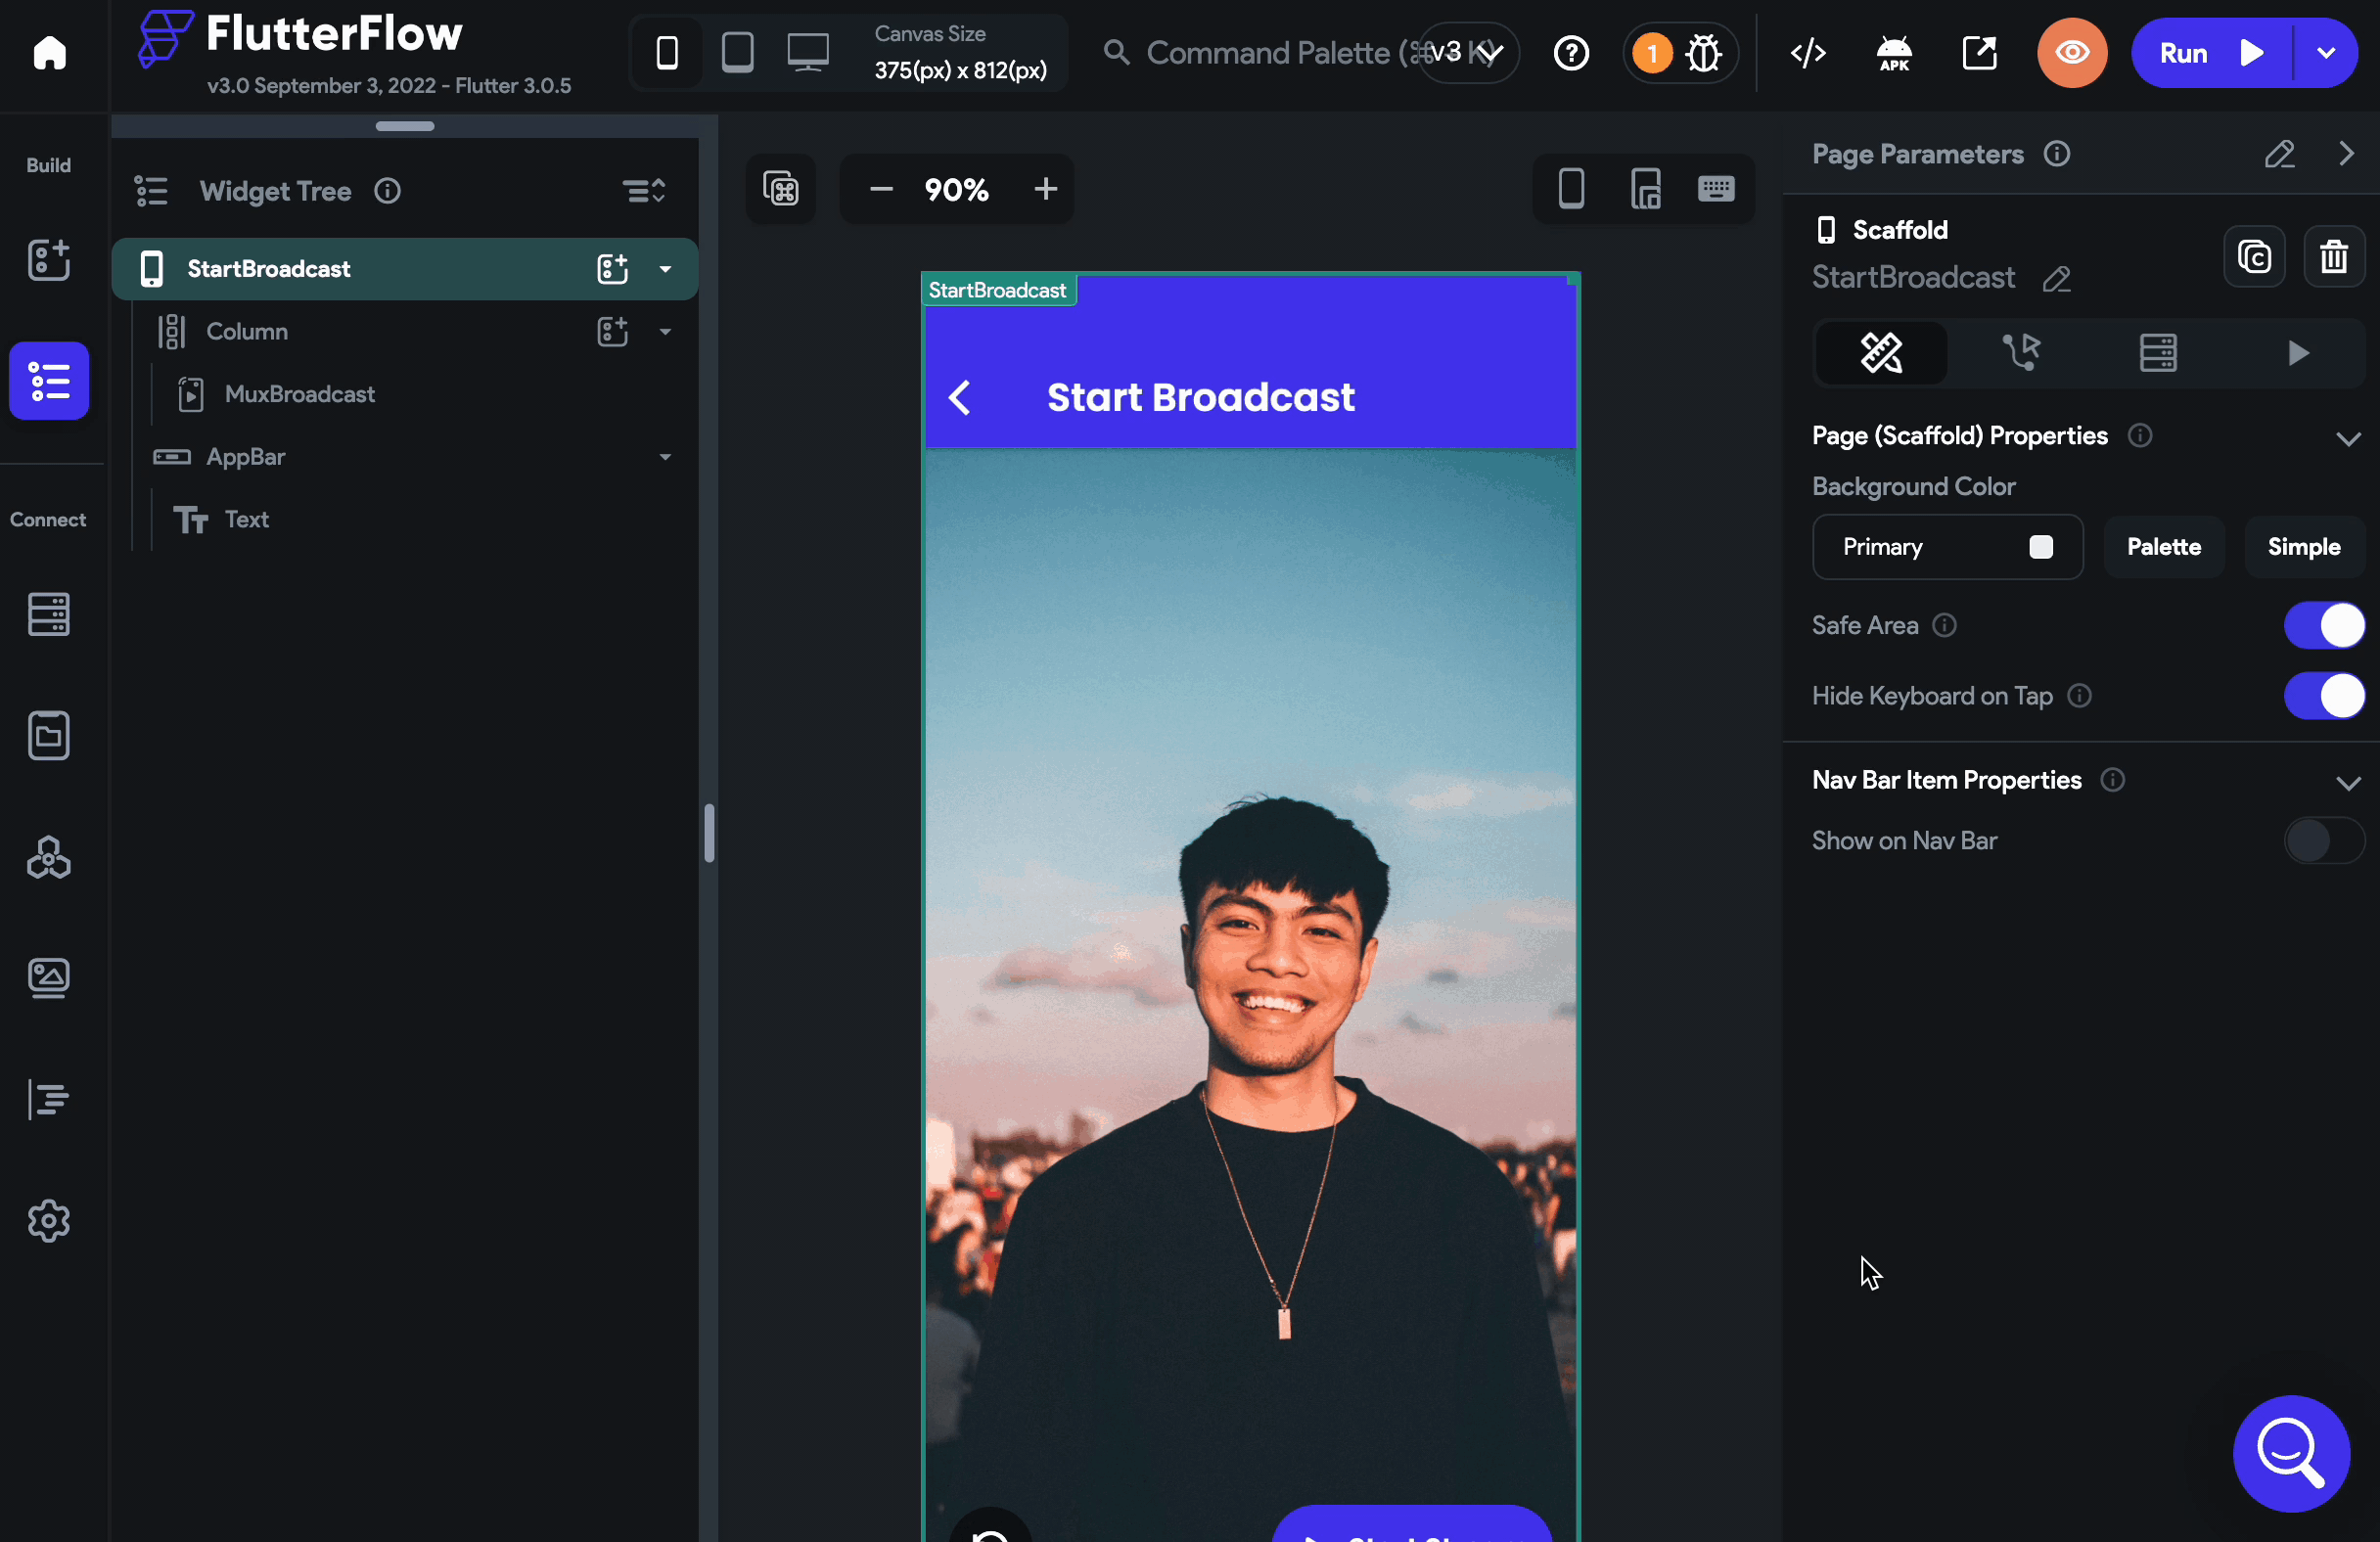
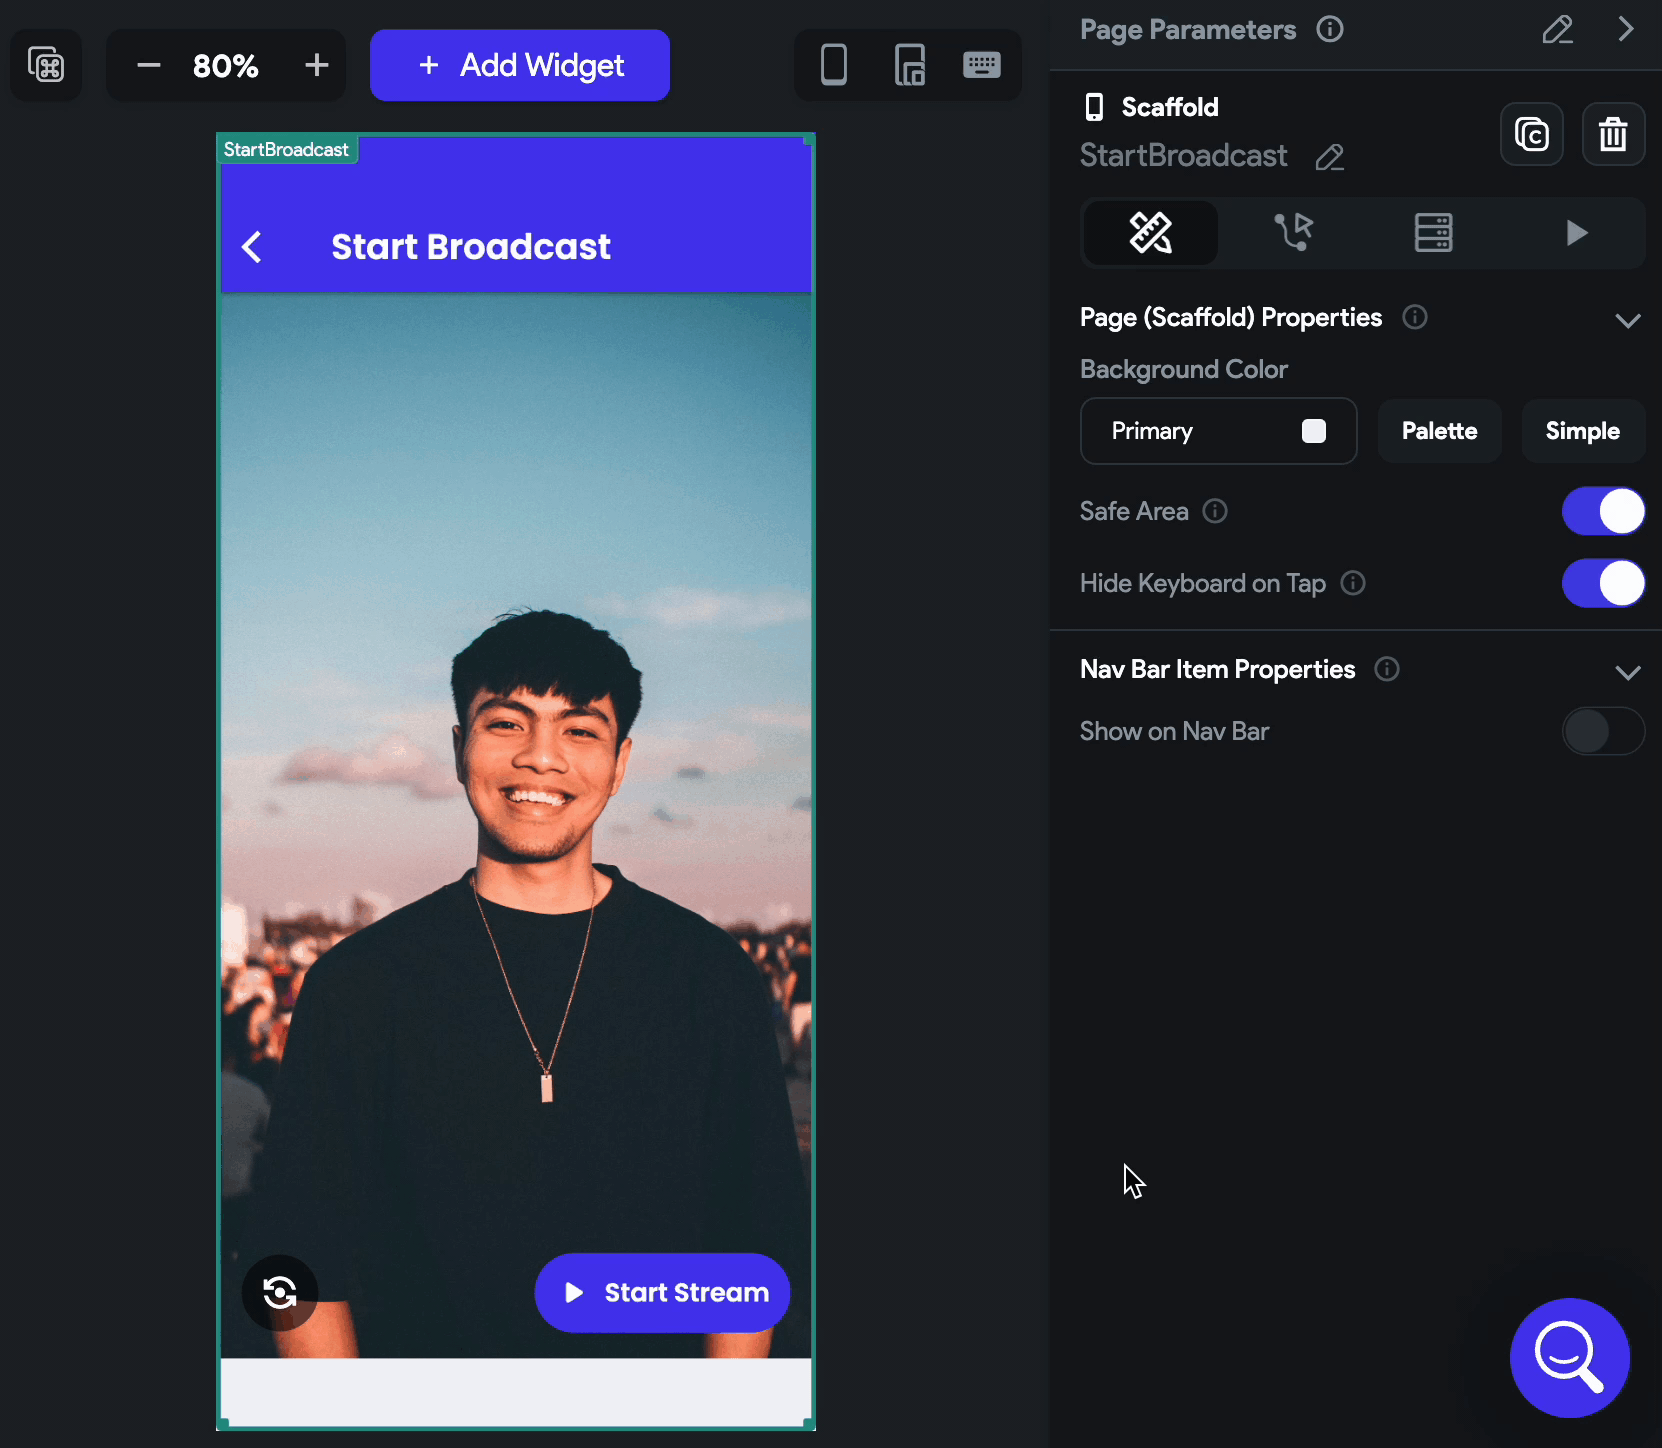
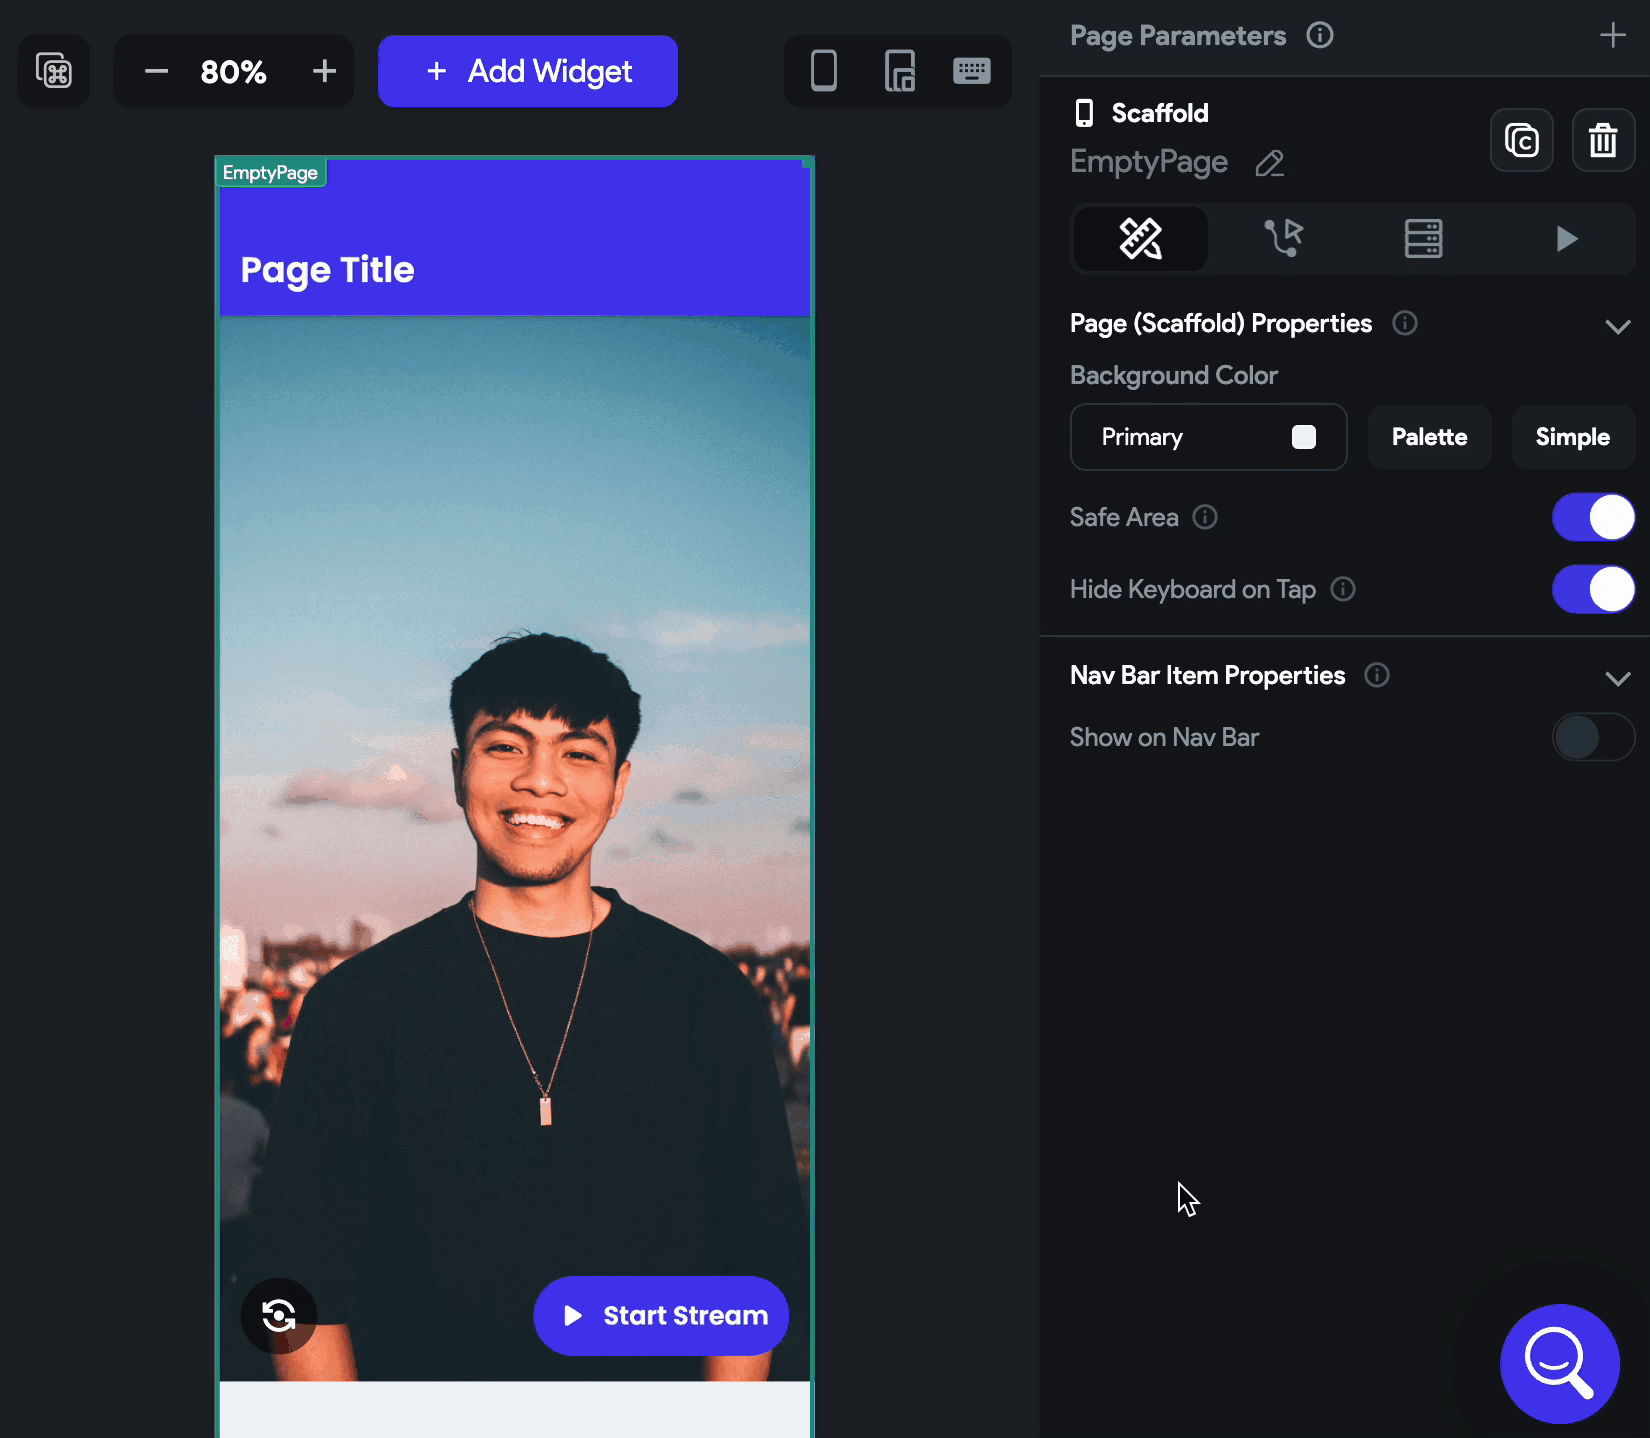
2.3 StartBroadcast Page
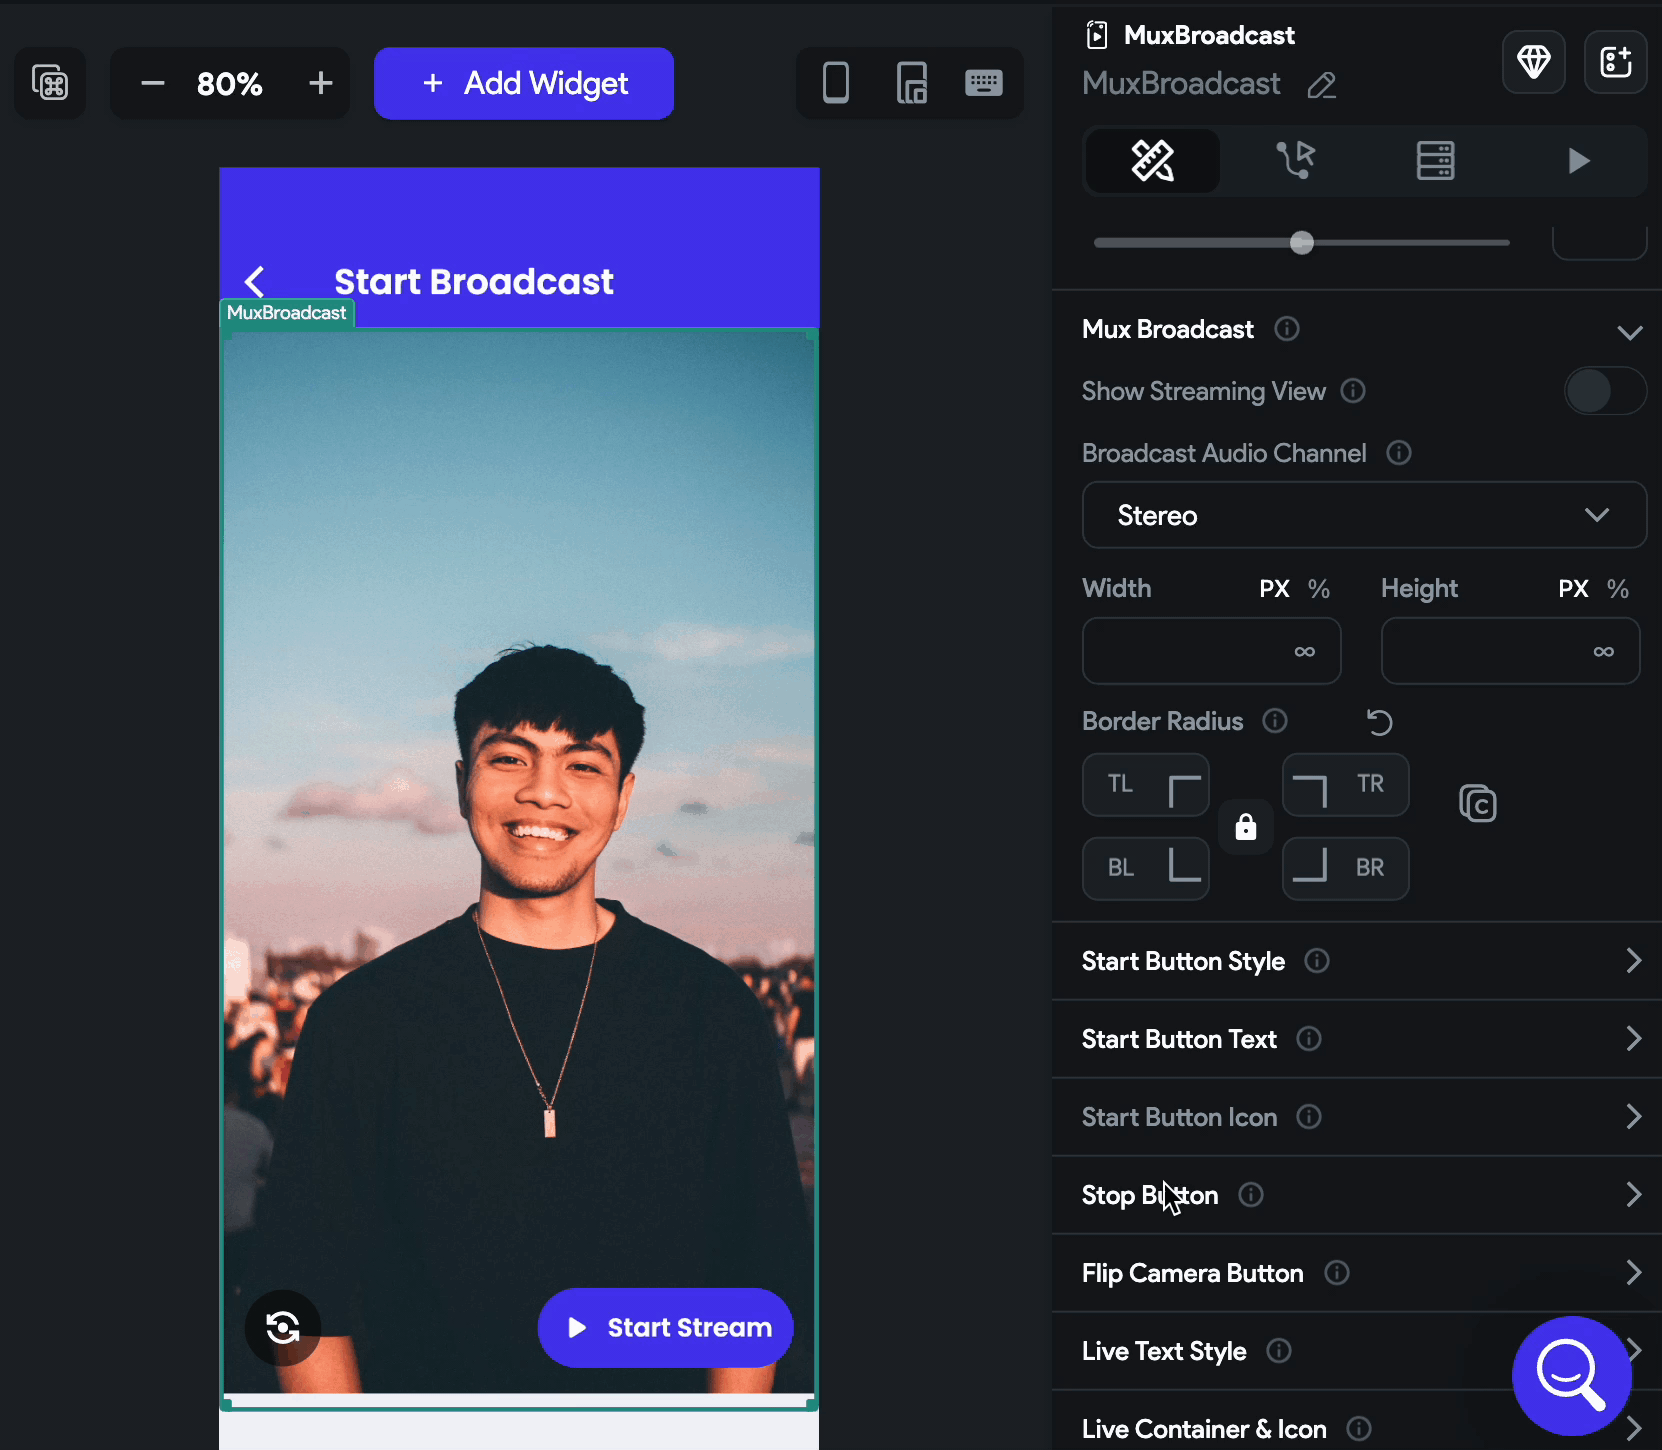
This page hosts the MuxBroadcast widget that is responsible for starting and stopping the live broadcast.
To add the MuxBroadcast widget, drag the MuxBroadcast widget from the Base Elements tab (in the Widget Panel) or add it directly from the widget tree.
Here's how it looks:
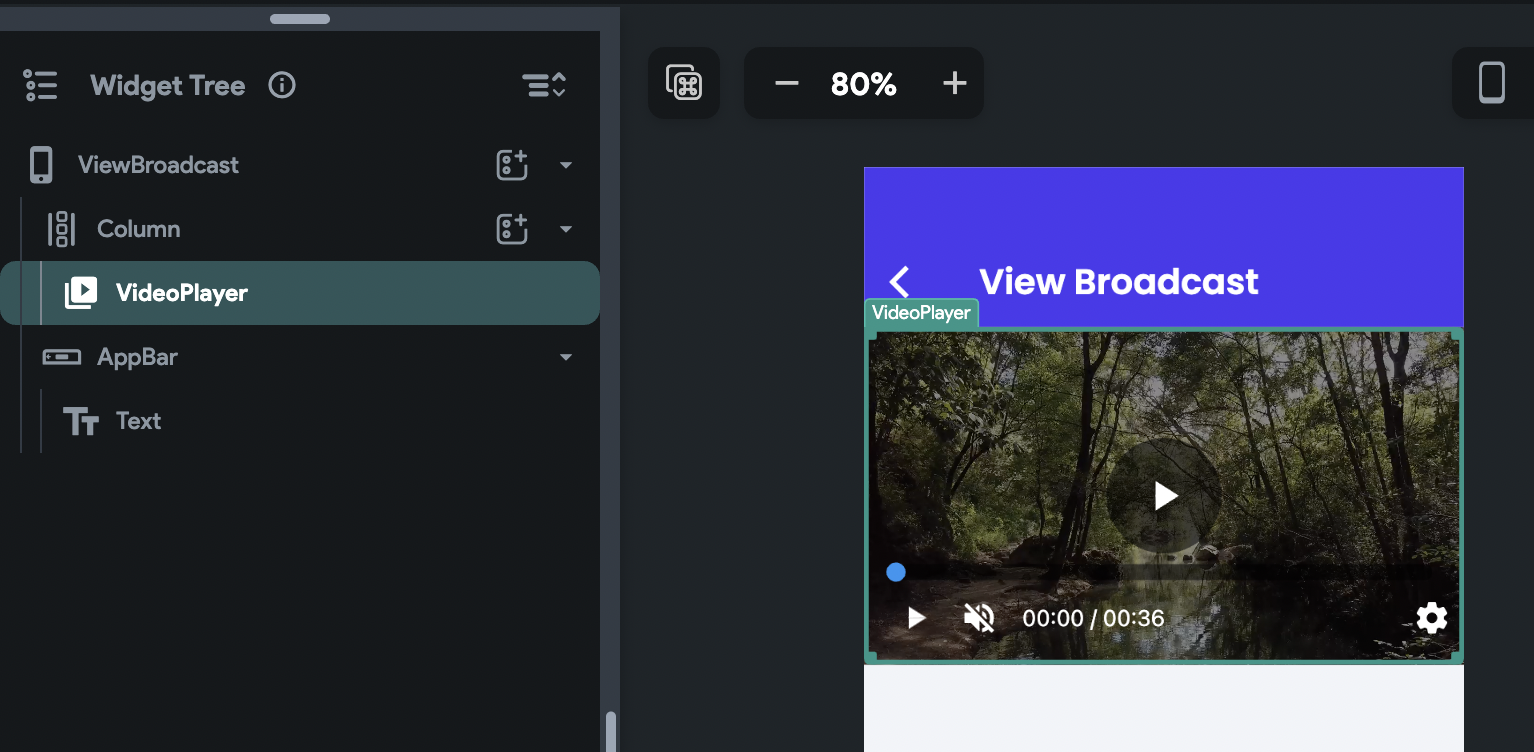
2.4 ViewBroadcast Page
This page hosts the VideoPlayer widget showing the live or past stream.
On this page, add the VideoPlayer widget and remove its height and width (This will make it fullscreen).
3. Retrieve broadcast list
Once the UI is ready, you can retrieve and display the broadcast listing from the Firestore collection into ListView. Here you will display the list by the latest stream first and show/hide the broadcast icon based on whether the stream is live.
To do so:
- Query a collection called broadcasts on a ListView.
- Order the collection by time field.
- Add the conditional visibility on an icon (that indicates if the stream is live) based on the is_live field.
 >
>
4. Navigate to the StartBroadcast page
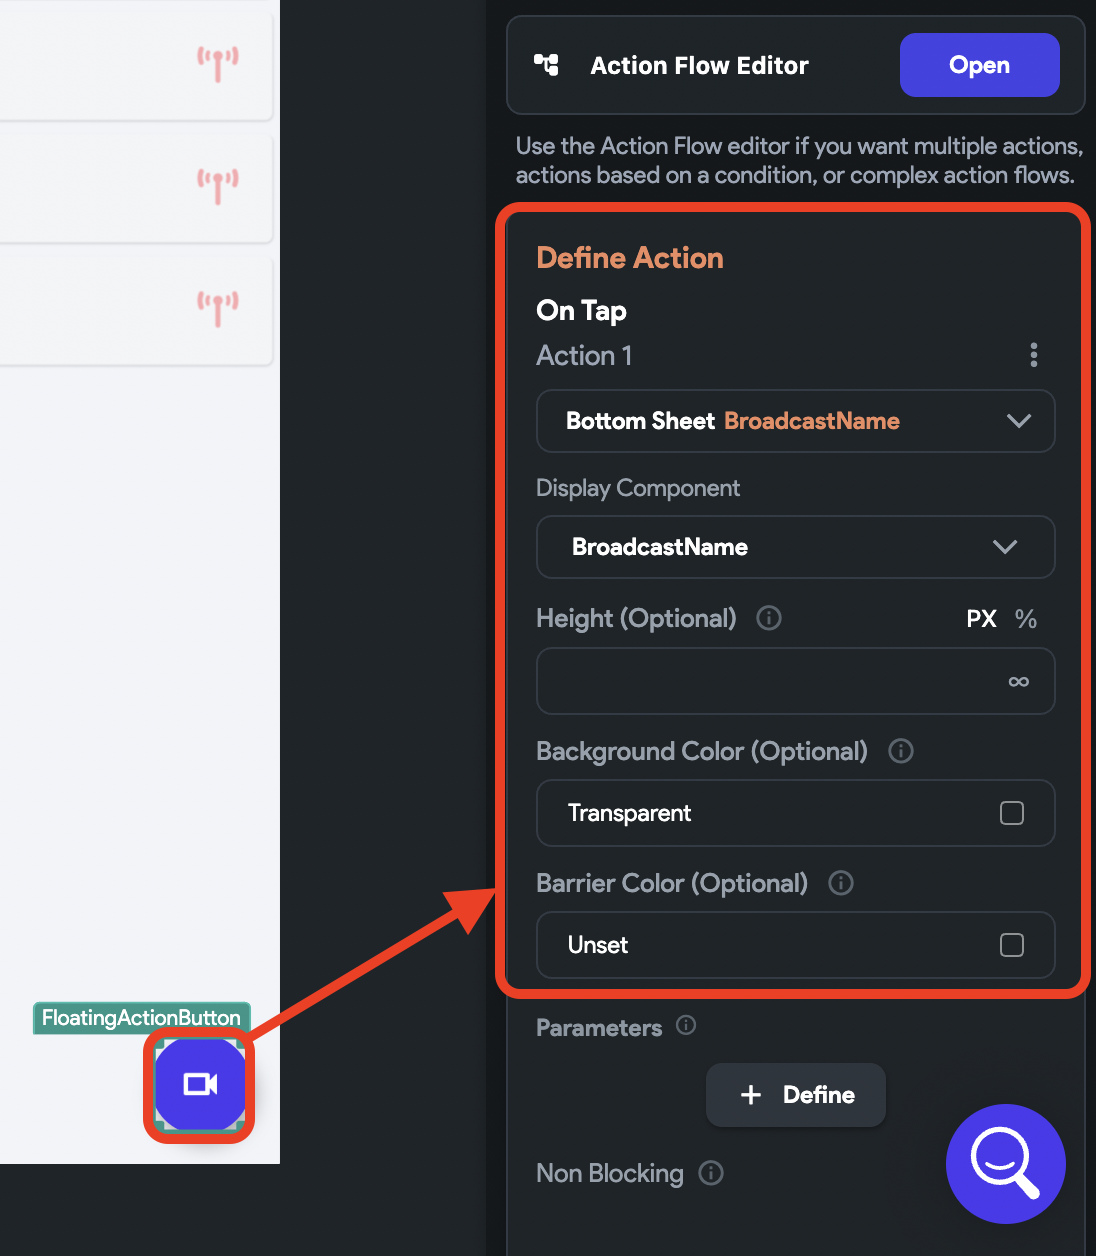
When you click the FloatingActionButton, you won't navigate straight to the StartBroadcast page. Instead, you will first open the bottom sheet that will accept the broadcast name, and when a button (inside the bottom sheet) is pressed, you'll navigate to the StartBroadcast page with a broadcast name as a parameter.
To do so:
- Select the FloatingActionButton and add an action to open the bottom sheet (createdin [4.2])
-
Now, on click of a button (inside the bottom sheet,) add an action to Navigate to the StartBroadcast page.
- Inside this action, click on the Define button. This will open the StartBroadcast page, where you can define a parameter that will accept the stream name.
- After defining the parameter, open this action again and pass its value From Variable > Widget State > [TextField name].
-
Add one more action to dismiss the bottom sheet.
 >
>
5. Adding broadcast action (start and stop)
On the StartBroadcast page, you have the MuxBroadcast widget (already added in step 4.3). You can use this widget to add the following broadcast actions:
- On Broadcast Start: Triggers when you click on the start the broadcast button.
- On Broadcast Stop: Triggers when you click on the stop broadcast button.
We will use the On Broadcast Start to create a new document inside the broadcast collection and On Broadcast Stop to update the same document to indicate the broadcast is ended.
To create a new document when the broadcast is started:
-
Select the MuxBroadcast widget from the widget tree or canvas area.
-
Select Actions from the Properties Panel (the right menu), and click Open. This will open an Action flow Editor in a new popup window.
-
Under the On Broadcast Start:
- Add the Create Document action.
- Set the collection to broadcasts.
- Click on the + Add Fields button and set the value of the field as per the following:
- is_live > Specific Value > True.
- name > From Variable > broadcastName (page parameter name).
- url > From Variable > Widget State > Mux Playback URL (This holds the URL of the Livestream and is available when you add the MuxBroadcast widget).
- times > Global Properties > Current Time.
- Enter the Action Output Variable Name as broadcastOutput (This will be used to update this document in the next step).
 >
>
When the broadcast is stopped, you must update the same document for the is_live field with False. To do so:
-
Select the MuxBroadcast widget from the widget tree or canvas area.
-
Select Actions from the Properties Panel (the right menu), and click Open. This will open an Action flow Editor in a new popup window.
-
Under the On Broadcast Stop:
- Add the Update Document action.
- Set the reference to Action Outputs > broadcastOutput (action output variable name set in previous step) > Reference.
- Click on the + Add Fields button and set the is_live > Specific Value > False.
-
Also, add one more action to Navigate Back.
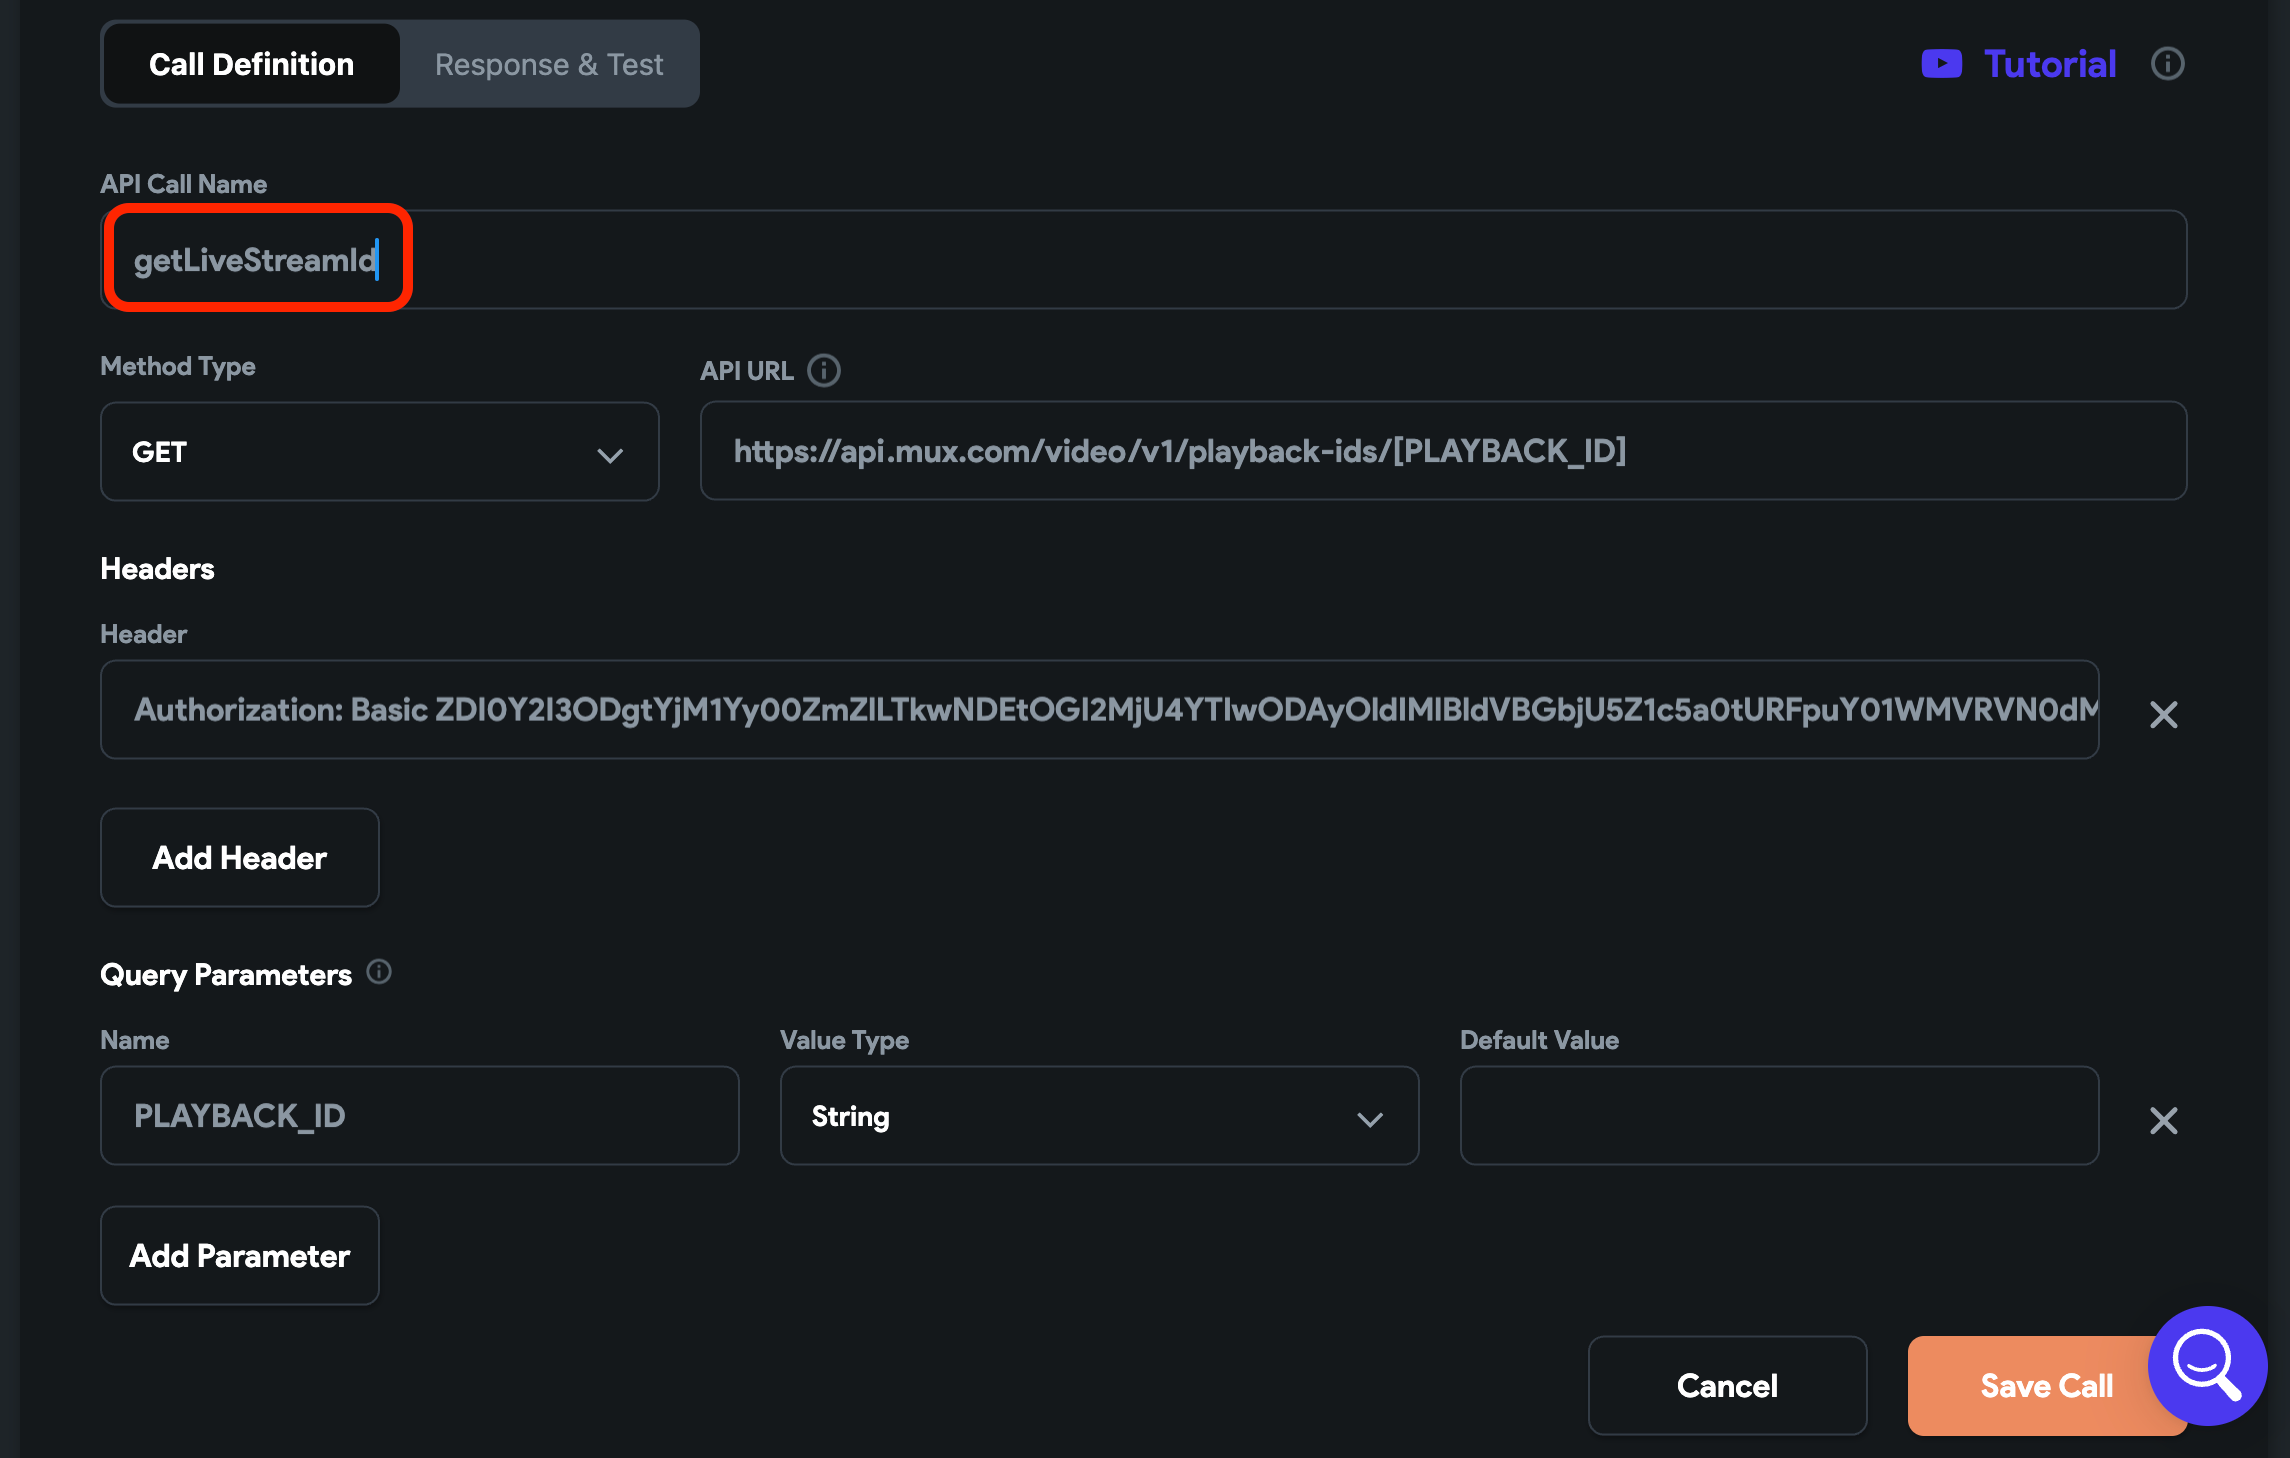
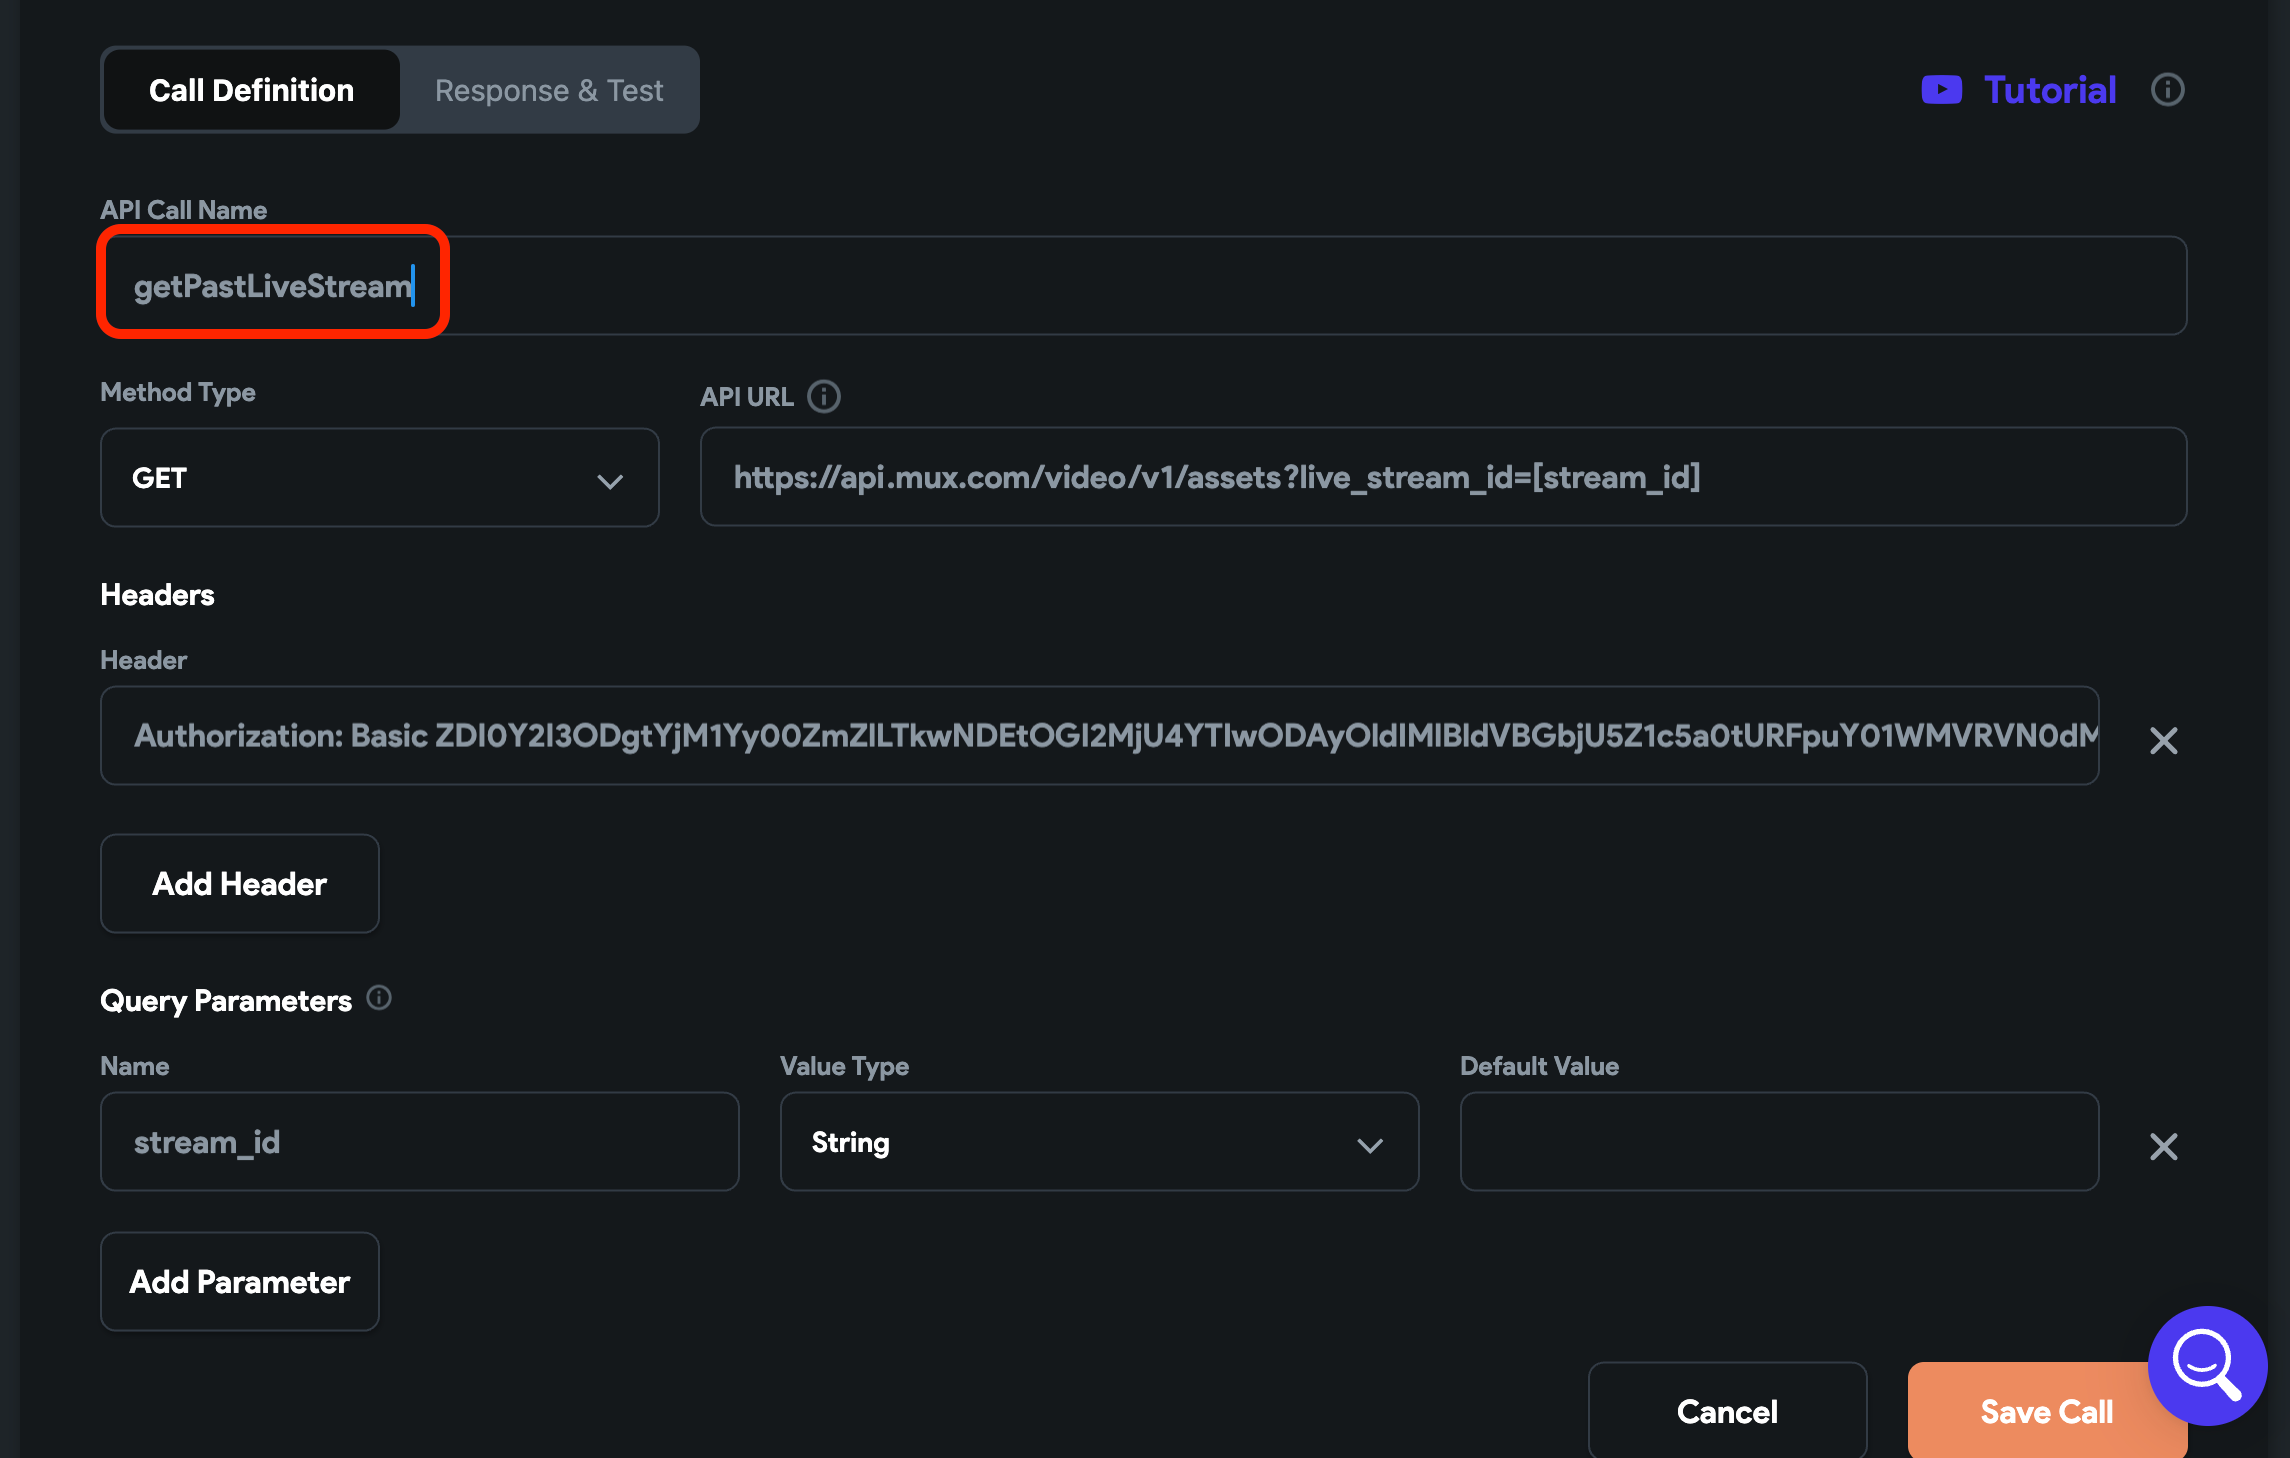
6. Adding Mux APIs
If the broadcast is live, you can navigate straight to the ViewBroadcast page with the playback URL and watch the live stream, but if the broadcast is ended, you can't use the same URL. Hence, you must retrieve the URL of the ended stream.
To do that, first, you need to retrieve the live stream Id based on its current playback Id and then use it to get the playback Id of the ended stream.
Here's the flow to retrieve playback Id of an ended stream:
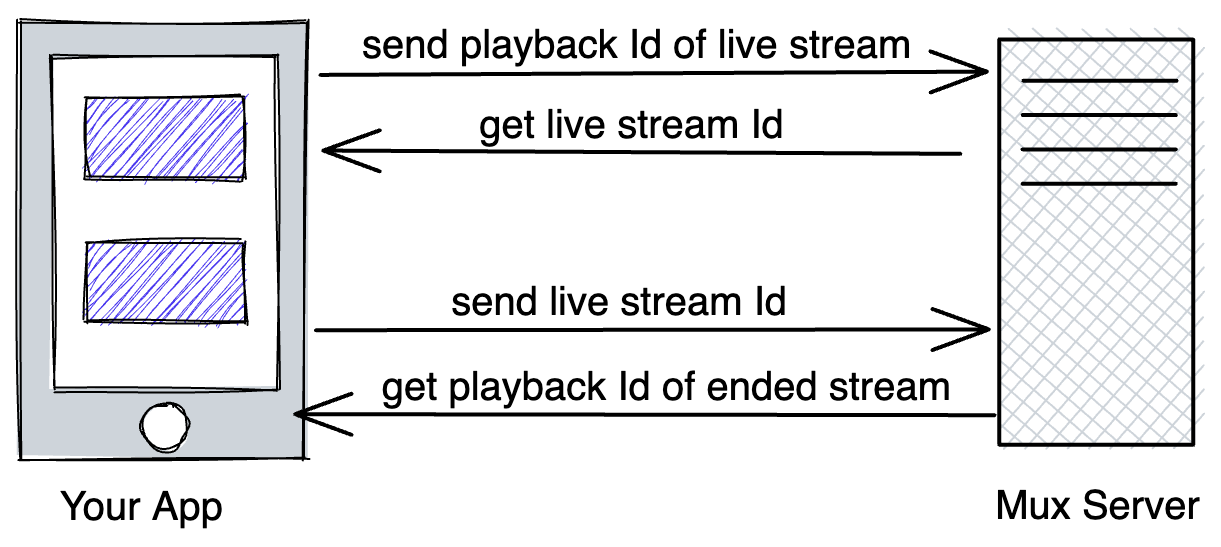
You can achieve this by adding the following two APIs to your project:
- getLiveStreamId: Returns live stream Id based on the current playback Id.
- getPastLiveStream: Returns playback id of ended stream based on the live stream Id.
Here's how both the APIs should look:
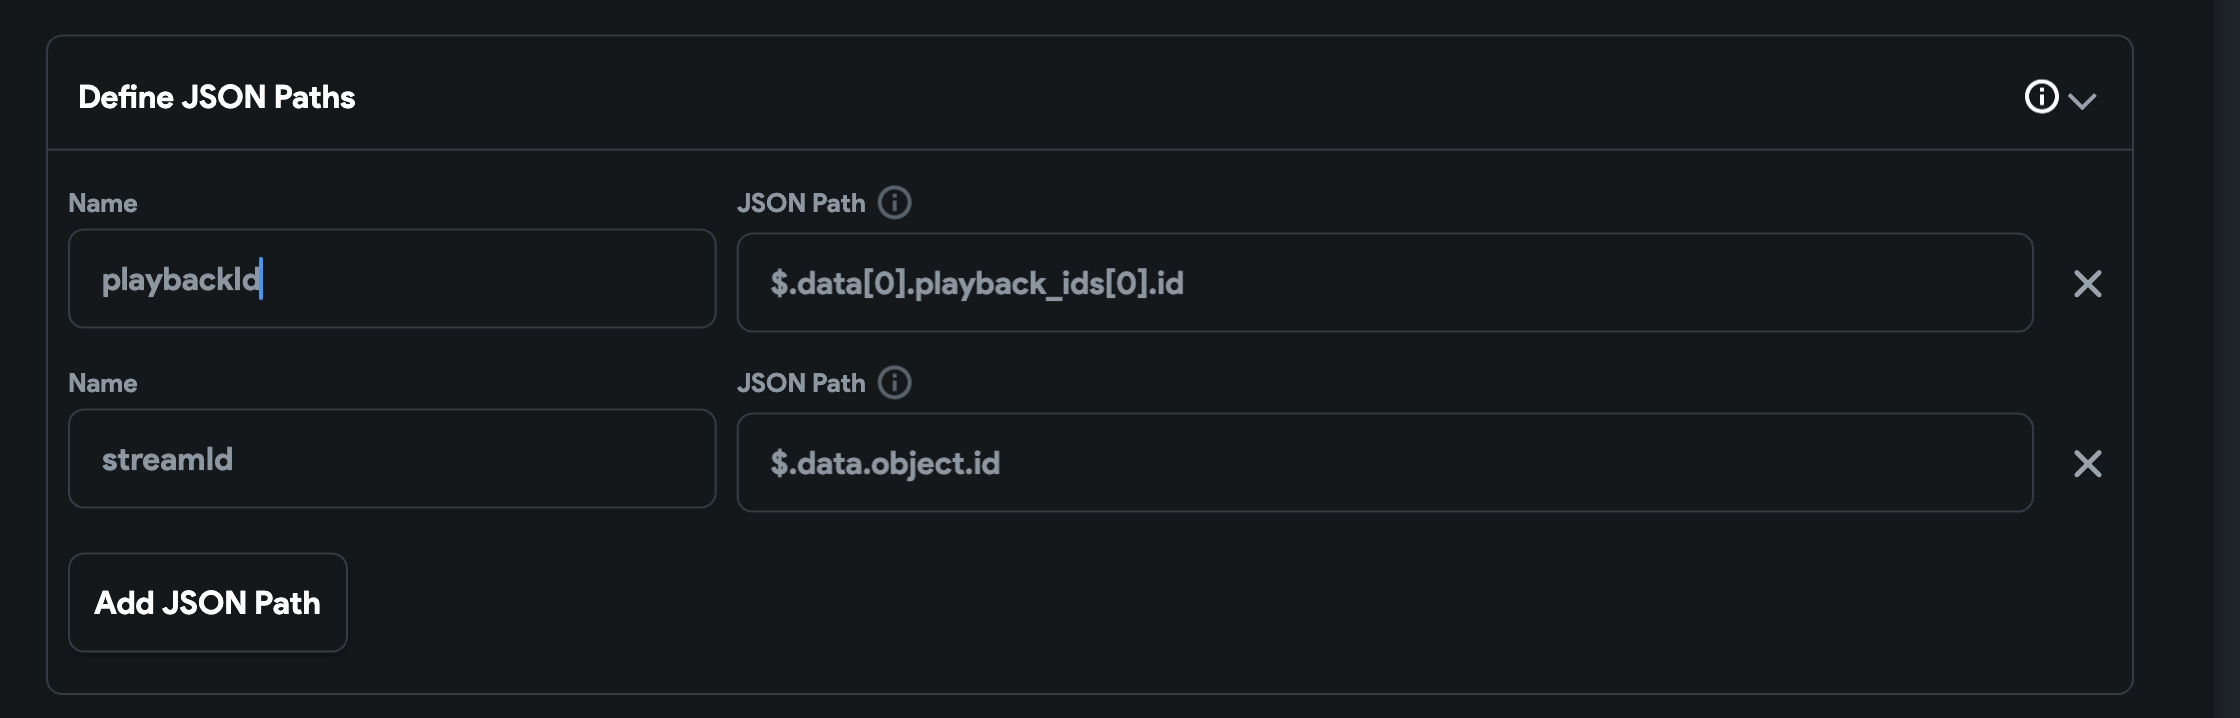
And here is the JSON path you can use to extract the required value.
- To retrieve live stream Id from getLiveStreamId API result,Use
$.data.object.id - To retrieve past Id from getPastLiveStream API result**,** Use
$.data[0].playback_ids[0].id
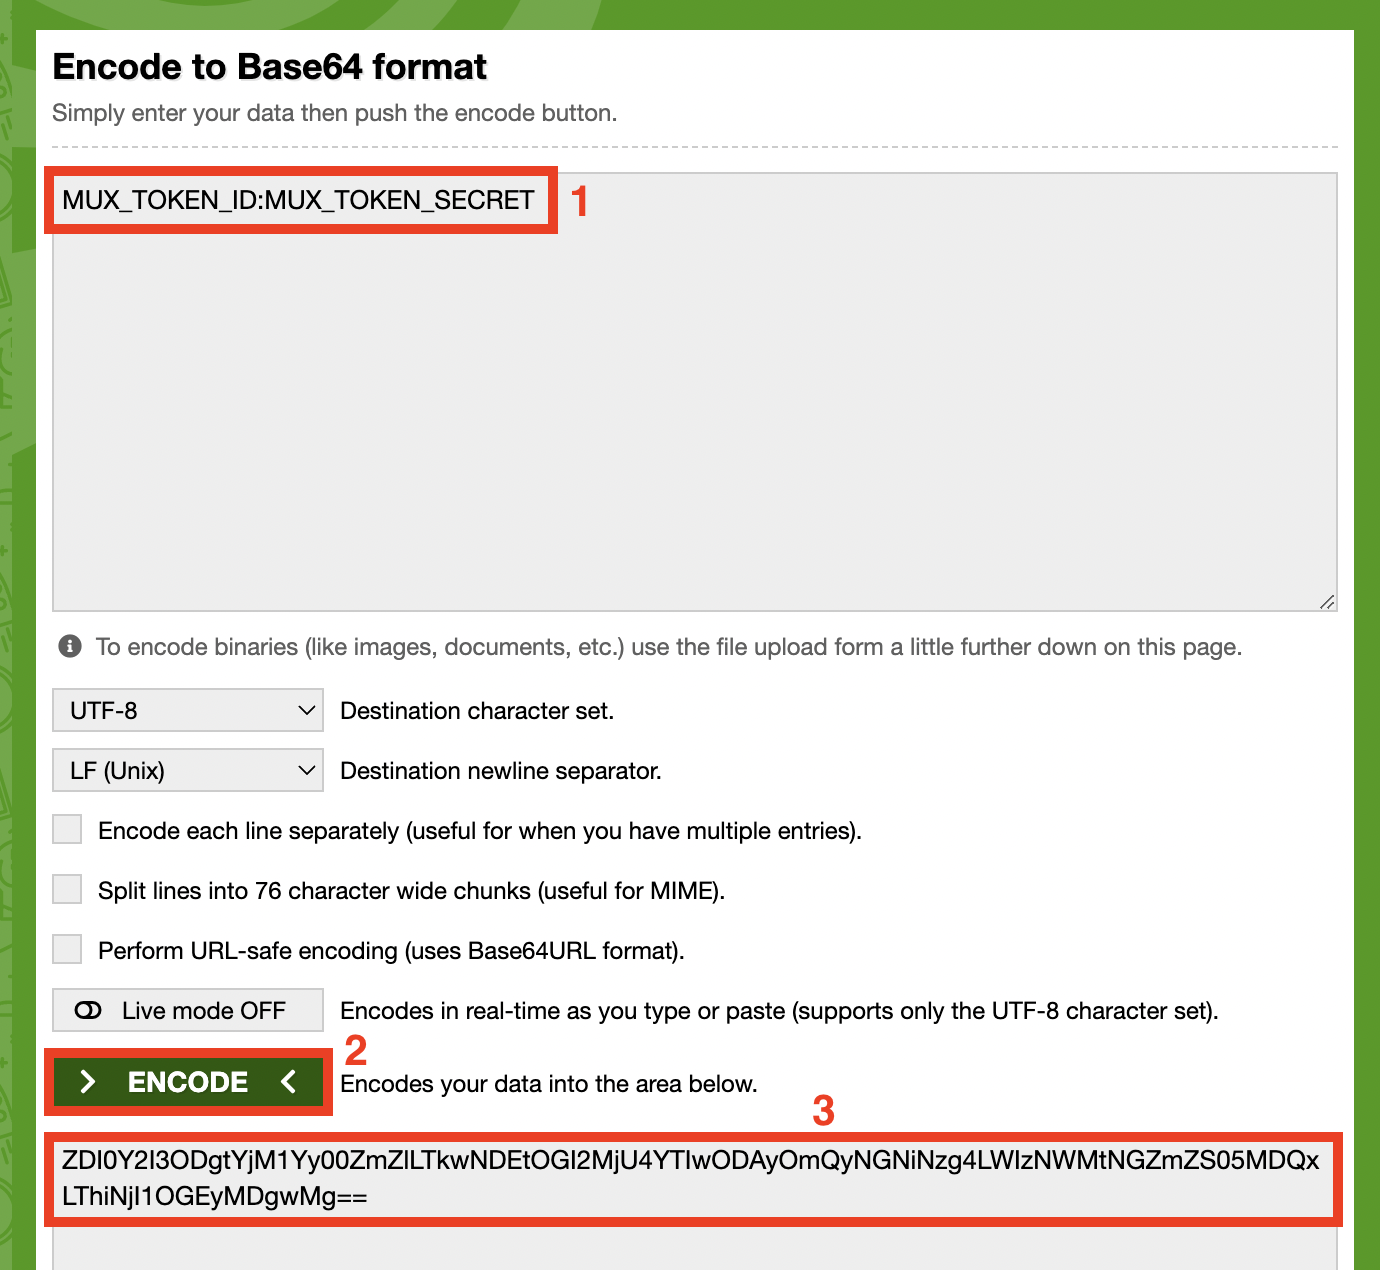
You can get the Authorization token by performing base64 encoding on your 'MUX_TOKEN_ID: MUX_TOKEN_SECRET'. You can also use this online tool to do just that.
7. Adding Custom Functions
The typical live stream URL looks like this:
Copy
https://stream.mux.com/{PLAYBACK_ID}.m3u8
When you call the APIs created in the previous step, you will need to extract the playback Id from the URL and create the URL back from the playback Id.
To achieve this, you can create two custom functions that look like the below:
- getPlaybackIdFromUrl
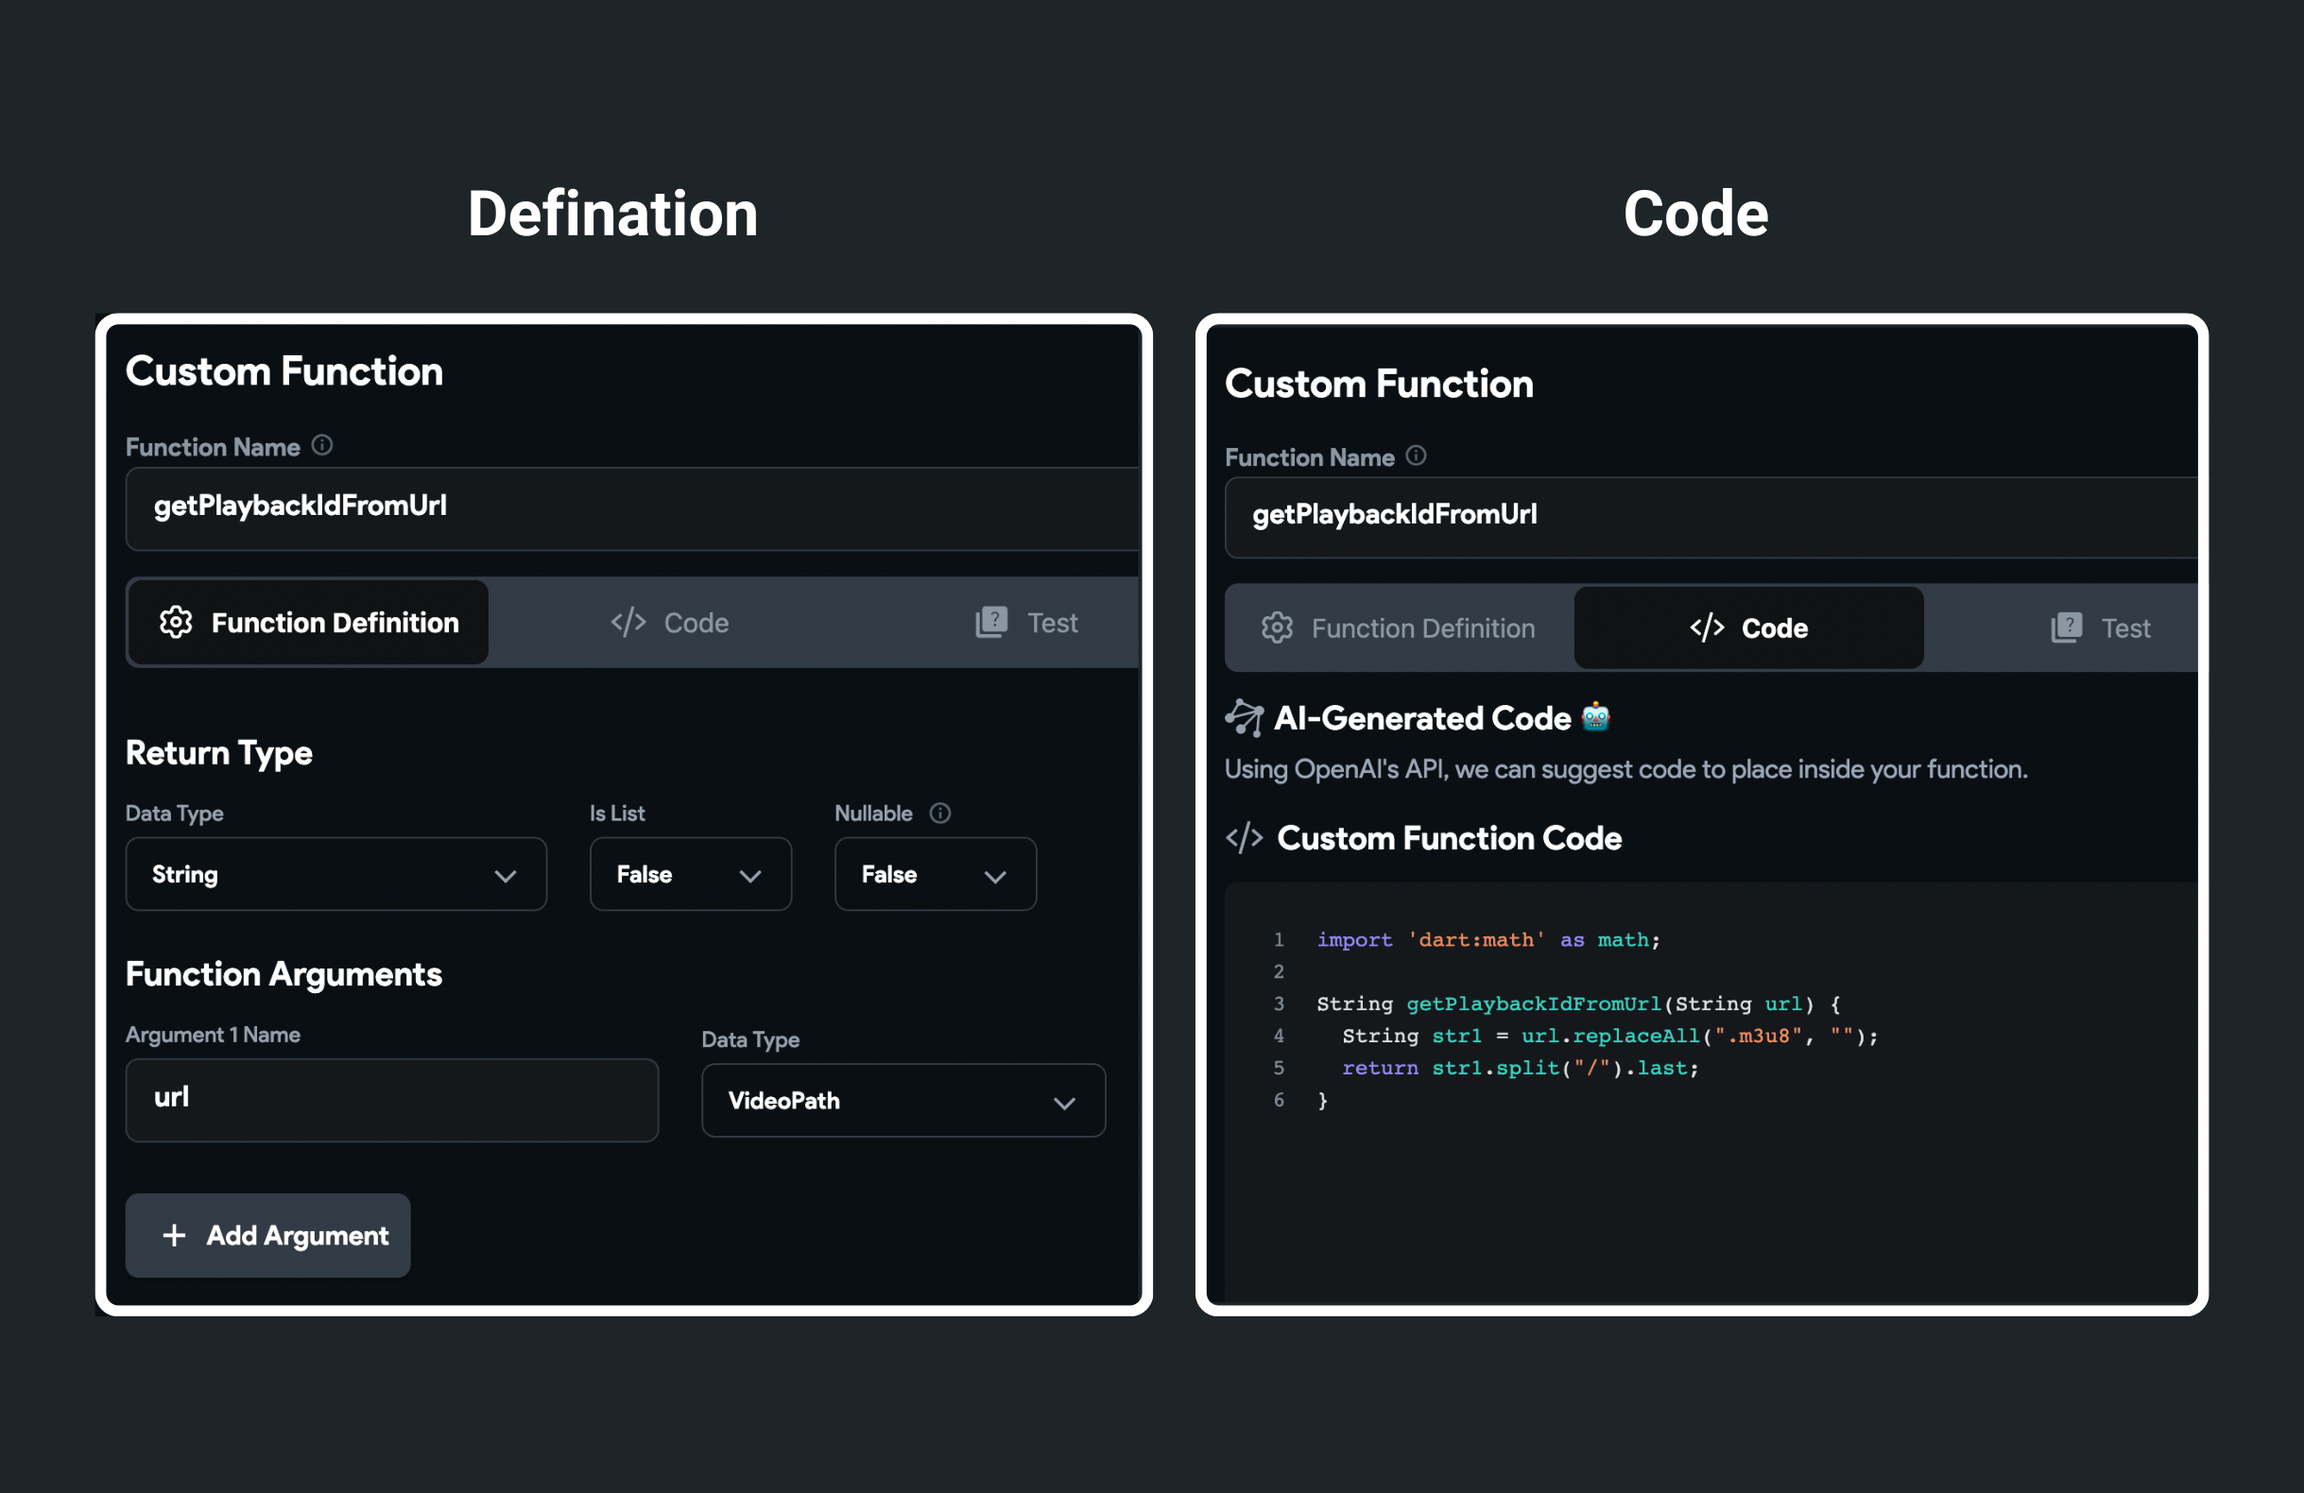
- createUrlFromPlaybackId
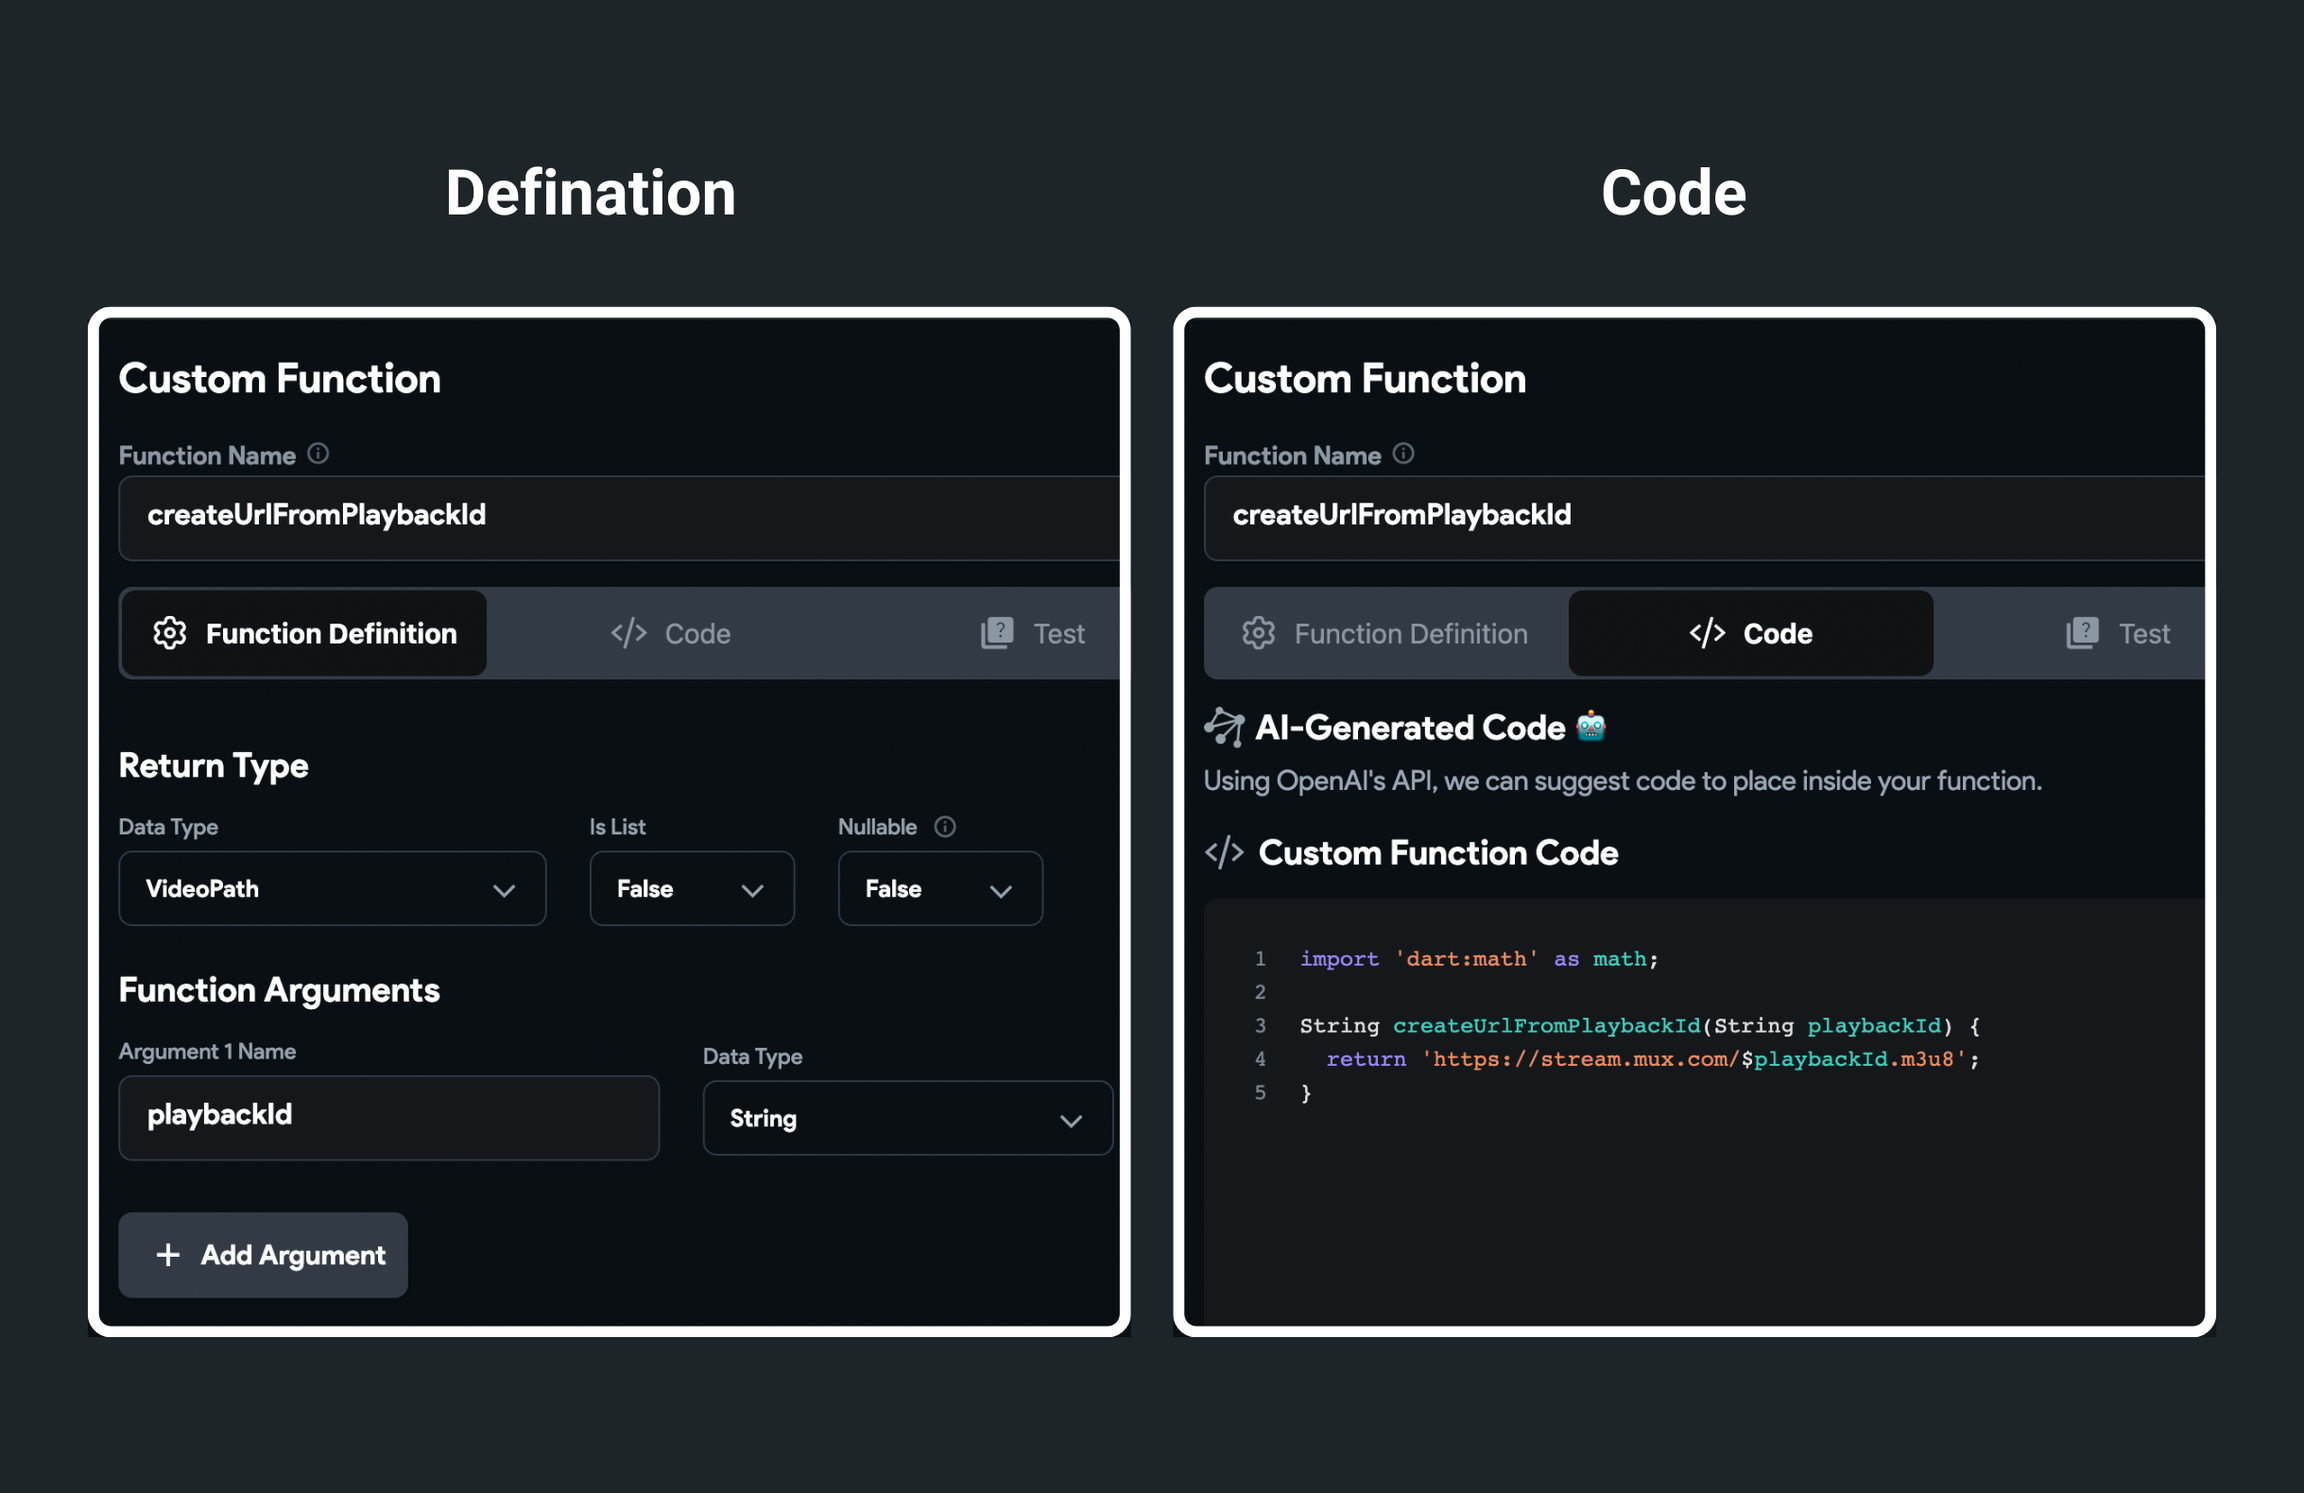
We will see how to use these functions in the next step.
8. Navigate to the ViewBroadcast page
On tapping the broadcast name card (inside the ListView), you will navigate to the ViewBroadcast page and pass the URL of the broadcast. The URL you will pass depends on whether the broadcast is live.
To navigate to the ViewBroadcast page and pass the URL of the live or past stream:
-
Select the Card widget from the widget tree or canvas area.
-
Open the action flow editor and click on the + Add Conditional Action.
-
Select the broadcasts Document > is_live.
-
Under the TRUE section:
- Add an action to navigate to the ViewBroadcast page. Note: While doing so, define the parameter url on the ViewBroadcast page. This will be used to pass the playback URL of the video.
-
Under the FALSE section:
- First, add the getLiveStreamId API call, use the getPlaybackIdFromUrl custom function to pass the current playback Id of the stream, and save the response by providing the * Action Output Variable Name*.
- Next, add the getPastLiveStream API call and pass the live stream Id from the action output variable of a previous API call.
- Finally, add an action to navigate to the ViewBroadcast page. Note: While doing so, use the createUrlFromPlaybackId custom function to pass the URL created using the playback Id (retrieved in the previous API call). Also, ensure you have defined the parameter url on the ViewBroadcast page.
Get the clonable version of this app **here **.
Run & Test
To play the video on the ViewBroadcast widget, Select the VideoPlayer widget, set the Path from a variable, and use the page parameter.
Now you can run the app and test your widget.
Mux Livestream can not be tested in Run Mode. Instead, you will need to test it on real device devices.
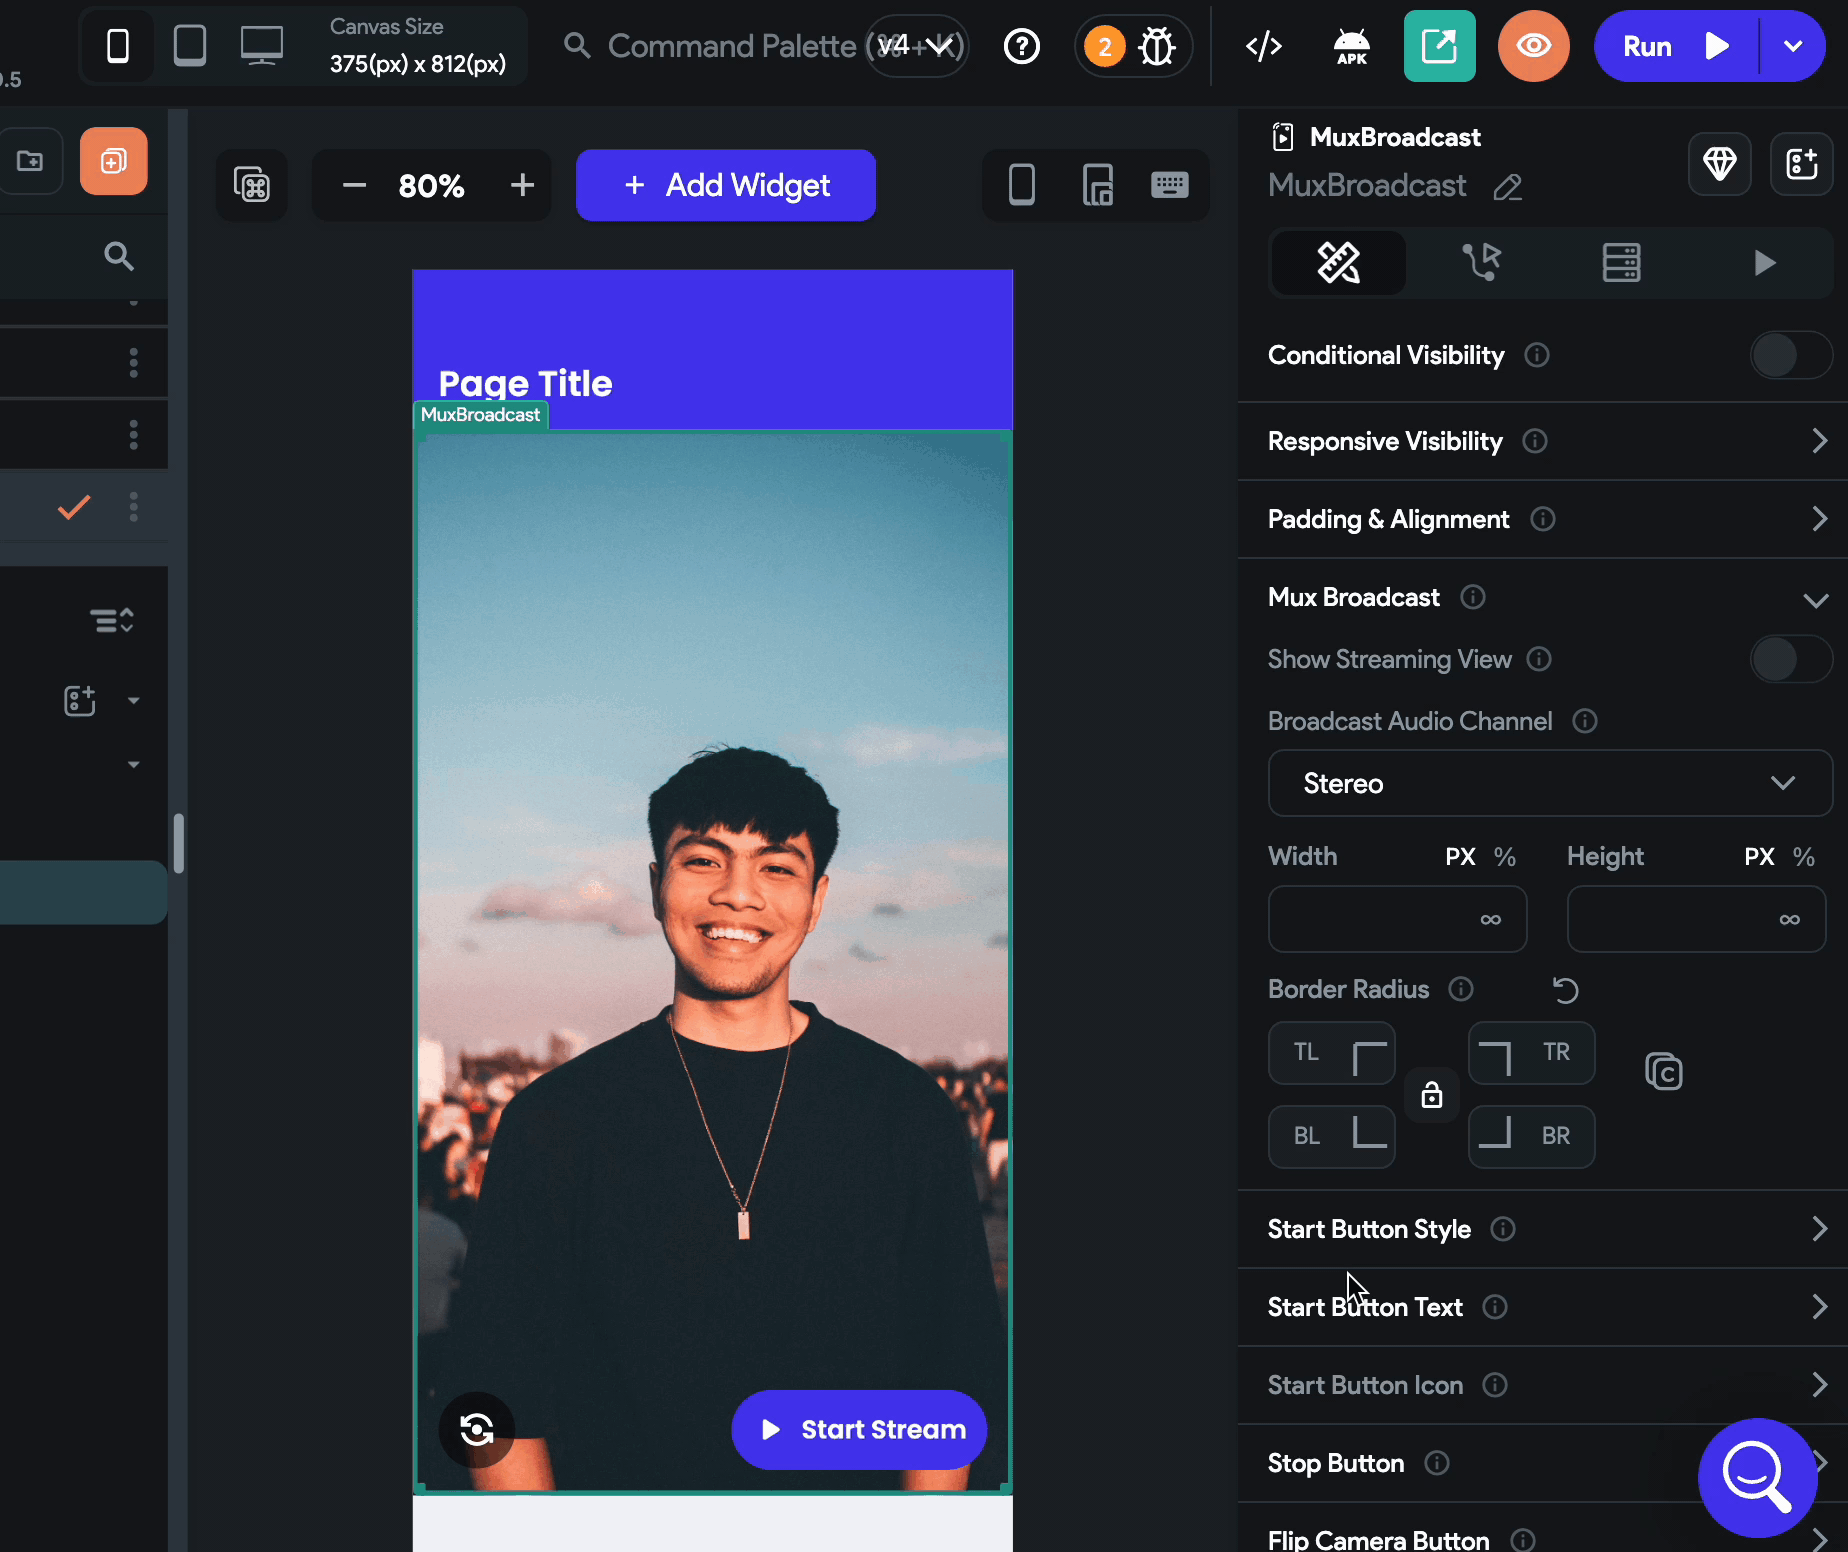
Customizing MuxBroadcast
You can customize the appearance and behavior of this widget using the various properties available under the Properties Panel.
Show streaming view
On the canvas, when you add this widget, it shows the 'Before streaming' view (i.e., flip camera and a start streaming button). To see how it will look when the stream is started, you can turn on this option from the Properties Panel.
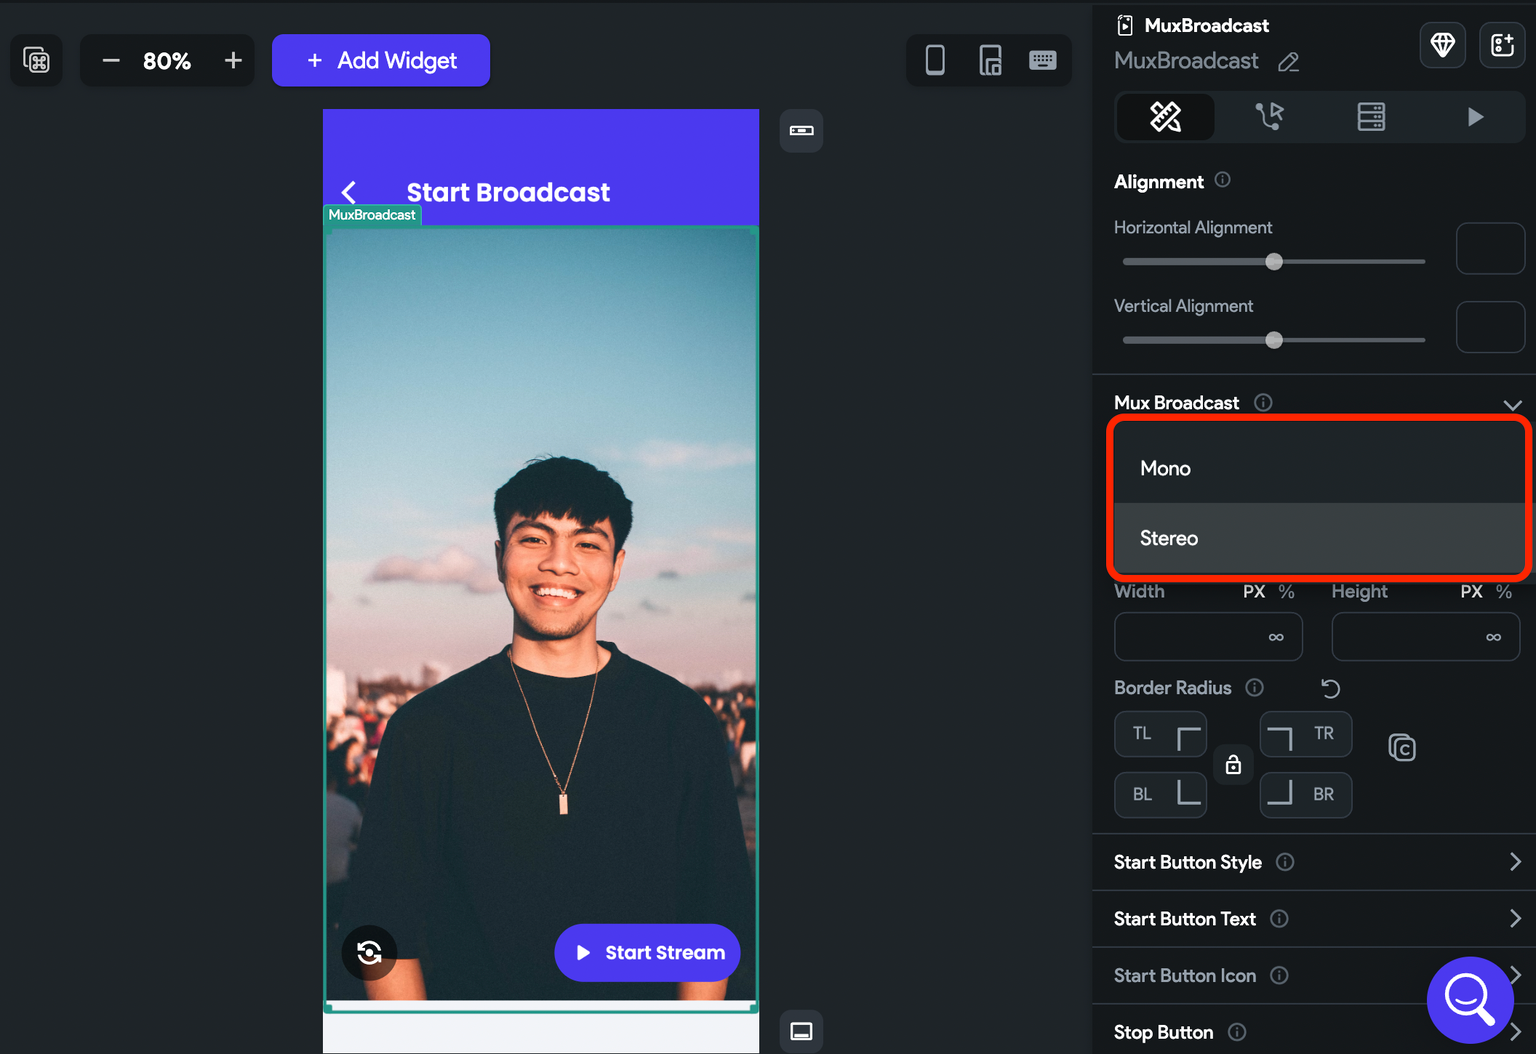
Broadcast audio channel
This option allows you to decide the type of audio recording while you broadcast. You can choose between Mono and Stereo. By default, it is set to stereo which can provide a better listening experience.
Changing size
By default, this widget occupies all the available space (i.e. fullscreen). To change its size, you can use the Height and Width property.
Border Radius
To create a rounded border around this widget, use this property. Toggle the lock icon () to edit all values together or individually.
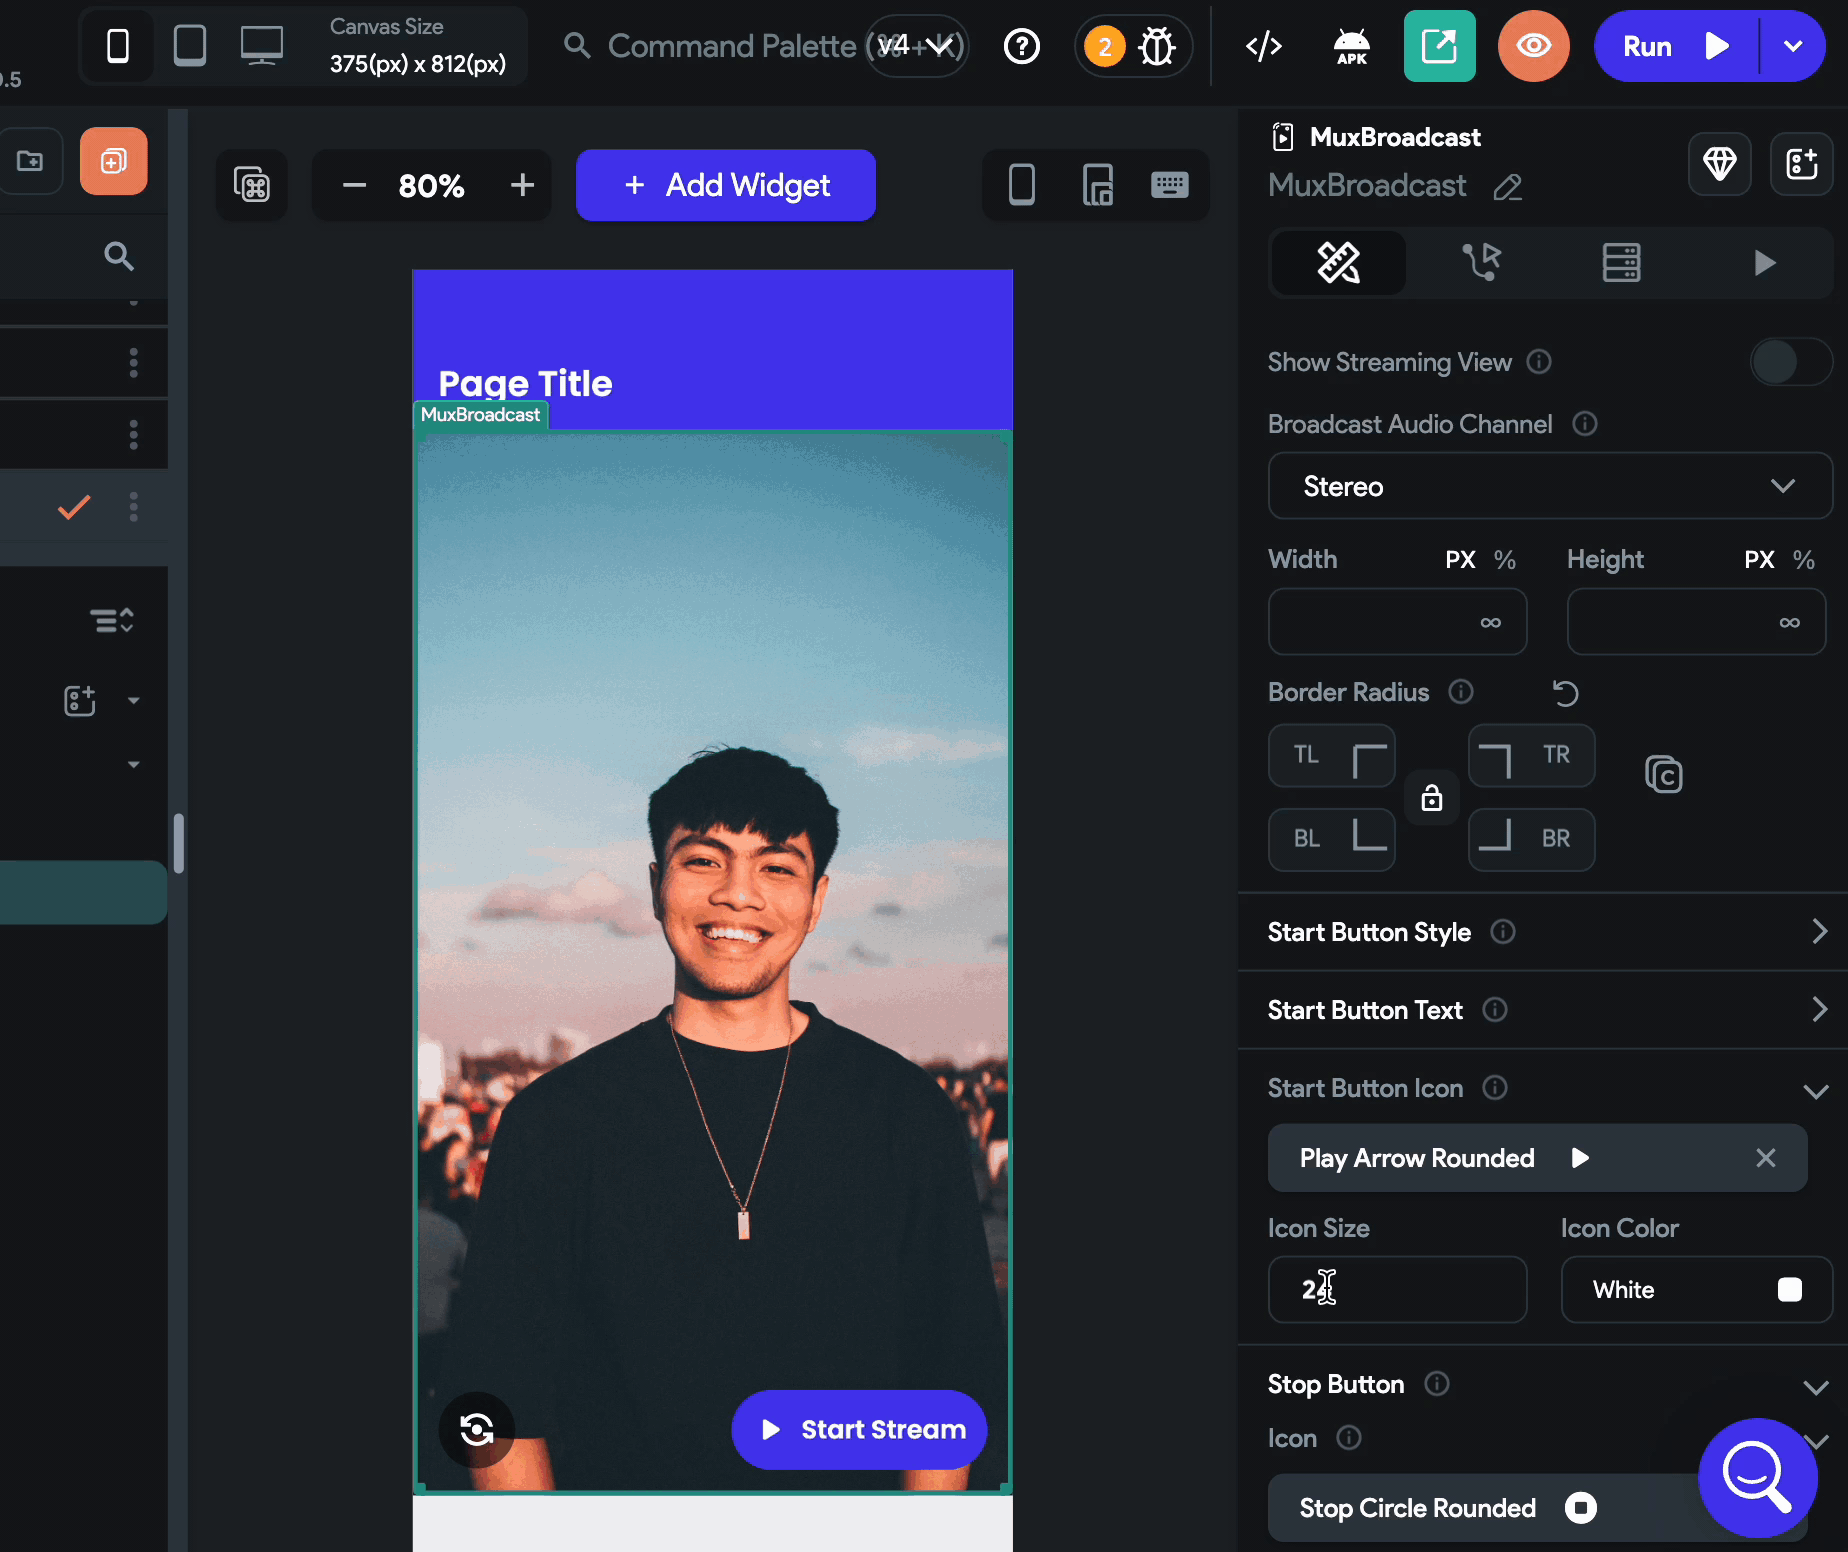
Customizing start button
To customize a button that allows you to start a stream:
-
Select the MuxBroadcast widget and move to the properties panel.
-
To change the button's appearance such as size, color, elevation, and border, use the properties under the Start Button Style section.
-
To change the button's text, open the Start Button Text section and set the Text. You can also customize the text if needed.
-
To change the button's icon, open the Start Button Icon section and select the new icon. You can also change its Size and Color.

Customizing stop button
To customize a button that allows you to stop a stream:
-
Find the Stop Button section. From here, you can change the icon, size, and color.
-
By default, the background color of the stop button is set to red. To change, use the * Background Color* property.
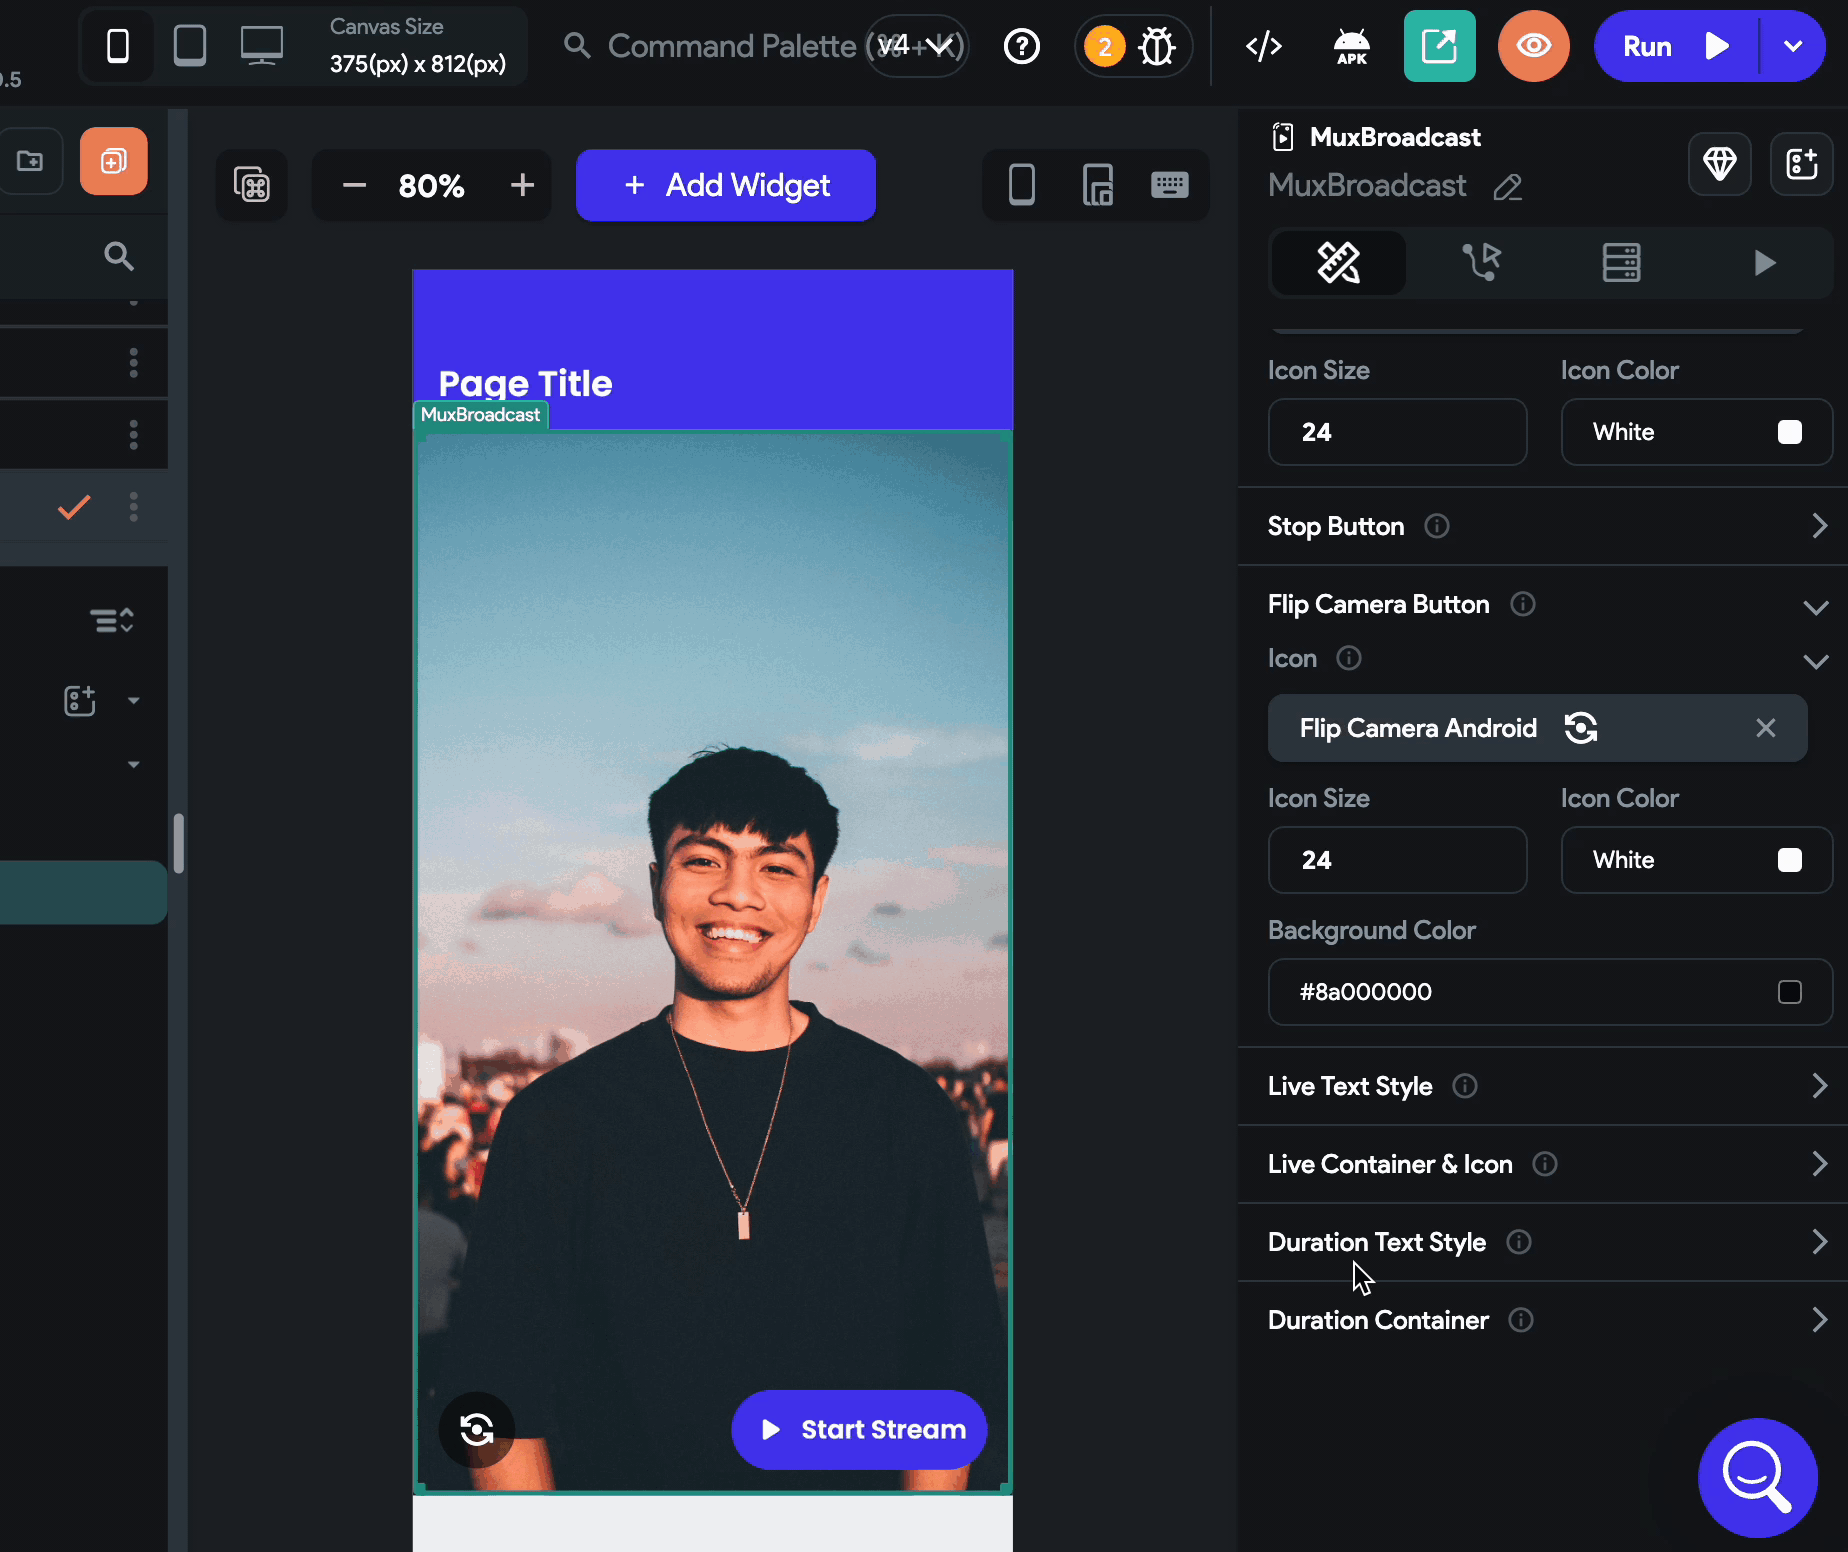
Customizing the flip camera button
The flip camera button allows you to toggle the front and back camera of your device before you start broadcasting.
To customize this button's appearance, open the Flip Camera Button section and use the property such as Icon, Icon size, Icon Color, and Background Color.
Customizing live indicator
The live indicator appears as soon as you start live streaming (at the top left side of the screen).
To customize the live indicator:
- To change its text (i.e. from LIVE to something else), open the Live Text Style section and set the Text. You can also customize the text if needed.
- To change the indicator appearance, open the Live Container & Icon section and use the property such as Icon, Icon size, Icon Color, Background Color, and Border Radius.
Customizing duration indicator
The duration indicator appears as soon as you start live streaming (at the top right side of the screen).
To customize the duration indicator:
- Open the Duration Text Style section and change its text style.
- To change the indicator appearance, open the Duration Container section and use the property such as Background Color and Border Radius.
Additionally, you can also add padding, alignment, show/hide this widget from the Properties Panel.