Stripe
Stripe helps integrate payment processing into your FlutterFlow app. Using this payment service, you can easily sell products directly inside your application and manage transactions easily.
While using Stripe as the payment provider, users can buy products using credit cards, Apple Pay, or Google Pay.
Before starting to set up payments, make sure you:
- Complete Firebase Setup for your project.
- Enable Firebase Authentication for your project.
- Upgrade your Firebase project to Blaze Plan. We use Firebase Cloud Functions to process a transaction.
Stripe Integration
Integrating the Stripe Payments in your app comprises the following steps:
- Setup Stripe payment
- Apple Pay setup (optional)
- Trigger Stripe payment
- Testing
- Releasing to production
1. Setup Stripe Payment
Setting up the Stripe payment includes acquiring the keys from your Stripe account and adding them to FlutterFlow.
You should always try out payments in test mode before releasing them to your production app. Hence, the instructions below will guide you on how to get the test keys.
Follow the steps below to set up payment using Stripe:
- Create a new Stripe account from here. If you already have an account, login.
- From the dashboard page, click Developers.
- Enable Test Mode (top right side of your screen).
- Switch to the API keys tab.
- Return to the FlutterFlow project and navigate to Settings and Integrations > In App Purchases & Subscriptions > Stripe. Use the toggle to Enable Stripe Payments.
- Copy the Publishable Key and Secret Key from the Stripe API keys page and paste them into the respective fields inside FlutterFlow. If you are using Stripe in test mode, make sure you paste them inside the Test Credentials section.
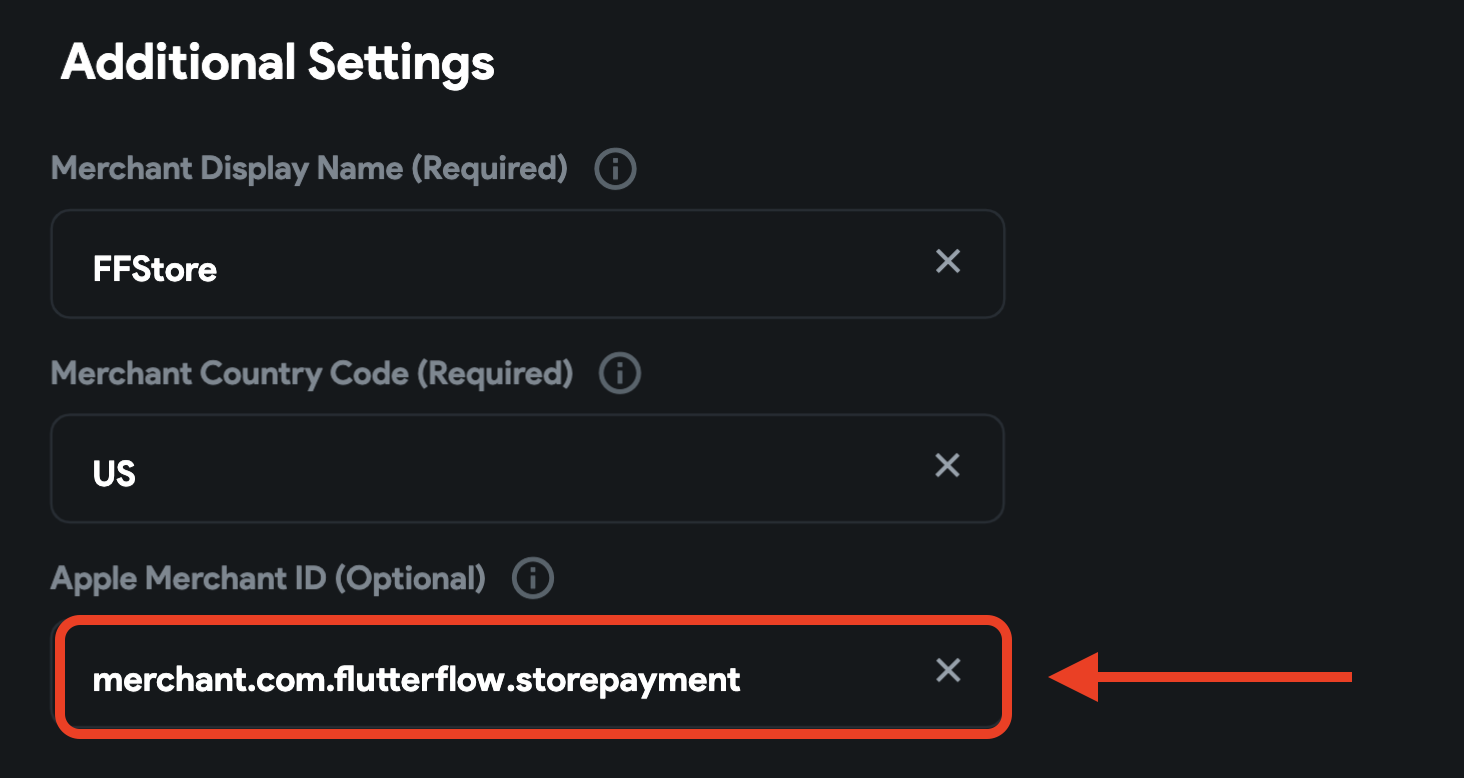
- Under the Additional Settings, you need to specify the following:
- Merchant Display Name (Required): Enter a name for the merchant (you) that the user will see while performing the payment.
- Merchant Country Code (Required): Enter your country code. This must be the 2 digit ISO country code, such as US, IN, and AU.
- Apple Merchant ID (Optional): You need to enter this if you want to accept payments through Apple Pay as well. The instructions for using Apple Pay are in this section.
- Click Deploy.
This would deploy the Stripe payment service as a Firebase Cloud Function. Now, you are ready to trigger payments inside your app.
2. Apple Pay Setup (optional)
Setting up Apple Pay comprises the following steps:
- Creating Apple Merchant ID
- Uploading Payment Certificate in Stripe
- Adding Apple Merchant ID in FlutterFlow
2.1 Creating Apple Merchant ID
To create Apple Merchant ID:
- Go to Apple's Developer Center and select Certificates, Identifiers & Profiles.
- Under Identifiers, select Merchant IDs.
- Click the Add button (+) in the upper-right corner.
- Enter a Description and specify an Identifier. The identifier is usually defined in the format
merchantfollowed by the Package Name of your app (you'll find it inside the Settings and Integrations page of FlutterFlow), for example,merchant.com.domainname.appname. - Click Continue.
- Review the settings, and click Register.
- Click Done.
- Now, again under Identifiers, select Apps IDs.
- Select your app's identifier from the list.
- Under Capabilities, check the Apple Pay Payment Processing option.
- Click Configure.
- Select the merchant account that you just created, and click Continue.
- Click Save and then Confirm in the dialog.
2.2 Uploading Payment Certificate in Stripe
To upload a payment certificate in Stripe:
- First, go to the Settings page from your Stripe dashboard and select the Payment methods option.
- Expand the Apple Pay tab under the Wallets section.
- Click Configure to navigate to the Apple Pay settings page.
- Under iOS certificates, click + Add new application.
- This will download the Certificate Signing Request (CSR) file on your system and click Continue.
- Select the Merchant ID with which you want to associate this certificate, and click Create Certificate.
- Follow the instructions to upload the CSR file that you downloaded from Stripe.
- To enable the certificate, click Activate. Then click Download to save it locally.
- Go back to the Stripe page where the dialog box is displayed, and click Continue.
- Upload the new certificate file.
- Once uploaded, you should see the certificate listed under iOS certificates.
2.3 Adding Apple Merchant ID in FlutterFlow
To add Apple Merchant ID in FlutterFlow:
- Navigate to Settings and Integrations > In App Purchases & Subscriptions > Stripe.
- Under the Additional Settings, enter your Apple Merchant ID.

3. Trigger Stripe Payment [Action]
In order to initiate a payment using Stripe, you have to use the Stripe Payment action.
Follow the steps below to add this action to any widget.
- Select the Widget (e.g., Container, Button, etc.) on which you want to add the action.
- Select Actions from the Properties panel (the right menu), and click Open. This will open an Action Flow Editor in a new popup window.
- Click on the + Add Action.
- On the right side, search and select the Stripe Payment (under Integrations) action.
- Enter or use a variable for specifying the total payment amount under the Amount section. The value should be specified in the currency's smallest unit. For example, $24.99 should be passed as 2499 (as a round-off integer, otherwise it would be automatically rounded), whereas ¥1925 can be simply passed as 1925. For more information check out this page.
- Enter the Currency Code to be used for the amount, for example, USD, EUR, BRL. Make sure you enter a valid currency code otherwise, the transaction won't go through.
- Next, you need to specify the Customer Email (required) and Customer Name (optional) to be used for the transaction. You can either use a variable or enter the value for them. If you are using authentication, these two values can be retrieved from the Authenticated User.
- Specify a Description of the purchase for both your and the user's record.
- To enable Google Pay or Apple Pay as the payment method, turn on the respective toggle. To use Apple Pay, you have to set up a Merchant ID by following the steps here.
- Select the Payment Sheet Theme among System Default, Light Theme, or Dark Theme.
- Specify the Primary Button Color and Button Text Color to be used on the payment dialog.
- Enter an Output Variable Name where the payment ID would be stored on a successful transaction. Later, you can use this variable elsewhere inside the page or pass it to a different page of the app.
Make sure the user is authenticated before triggering the Stripe Payment Action. Otherwise, it will result in an error.
4. Testing
You can test Stripe payments on mobile and the Web before deployment. To do that:
- Go to the FlutterFlow project and navigate to Settings and Integrations > In App Purchases & Subscriptions > Stripe.
- Make sure the Is Production is disabled.
- Make sure you have entered the correct Test Credentials, such as Publishable Key and Secret Key.
- Download and run your project..
- To test the purchase, you can use any of these basic test card numbers.
5. Releasing to Production
Before you release the app to production, complete the following steps:
- Login to your Stripe account and navigate to the Developers page.
- Disable the Test Mode (top right side of your screen).
- Select API keys from the left menu and copy the Publishable Key and Secret Key.
- Return to FlutterFlow; under the Production Credentials section, paste the Publishable Key and Secret Key.
- To deploy the Android app, follow the Google Play Store Deployment guide.
- To deploy the iOS app, follow the App Store Deployment guide.
FAQs
I am getting "Error: Unknown error occurred"
When encountering the "Error: Unknown error occurred" message, consider these troubleshooting steps:
- Stripe Settings Adjustment: In FlutterFlow's Stripe settings, verify the Merchant country code is a 3-digit code, like "USA" instead of "US". If needed, remove previously deployed functions in the Firebase console and redeploy them after updating the country code.
- User Authentication Requirement: Stripe payments require an authenticated user session. Ensure you're attempting the Stripe action after a user has successfully logged in to the app.
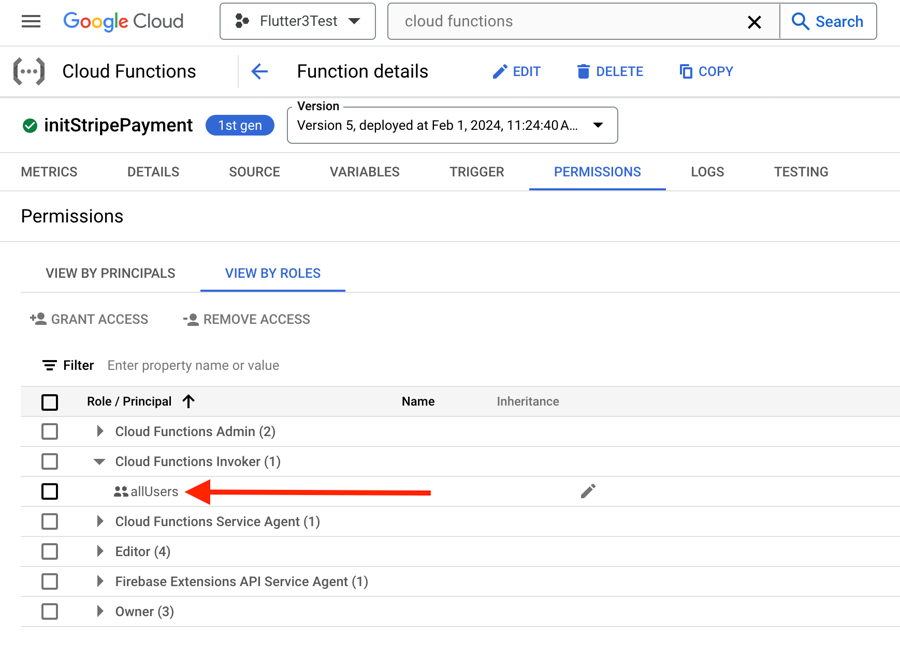
- Cloud Functions Permissions: Check that your cloud functions have the Cloud Functions Invoker permission set for allUsers in the Google Cloud console. To do this, go to the Cloud Console, directly search for the initStripePayment function, open the function, switch to the Permissions tab, and confirm the permissions status. This permission is typically assigned by default, but it's good practice to double-check.
